Enterprise App Store and Testing Distribution Single Sign-On (SSO) Providers Configuration
1. Introduction
Single Sign-On (SSO) allows users to log in to Appcircle using their existing credentials from an Identity Provider (IdP). By integrating SSO, organizations can streamline user access management, enhance security, and provide a seamless login experience across multiple platforms.
This document specifically covers the SSO configuration for the Testing Portal (Testing Distribution module) and Enterprise Store (Enterprise App Store module). Please note that a separate SSO configuration exists. This document does not cover those configurations for the Appcircle Portal. For more information on SSO setup for the Testing Portal and Enterprise Store, please refer to the Appcircle Login Single Sign-On (SSO) Providers Configuration.
Currently, this configuration supports enabling SSO with only one identity provider at a time. Adding multiple SSO providers is not supported at this moment but may be available in the future.
The SSO setup described in this document integrates the selected identity provider with the Appcircle IAM module, essentially adding the provider as an identity source for Appcircle.
This document provides a comprehensive guide to configuring SSO with various supported identity providers, including Auth0, Microsoft Entra ID (formerly Azure Active Directory), Okta, OneLogin and Keycloak. Whether you choose to implement OpenID Connect or SAML, this guide will walk you through the necessary steps to ensure a successful integration with Appcircle.
Supported Identity Providers
- Auth0:
- Auth0 (OpenID Connect)
- Auth0 (SAML)
- Microsoft Entra ID (formerly Azure Active Directory):
- Microsoft Entra ID (SAML)
- Okta:
- Okta (OpenID Connect)
- Okta (SAML)
- OneLogin:
- OneLogin (SAML)
- Keycloak:
- Keycloak (OpenID Connect)
- Keycloak (SAML)
Each section will provide detailed instructions for configuring your chosen identity provider, including screenshots and troubleshooting tips to ensure a smooth setup process.
2. Prerequisites
Before you begin configuring SSO for Appcircle, ensure that you have the following prerequisites:
- An active account with one of the supported Identity Providers (IdPs).
- Administrative access to both the Identity Provider and Appcircle's platform. For more details, refer to the Appcircle Role Management Documentation.
- Access to SAML tracing tools or other relevant debugging resources.
- SSL certificates (if required by your IdP).
These prerequisites will ensure that the SSO configuration process is smooth and any issues that arise can be quickly resolved.
SSO Terminology
Understanding the following key terms will help you navigate the SSO configuration process more effectively:
- Identity Provider (IdP): The service responsible for authenticating the user and issuing identity information. Common examples include Auth0, Microsoft Entra ID, Okta, OneLogin, and Keycloak.
- Service Provider (SP): The service (in this case, Appcircle) that relies on the IdP to authenticate users and grant them access. The SP uses the identity information provided by the IdP to manage user sessions and permissions.
- SAML Assertion: A secure XML document sent by the IdP to the SP, containing the user's authentication and authorization information. This document is a core component of the SAML protocol, used to establish a user’s identity across different services.
- OpenID Connect Token: A token used in the OpenID Connect protocol to convey identity information from the IdP to the SP. This token typically includes user information and is crucial for establishing secure communication between the IdP and SP.
These terms form the foundation of the SSO process, where the IdP authenticates the user and the SP relies on this authentication to grant access. For more in-depth information, refer to the OpenID Connect specification or the SAML specification.
3. General Configuration Steps
The following steps outline the general process for configuring Single Sign-On (SSO) with Appcircle, applicable to all supported identity providers. These steps will guide you through the initial setup within the Appcircle dashboard and the configuration within your chosen identity provider.
Step 1: Enable SSO in Appcircle
Begin by enabling SSO within your Appcircle organization settings. Follow these steps:
- In the Appcircle dashboard, navigate to the Organization section located on the far left sidebar.
- On the My Organization screen, select Integrations from the left-hand menu.
- In the Integrations screen, find the Authentications area on the far right, and click the Connect button.

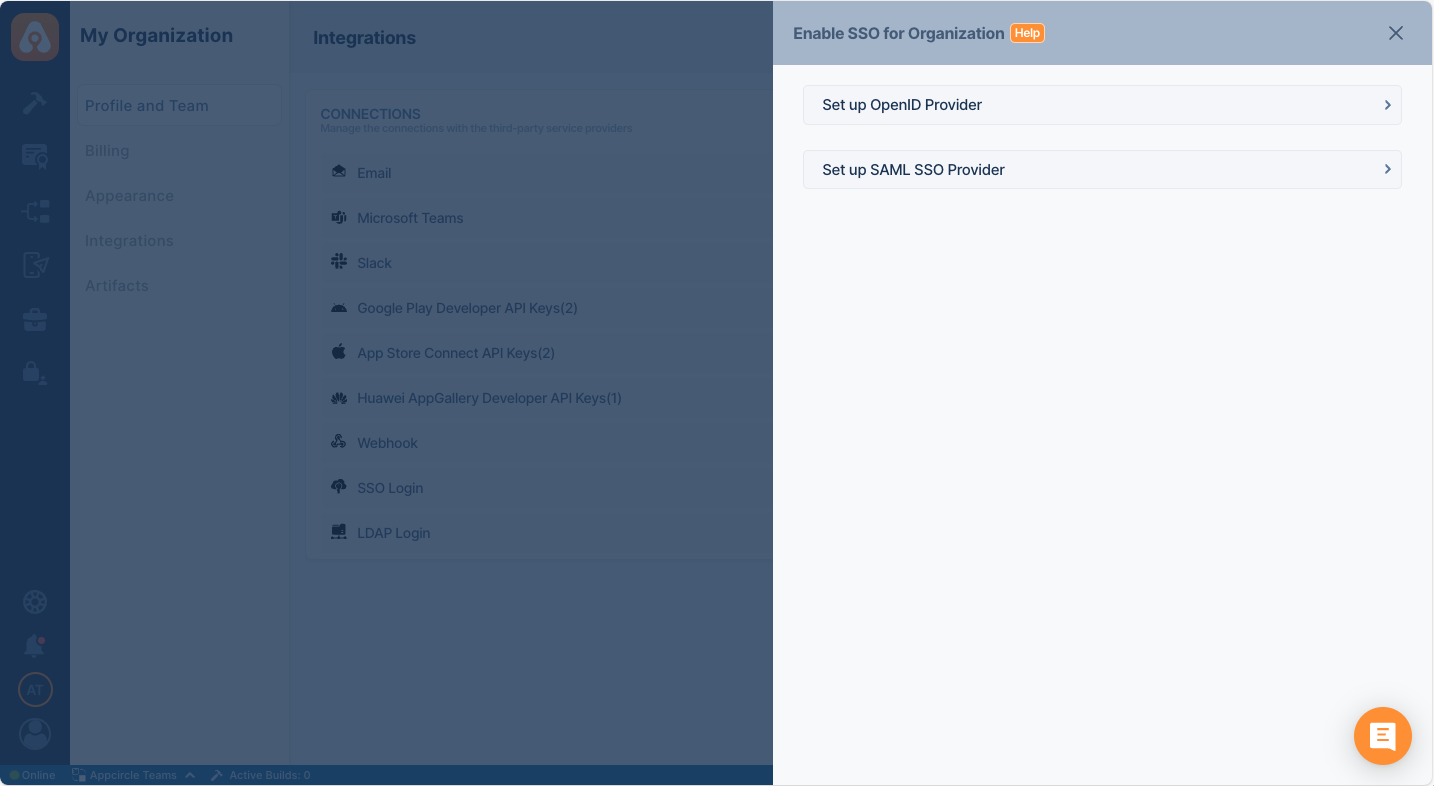
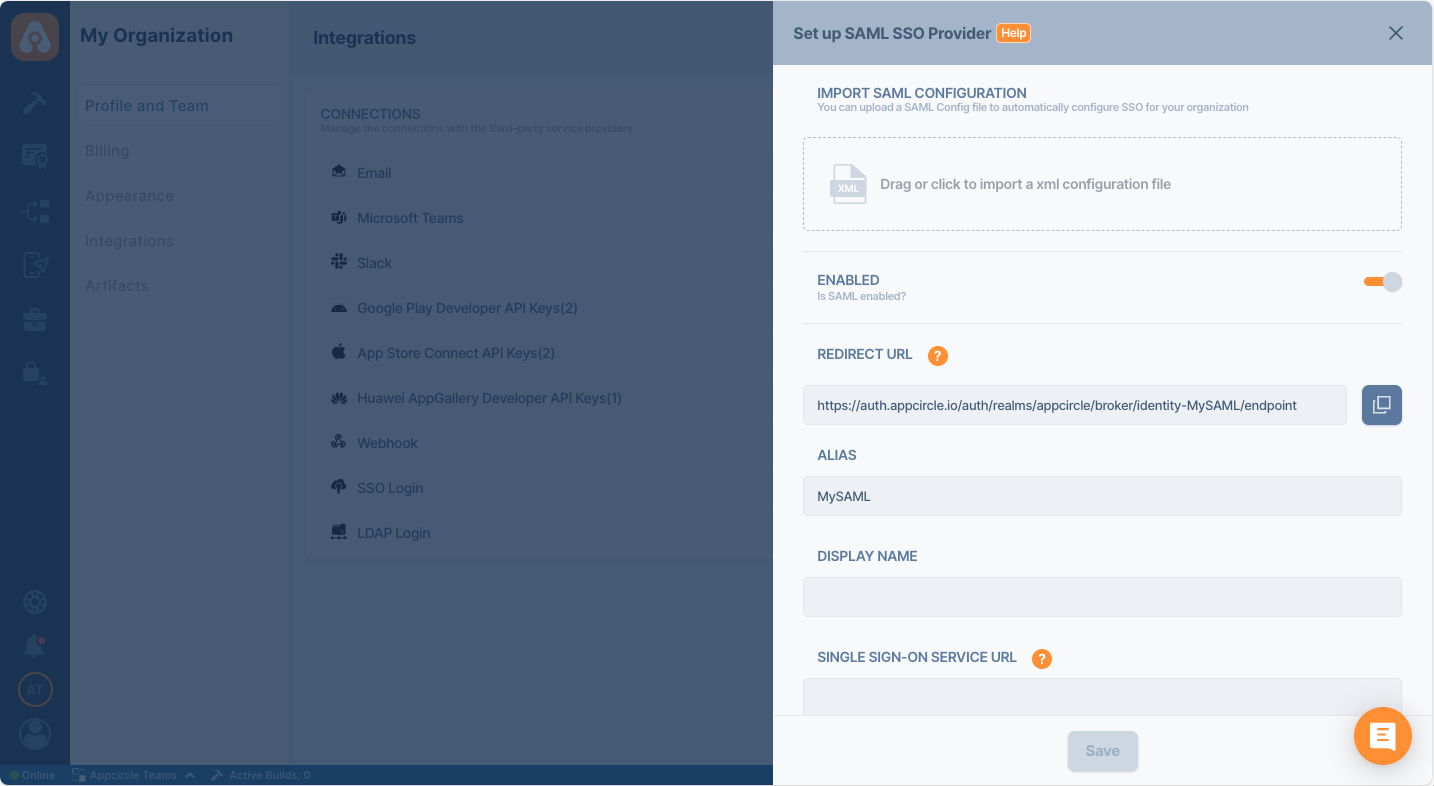
- The Enable SSO for Organizations window will open, presenting two options:
- Set up OpenID Provider
- Set up SAML SSO Provider
- In the setup window, manually enter a unique Alias for your organization.
- Additionally, enter a Display Name for your organization.
- After setting the alias and Display Name, Appcircle will automatically generate the Store Redirect URL and Distribute Redirect URL specific to your configuration. Store Redirect URL and Distribute Redirect URL must be used in your identity provider's settings to ensure proper redirection after authentication.

Ensure that the alias and Display Name you choose are unique and easily identifiable, as they are essential for the SSO authentication process. The Store Redirect URL and Distribute Redirect URL are crucial for your SSO setup, so be sure to copy and save them for use in the following steps.
Step 2: Select and Configure Your Identity Provider
After enabling SSO and setting your alias, proceed to select and configure your identity provider:
- Depending on the option you selected in the previous step, you will either be configuring an OpenID Connect or SAML provider.
- Follow the specific steps for your chosen provider to enter the necessary configuration details, including Client ID, Client Secret, and other required parameters.
- Use the previously generated Store Redirect URL and Distribute Redirect URL provided by Appcircle when configuring your identity provider settings to ensure proper redirection after authentication.
Only one SSO provider can be configured at a time.
Step 4: Test and Verify
After completing the SSO configuration, it's essential to test and ensure everything is functioning correctly. The following steps outline the testing process.
Step 4.1: Test and Verify SSO Configuration for Enterprise Store (Enterprise App Store module)
Begin by enabling SSO for the Enterprise App Store. Follow these steps:
- In the Appcircle dashboard, navigate to the Enterprise App Store section located on the far left sidebar.
- On the Enterprise App Store screen, select Settings from the left-hand menu.
- Click on the Activate button next to SSO Login.

- Follow Enterprise App Store Documentation to test the integration.
Step 4.2: Test and Verify SSO Configuration for Testing Portal (Testing Distribution module)
Begin by enabling SSO for the Testing Portal. Follow these steps:
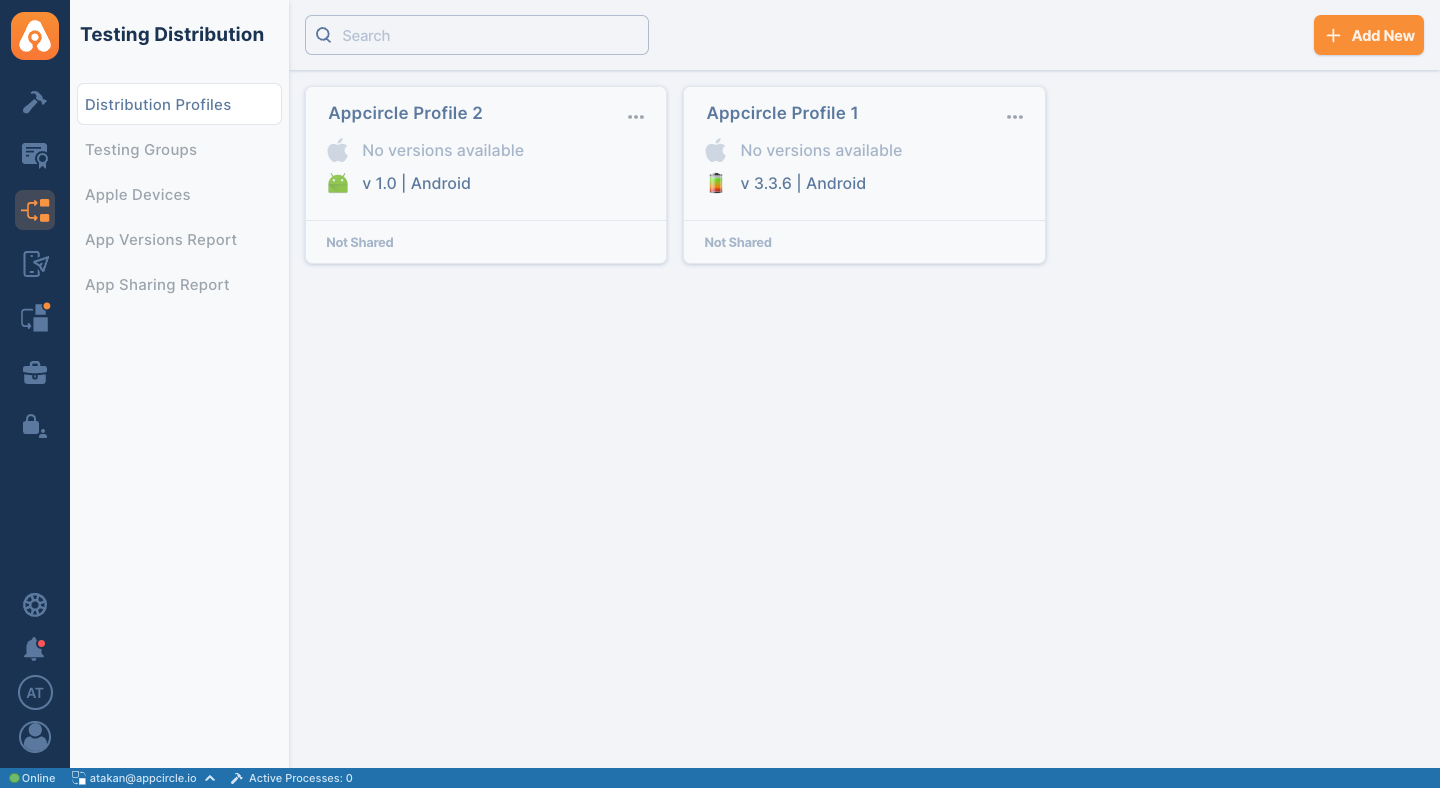
- In the Appcircle dashboard, navigate to the Testing Distribution section located on the far left sidebar.
- On the Testing Distribution screen, select Distribution Profiles from the left-hand menu.
- Select the relevant Distribution Profile to be distributed via SSO authentication.
- On the Distribution Profile screen, click on the Settings button.
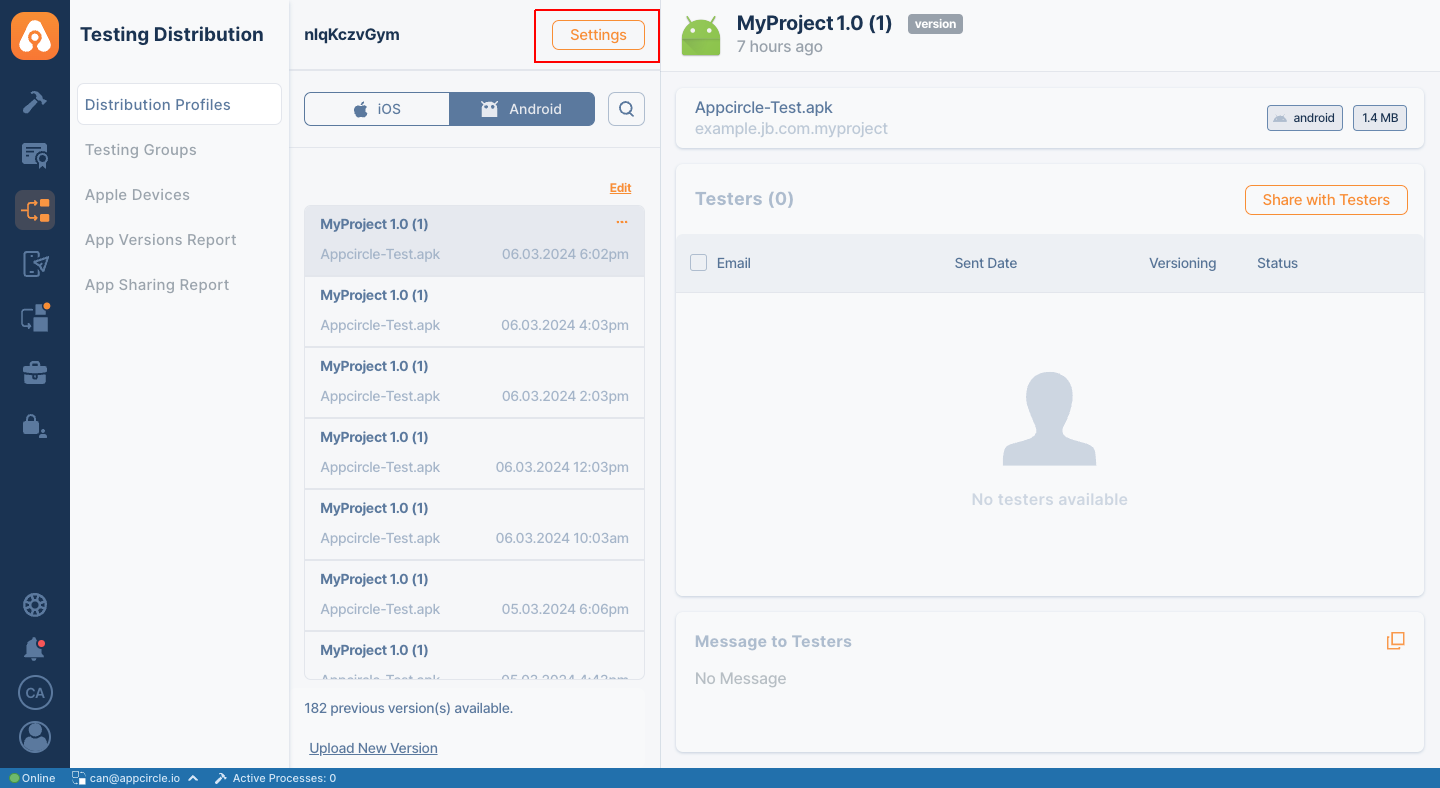
- Navigate to the Authentication tab and select SSO Login as the authentication type.

-
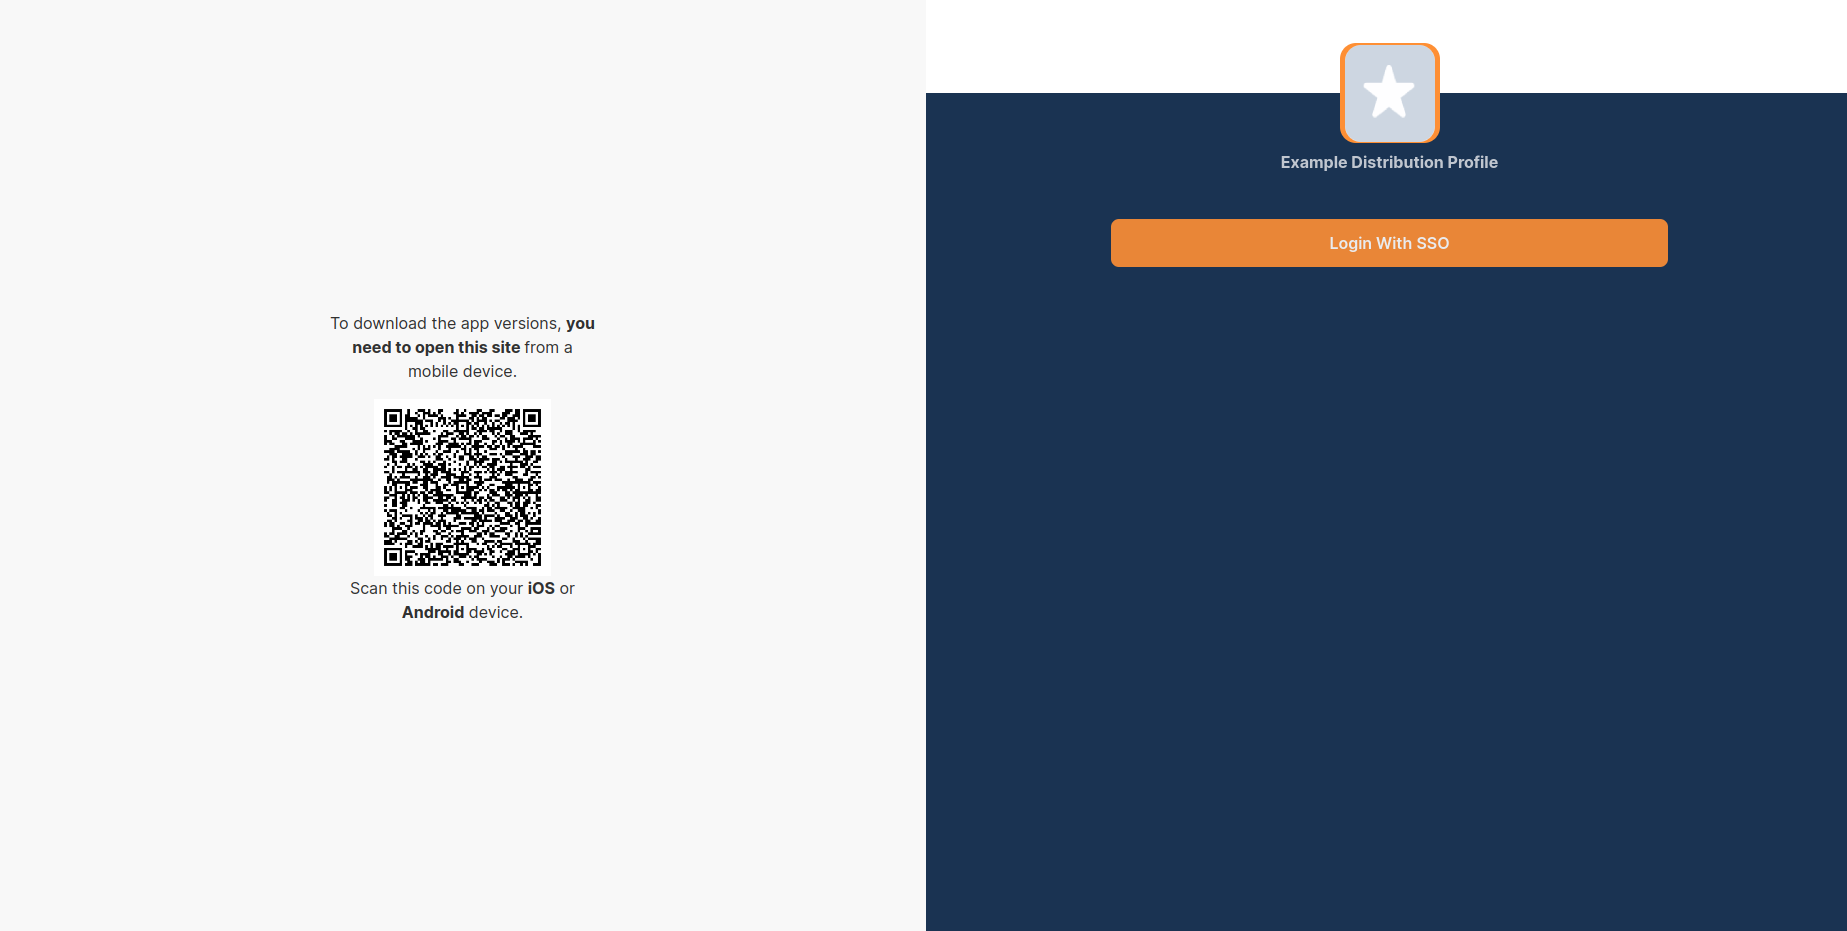
Follow the Share Binary documentation to distribute application. You can share application to your email address that exist on Identity Provider for testing purposes.
-
Check your email inbox and goto link in email.
4. Specific Provider Configuration
4.1 Auth0 (OpenID Connect)
Auth0 is a popular identity provider that supports the OpenID Connect protocol, which can be integrated with Appcircle for secure authentication.
Step 1: Create an Application in Auth0
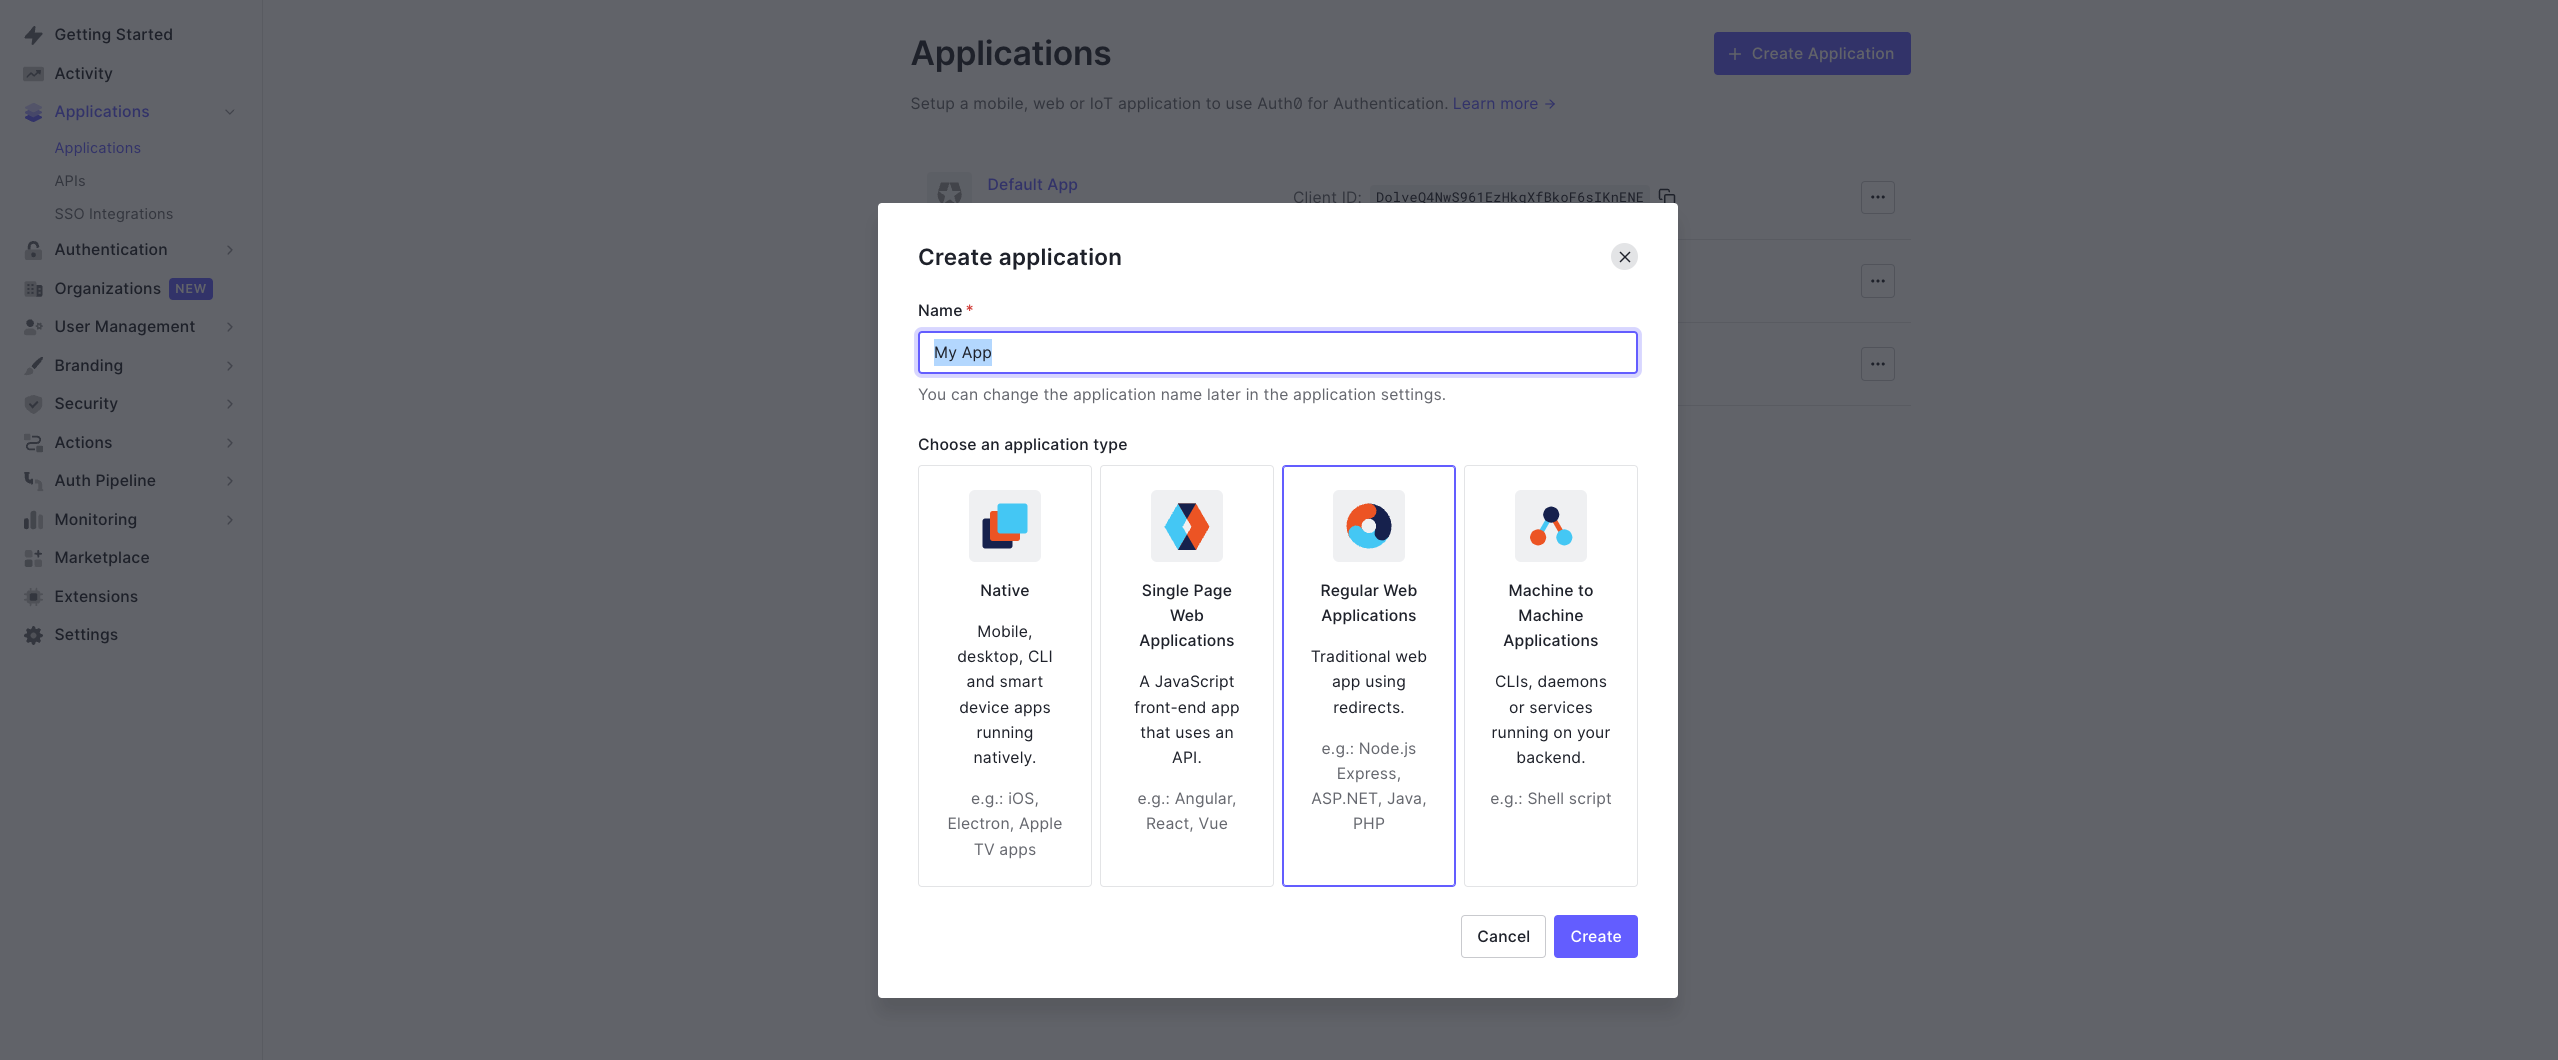
To start, log in to your Auth0 dashboard and create a new application for Appcircle:
- In the Auth0 dashboard, navigate to the Applications section.
- Click Create Application and choose a name for your application (e.g., "Appcircle SSO - OpenID").

- Select Regular Web Applications as the application type.
- Click Create button.
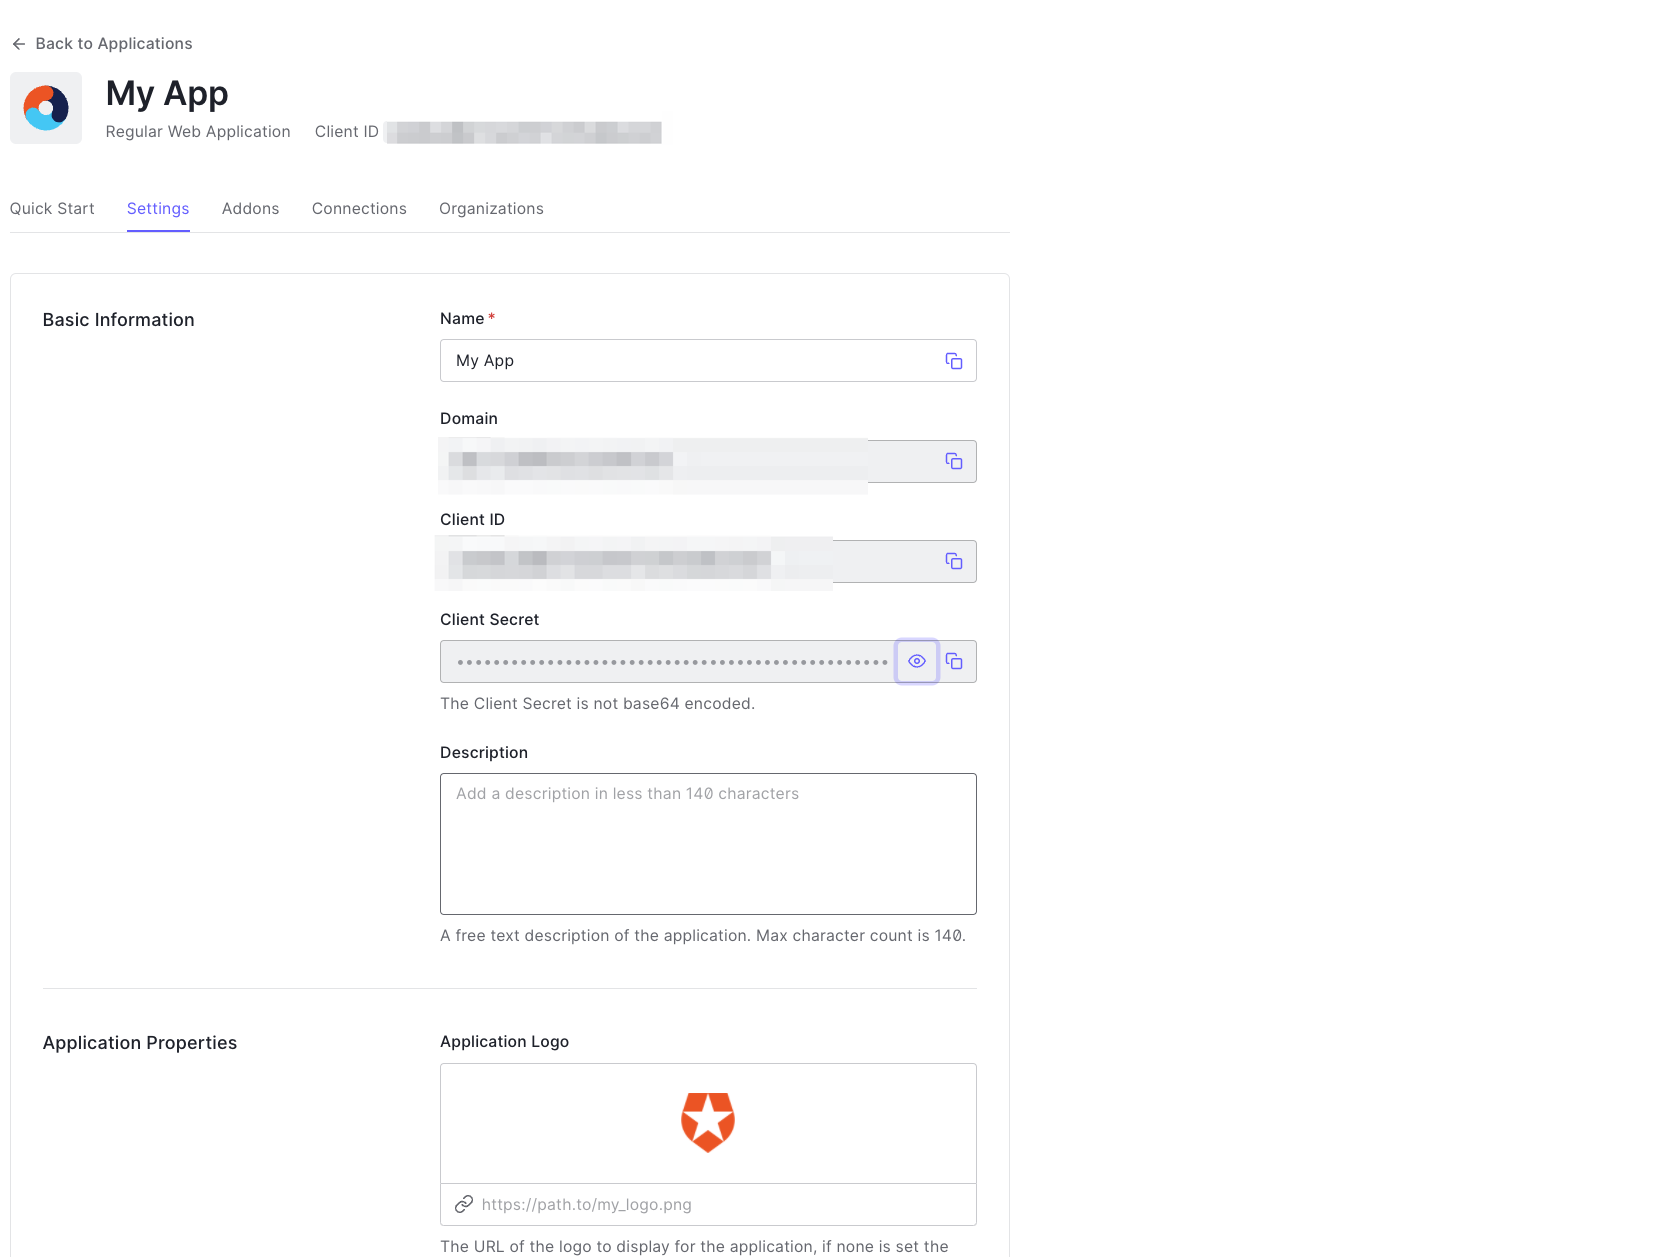
- Once application created, navigate to the Settings of application.
- Take note of the Client ID and Client Secret, which will be needed later.
Step 2: Configure Callback URLs in Auth0
Next, configure the callback URLs in Auth0 to ensure proper redirection to Appcircle after authentication:
- In the Auth0 dashboard, go to the Settings tab of your application.
- In the Allowed Callback URLs field, enter the Store Redirect URL and Distribute Redirect URL (created using the alias in "Step 1: Enable SSO in Appcircle" from the "General Configuration Steps" section), combined by a comma.
Example Callback URL: https://auth.appcircle.io/auth/realms/store/broker/identity-{your-alias}/endpoint,https://auth.appcircle.io/auth/realms/distribute/broker/identity-{your-alias}/endpoint
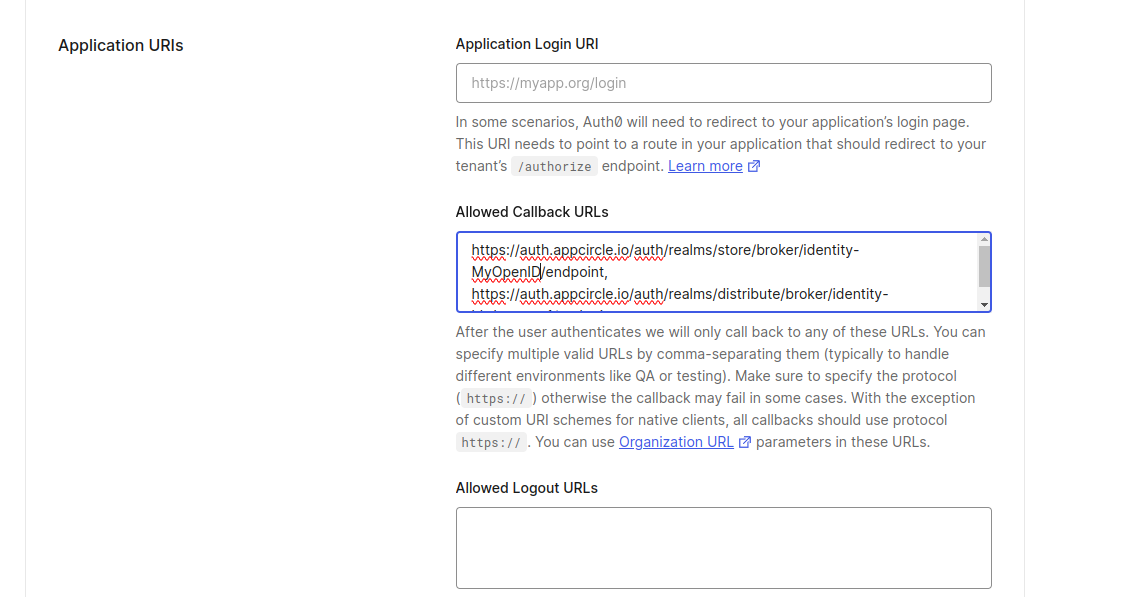
- Click on the Save Changes button.
Step 3: Download OpenID Configuration from Auth0
Instead of writing all the settings of OpenID, you can download the settings file from Auth0 and import in Appcircle. Download the OpenID configuration JSON file from Auth0 with following steps.
- In the Auth0 dashboard, go to the Settings tab of your application.
- Scroll to the bottom of the page and expand the Advanced Settings section.
- Navigate to the Endpoints tab.
- Copy and open OpenID Configuration URL in different tab in your browser.
- Save OpenID Configuration as json file.
Step 4: Upload OpenID Configuration to Appcircle��
Now, upload the OpenID configuration JSON file to Appcircle and complete the configuration:
- Navigate to the Set up OpenID Provider screen in Appcircle, which you accessed during the SSO setup in the "General Configuration Steps."
- Upload the downloaded OpenID configuration JSON file to Appcircle.

- Choose the Client secret sent as basic auth as Client Authentication
- Enter the Client ID and Client Secret that you noted earlier from Auth0.
- Click Save to finalize the SSO setup.
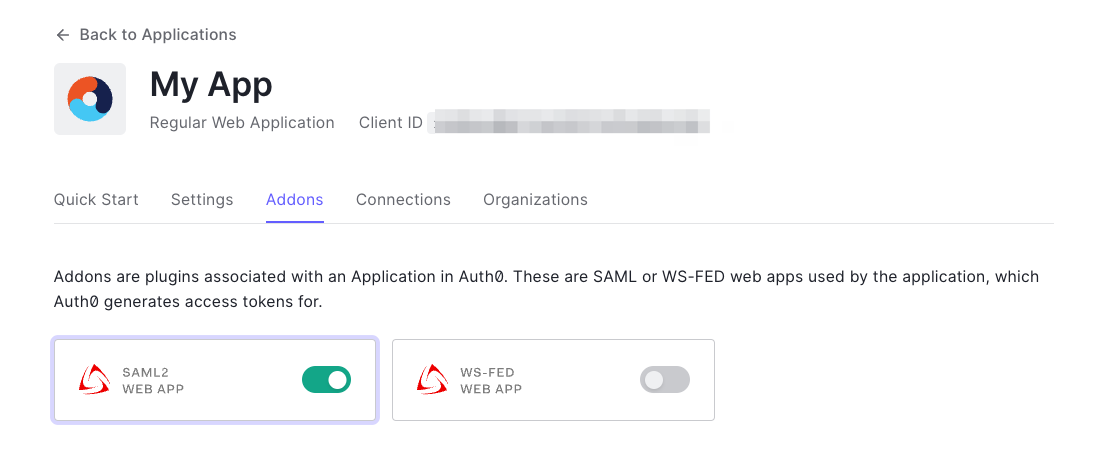
4.2 Auth0 (SAML)
Auth0 supports the SAML protocol, allowing integration with Appcircle for secure authentication.
Step 1: Create a SAML Application in Auth0
To start, log in to your Auth0 dashboard and create a new SAML application for Appcircle:
- In the Auth0 dashboard, navigate to the Applications section.
- Click Create Application and choose a name for your application (e.g., "Appcircle SSO - SAML").
- Select Regular Web Applications as the application type.
- Click Create button.
Step 2: Configure SAML Settings in Auth0
Next, configure the SAML settings in Auth0 to ensure it can authenticate and redirect back to Appcircle:
- Enable the SAML addon for your Auth0 application through the Addons tab in your Auth0 application settings.
- Navigate to the Settings tab in the opened dialog. Use the following JSON settings to configure the SAML addon:
    {
      "nameIdentifierFormat": "urn:oasis:names:tc:SAML:1.1:nameid-format:emailAddress",
      "nameIdentifierProbes": [
        "http://schemas.xmlsoap.org/ws/2005/05/identity/claims/emailaddress"
      ]
    }
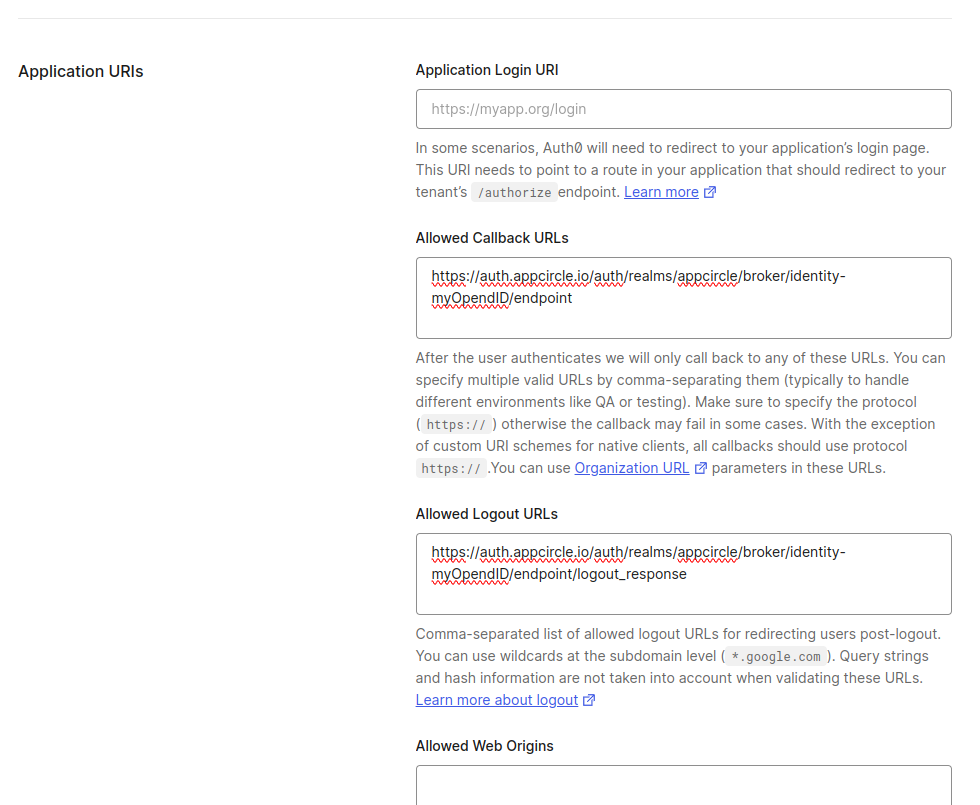
- In the Application Callback URL field, enter the Store Redirect URL and Distribute Redirect URL (created using the alias in "Step 1: Enable SSO in Appcircle" from the "General Configuration Steps" section), combined by a comma.
Example Callback URL: https://auth.appcircle.io/auth/realms/store/broker/identity-{your-alias}/endpoint,https://auth.appcircle.io/auth/realms/distribute/broker/identity-{your-alias}/endpoint
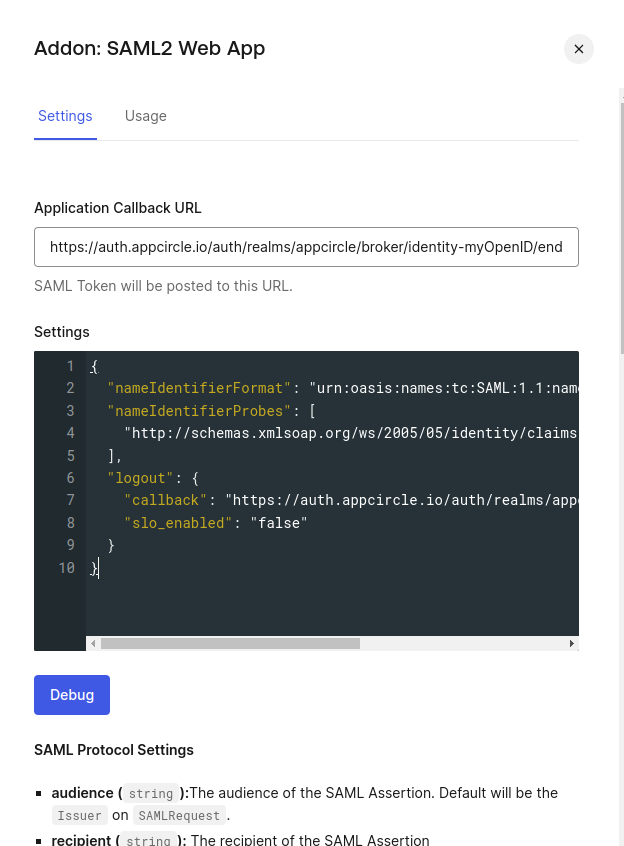
- Download the SAML metadata file from Auth0.
This metadata file will be used in the next step to configure Appcircle.
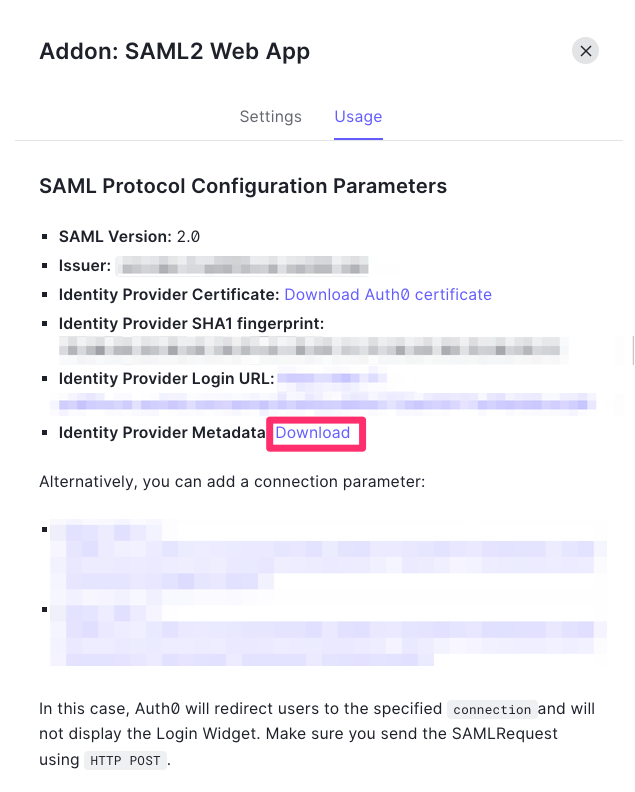
Step 3: Upload SAML Metadata to Appcircle
Now, upload the SAML metadata file to Appcircle and finalize the configuration:
- Navigate to the Set up SAML SSO Provider screen in Appcircle, which you accessed during the SSO setup in the "General Configuration Steps."
- Upload the downloaded SAML metadata file to Appcircle.

Check that the Redirect and SSO URLs are imported correctly. Ensure the X509 Certificate is imported correctly as well. If you need to enter multiple certificates, separate them with a comma. Be sure to remove any new lines or file headers, as this edit box only accepts a long base64 encoded string.
- Complete any additional configuration settings in Appcircle as required.
- Click Save to finalize the SSO setup.
Important: Ensure all settings match those provided in the SAML metadata file to avoid issues with authentication.
4.3 Microsoft Entra ID (SAML) (formerly Azure Active Directory)
Microsoft Entra ID supports the SAML protocol, allowing integration with Appcircle for secure authentication. This section will guide you through setting up Microsoft Entra ID as your SAML identity provider for Appcircle.
Step 1: Access Microsoft Entra and Create an Enterprise Application
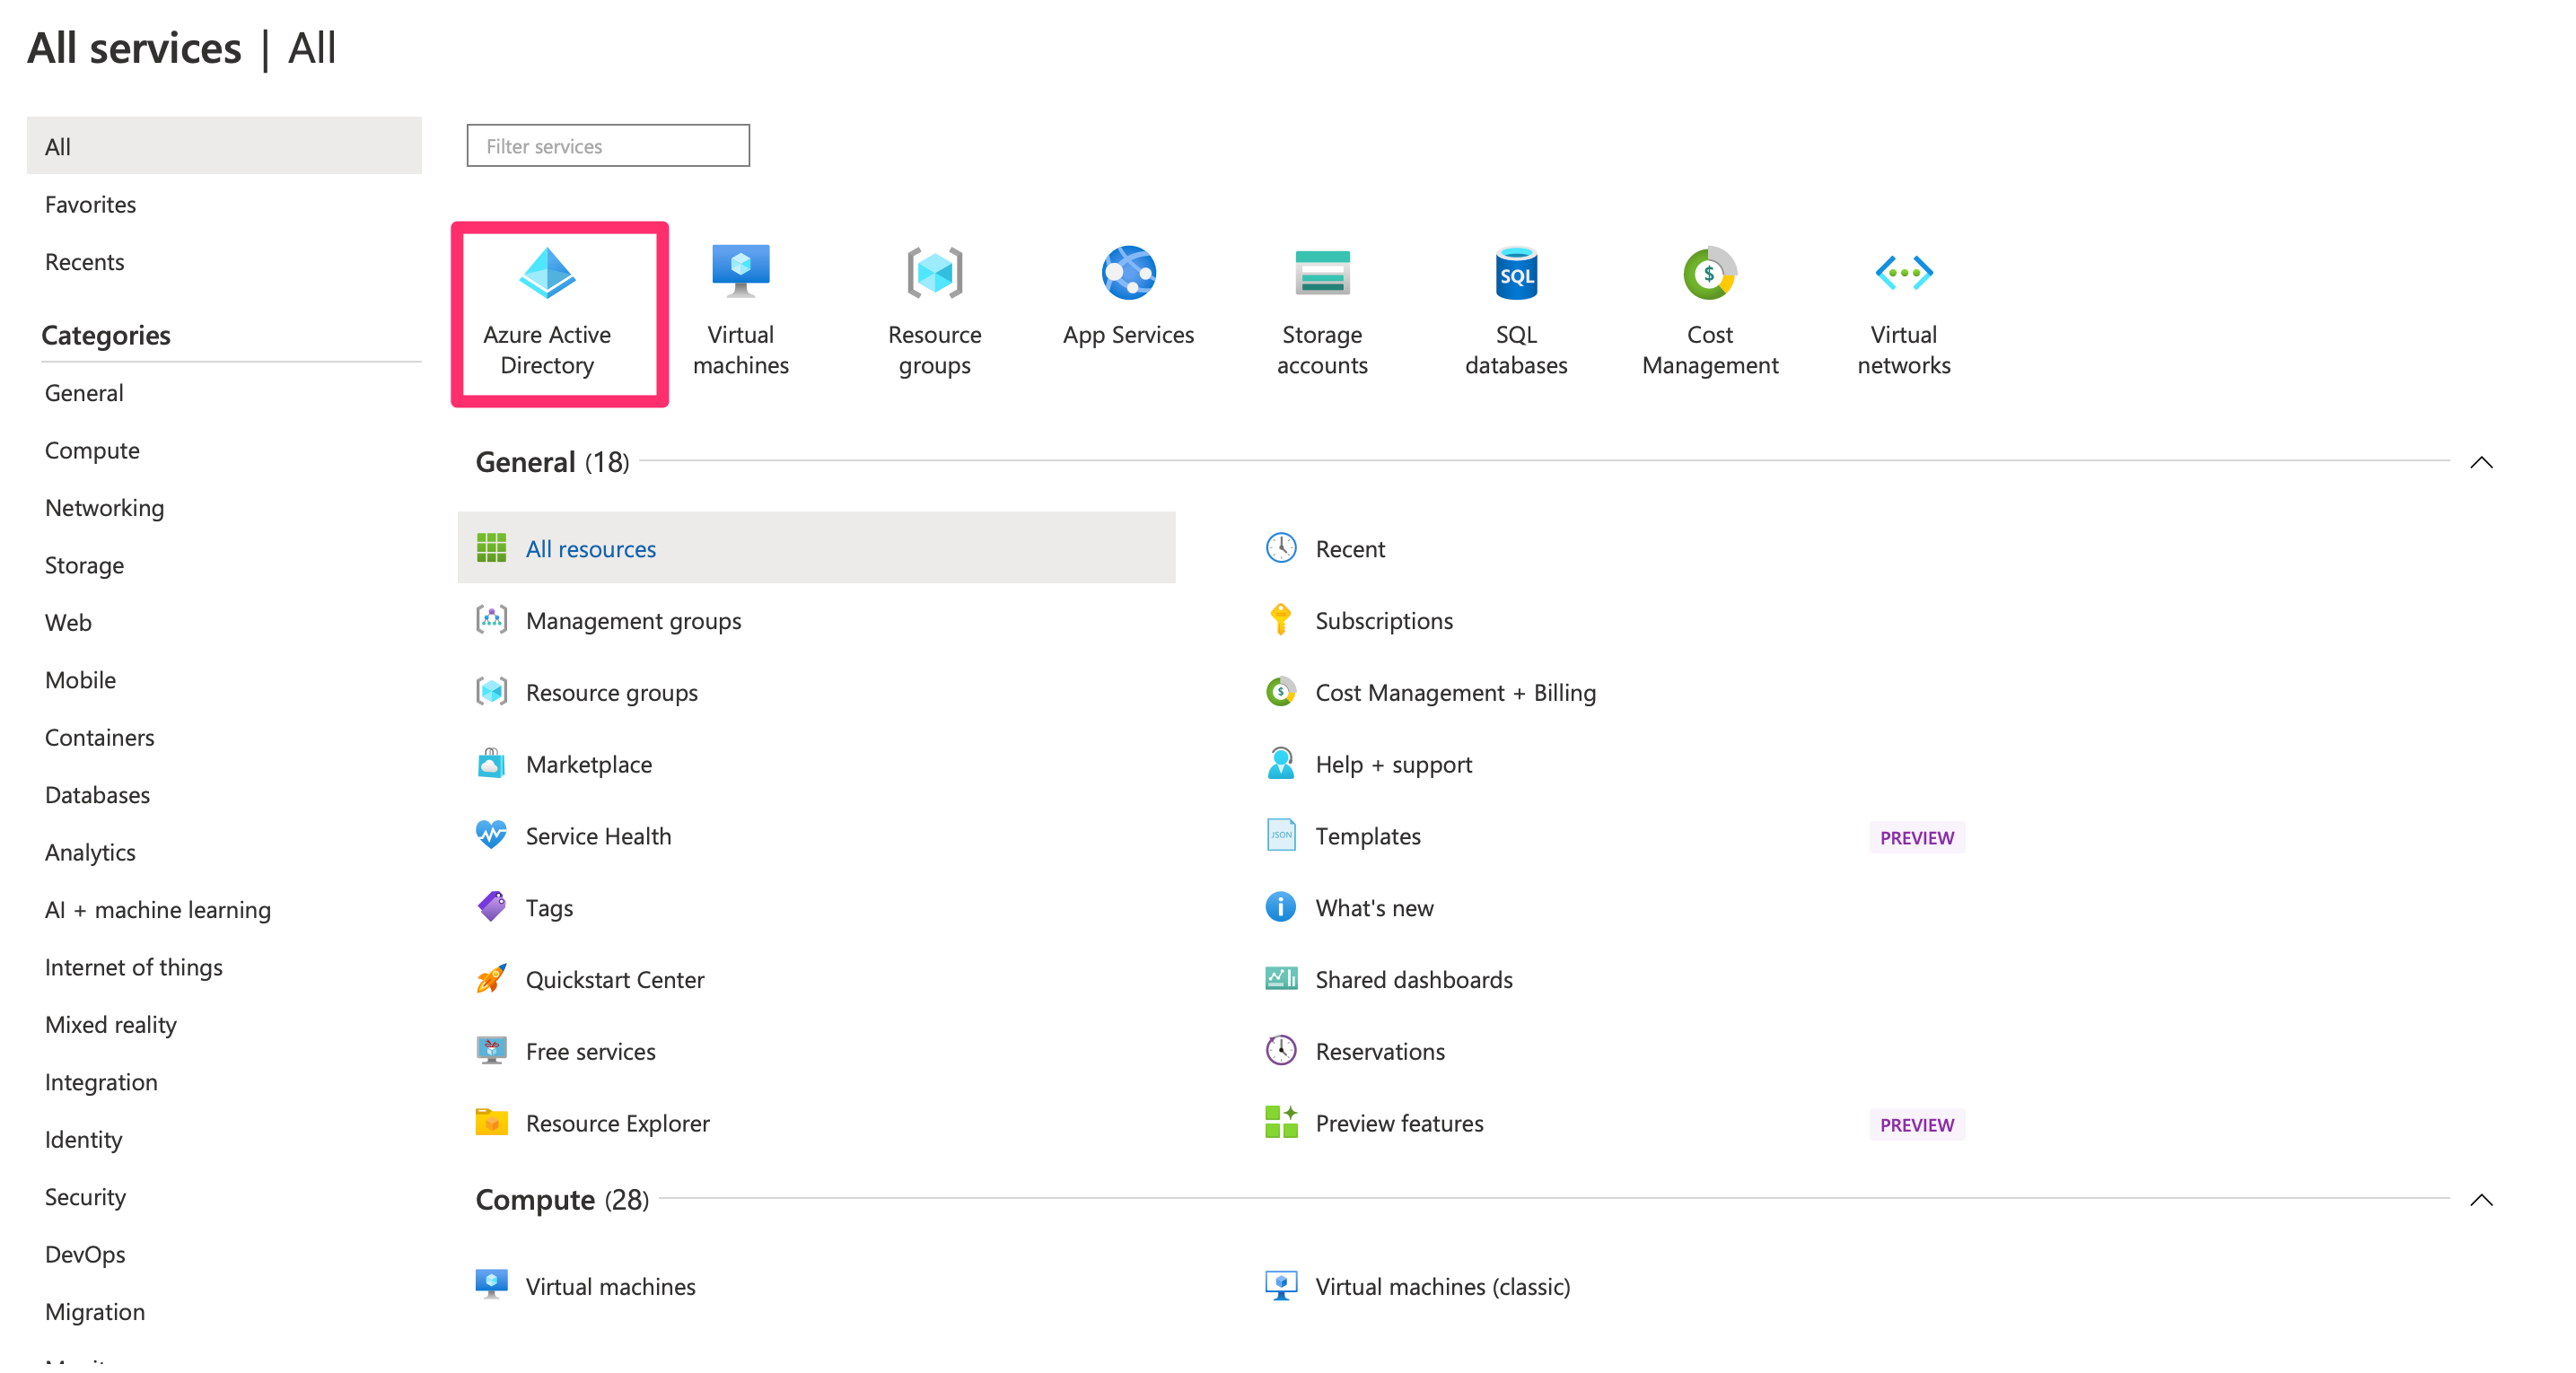
First, log in to your Azure portal as an admin:
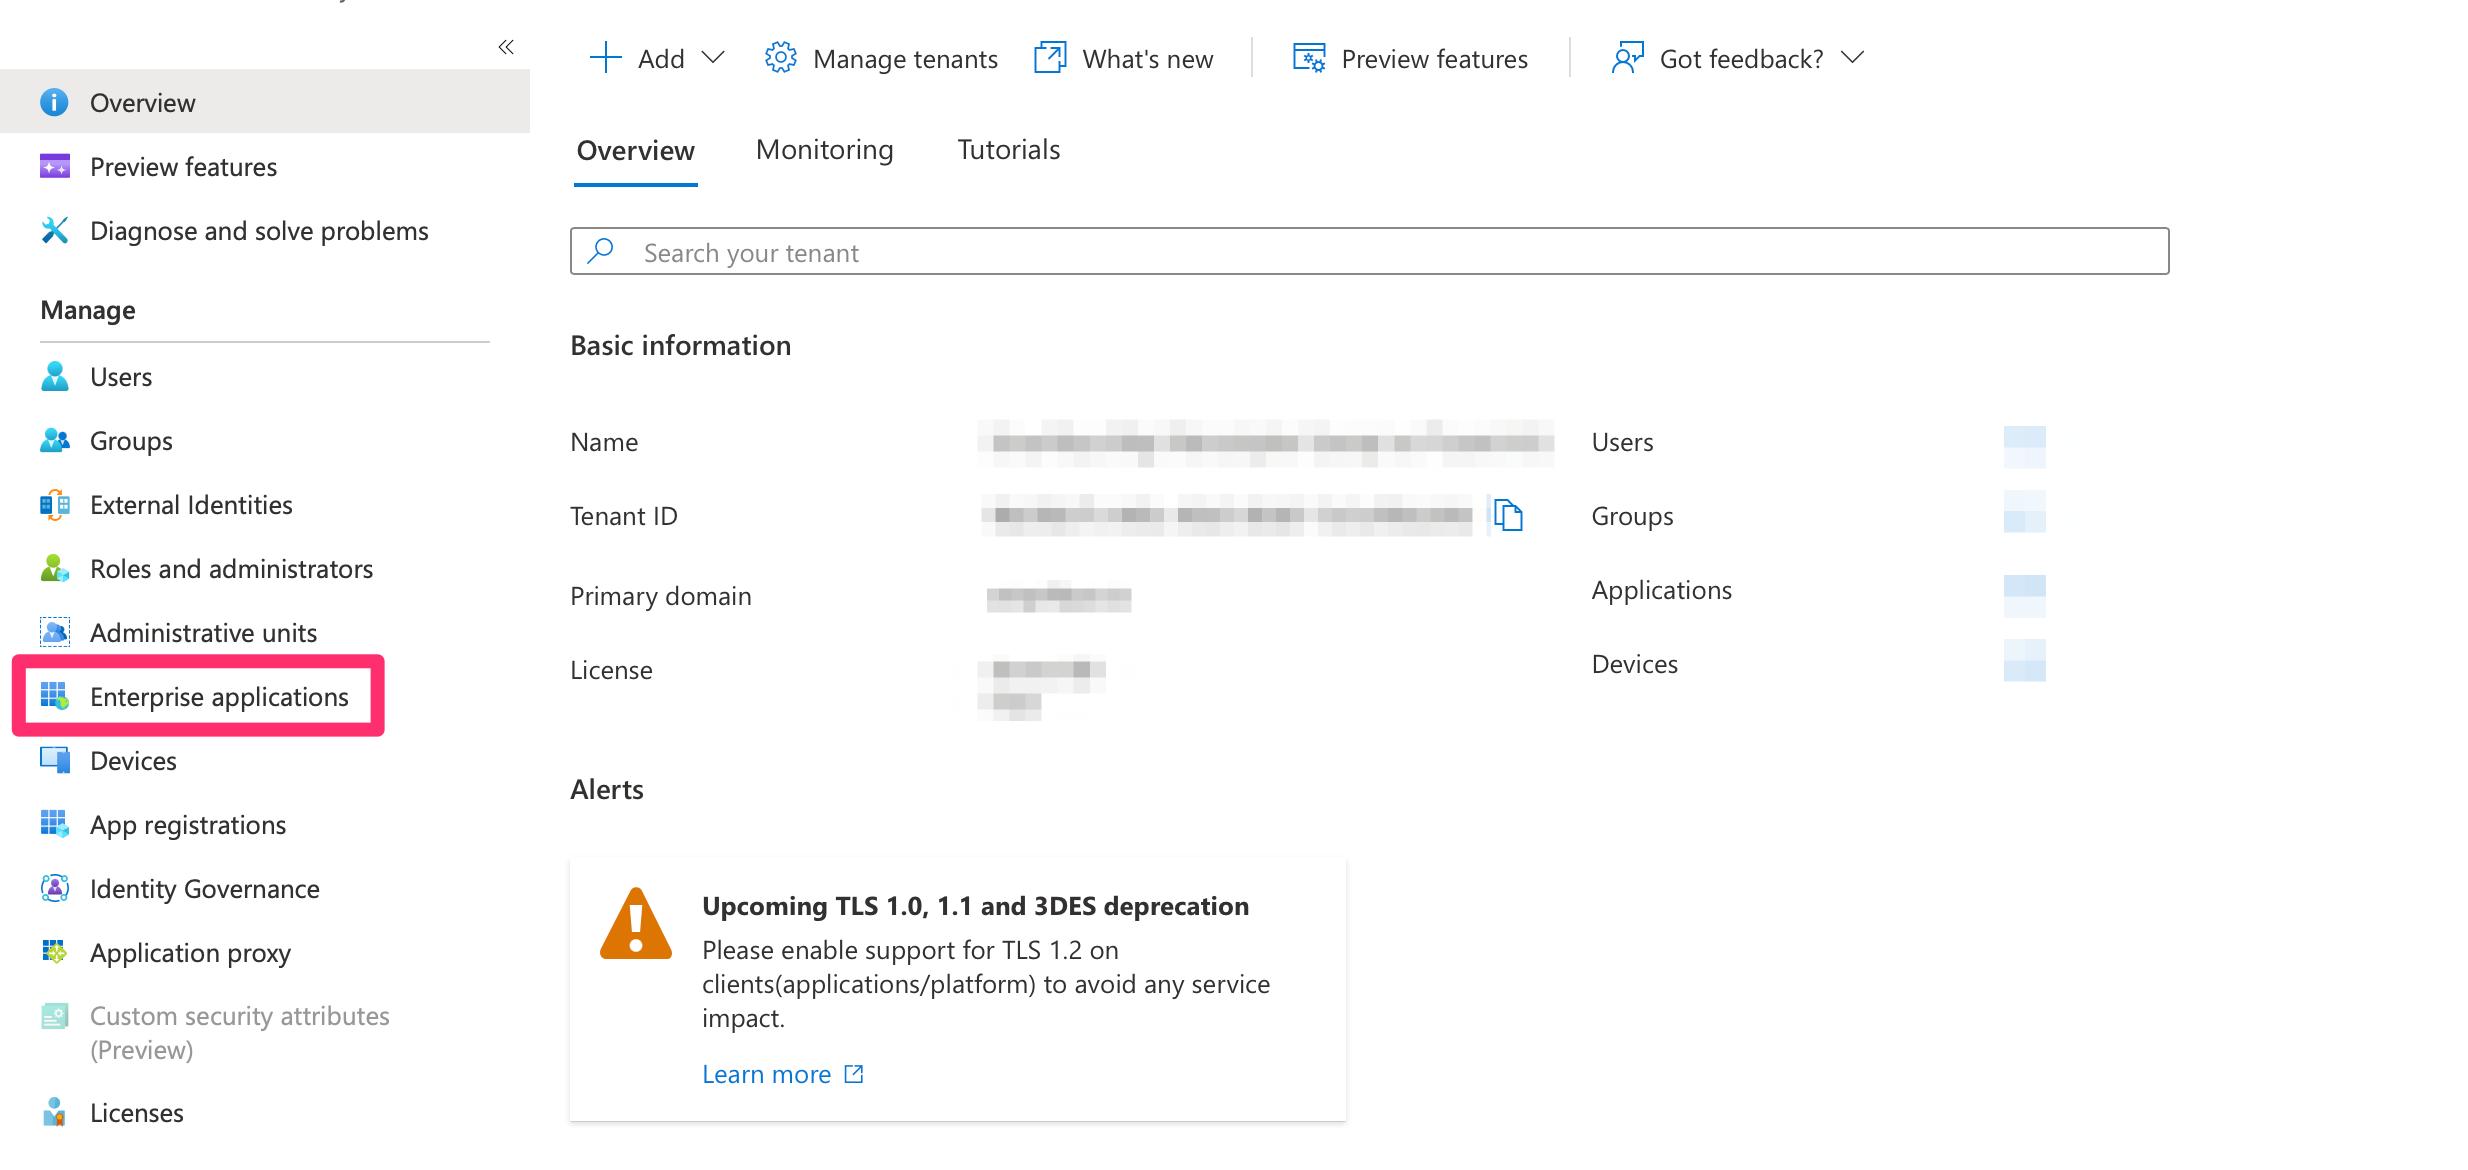
- Log in to Azure portal as an admin and navigate to Azure Services and then click Microsoft Entra ID.
- In the Azure portal, go to Enterprise Applications
- Click New Application.

- Select Create your own application, name it (e.g., "Appcircle SSO - SAML").
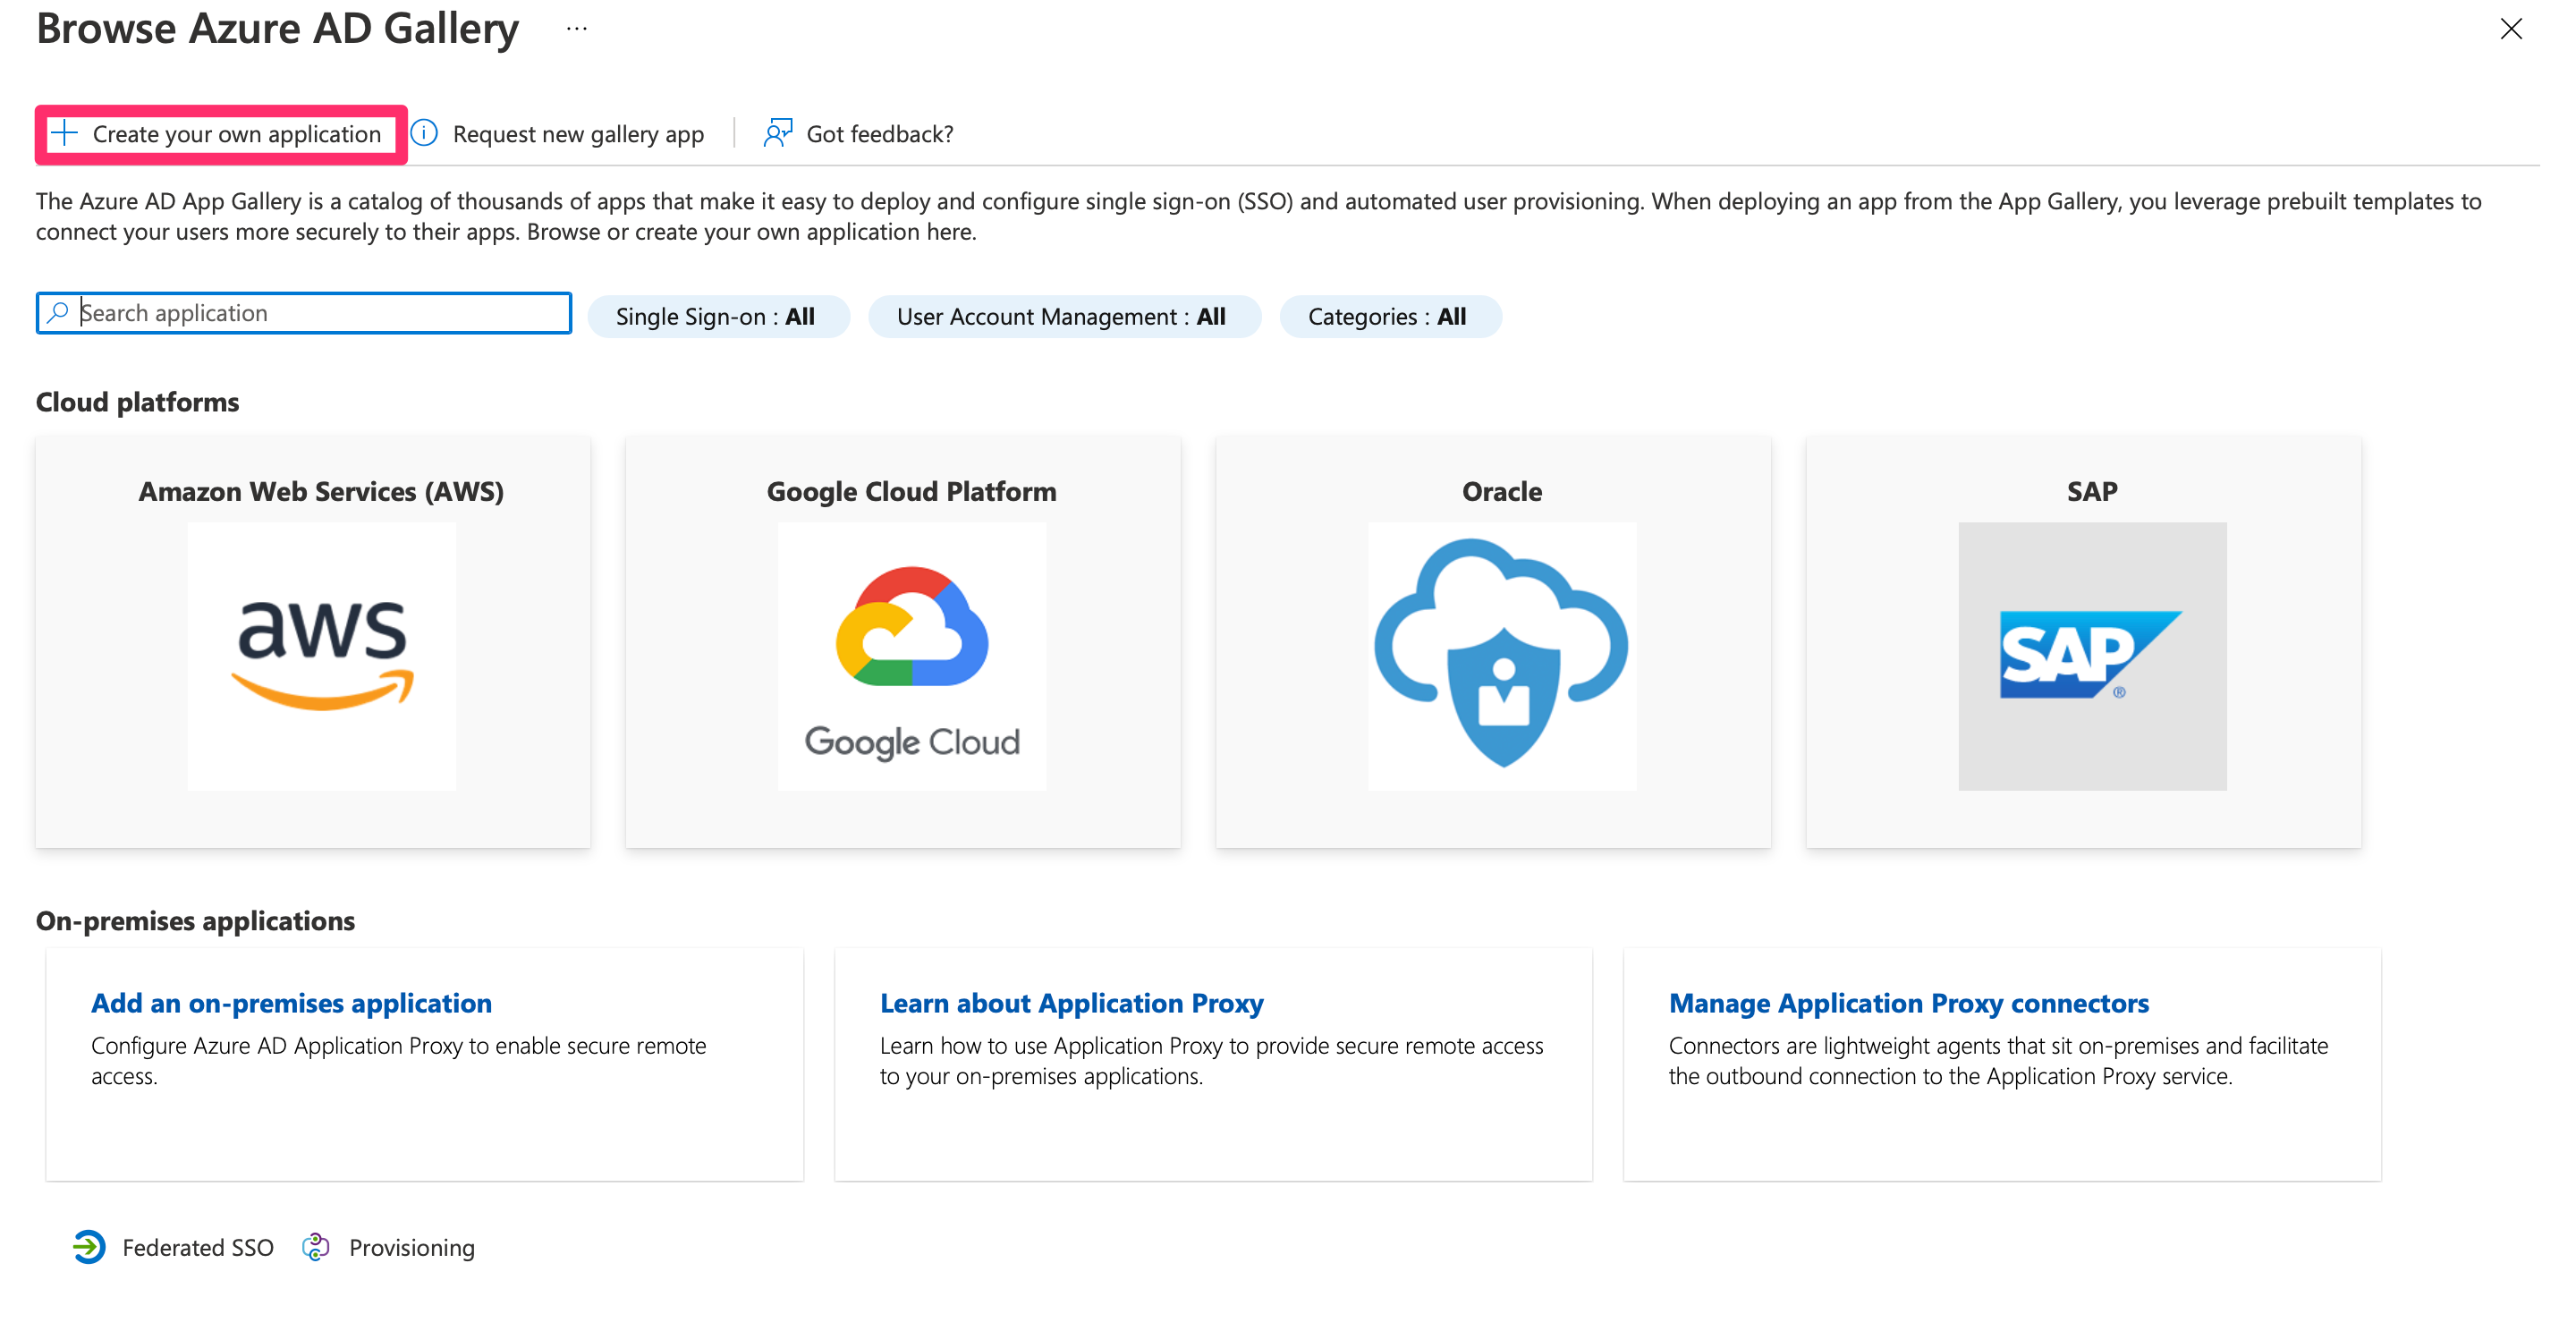
- Choose Integrate any other application you don't find in the gallery.
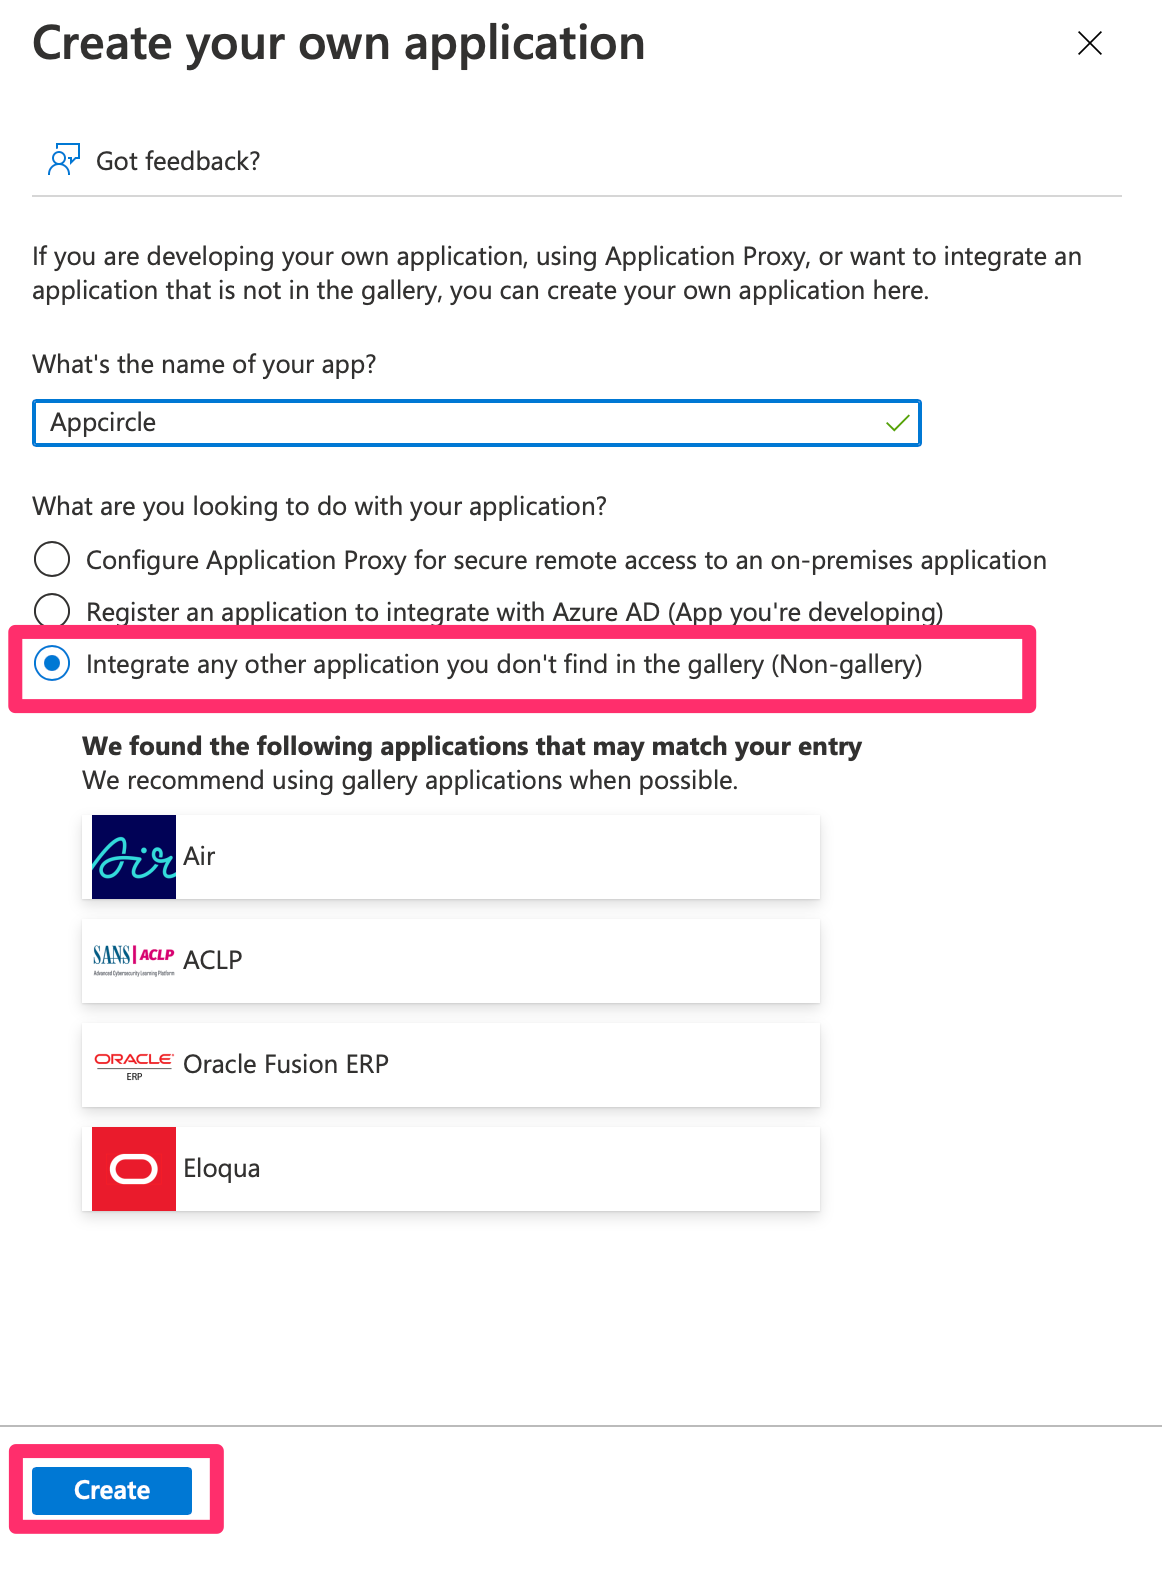
- Click Create to set up the application.
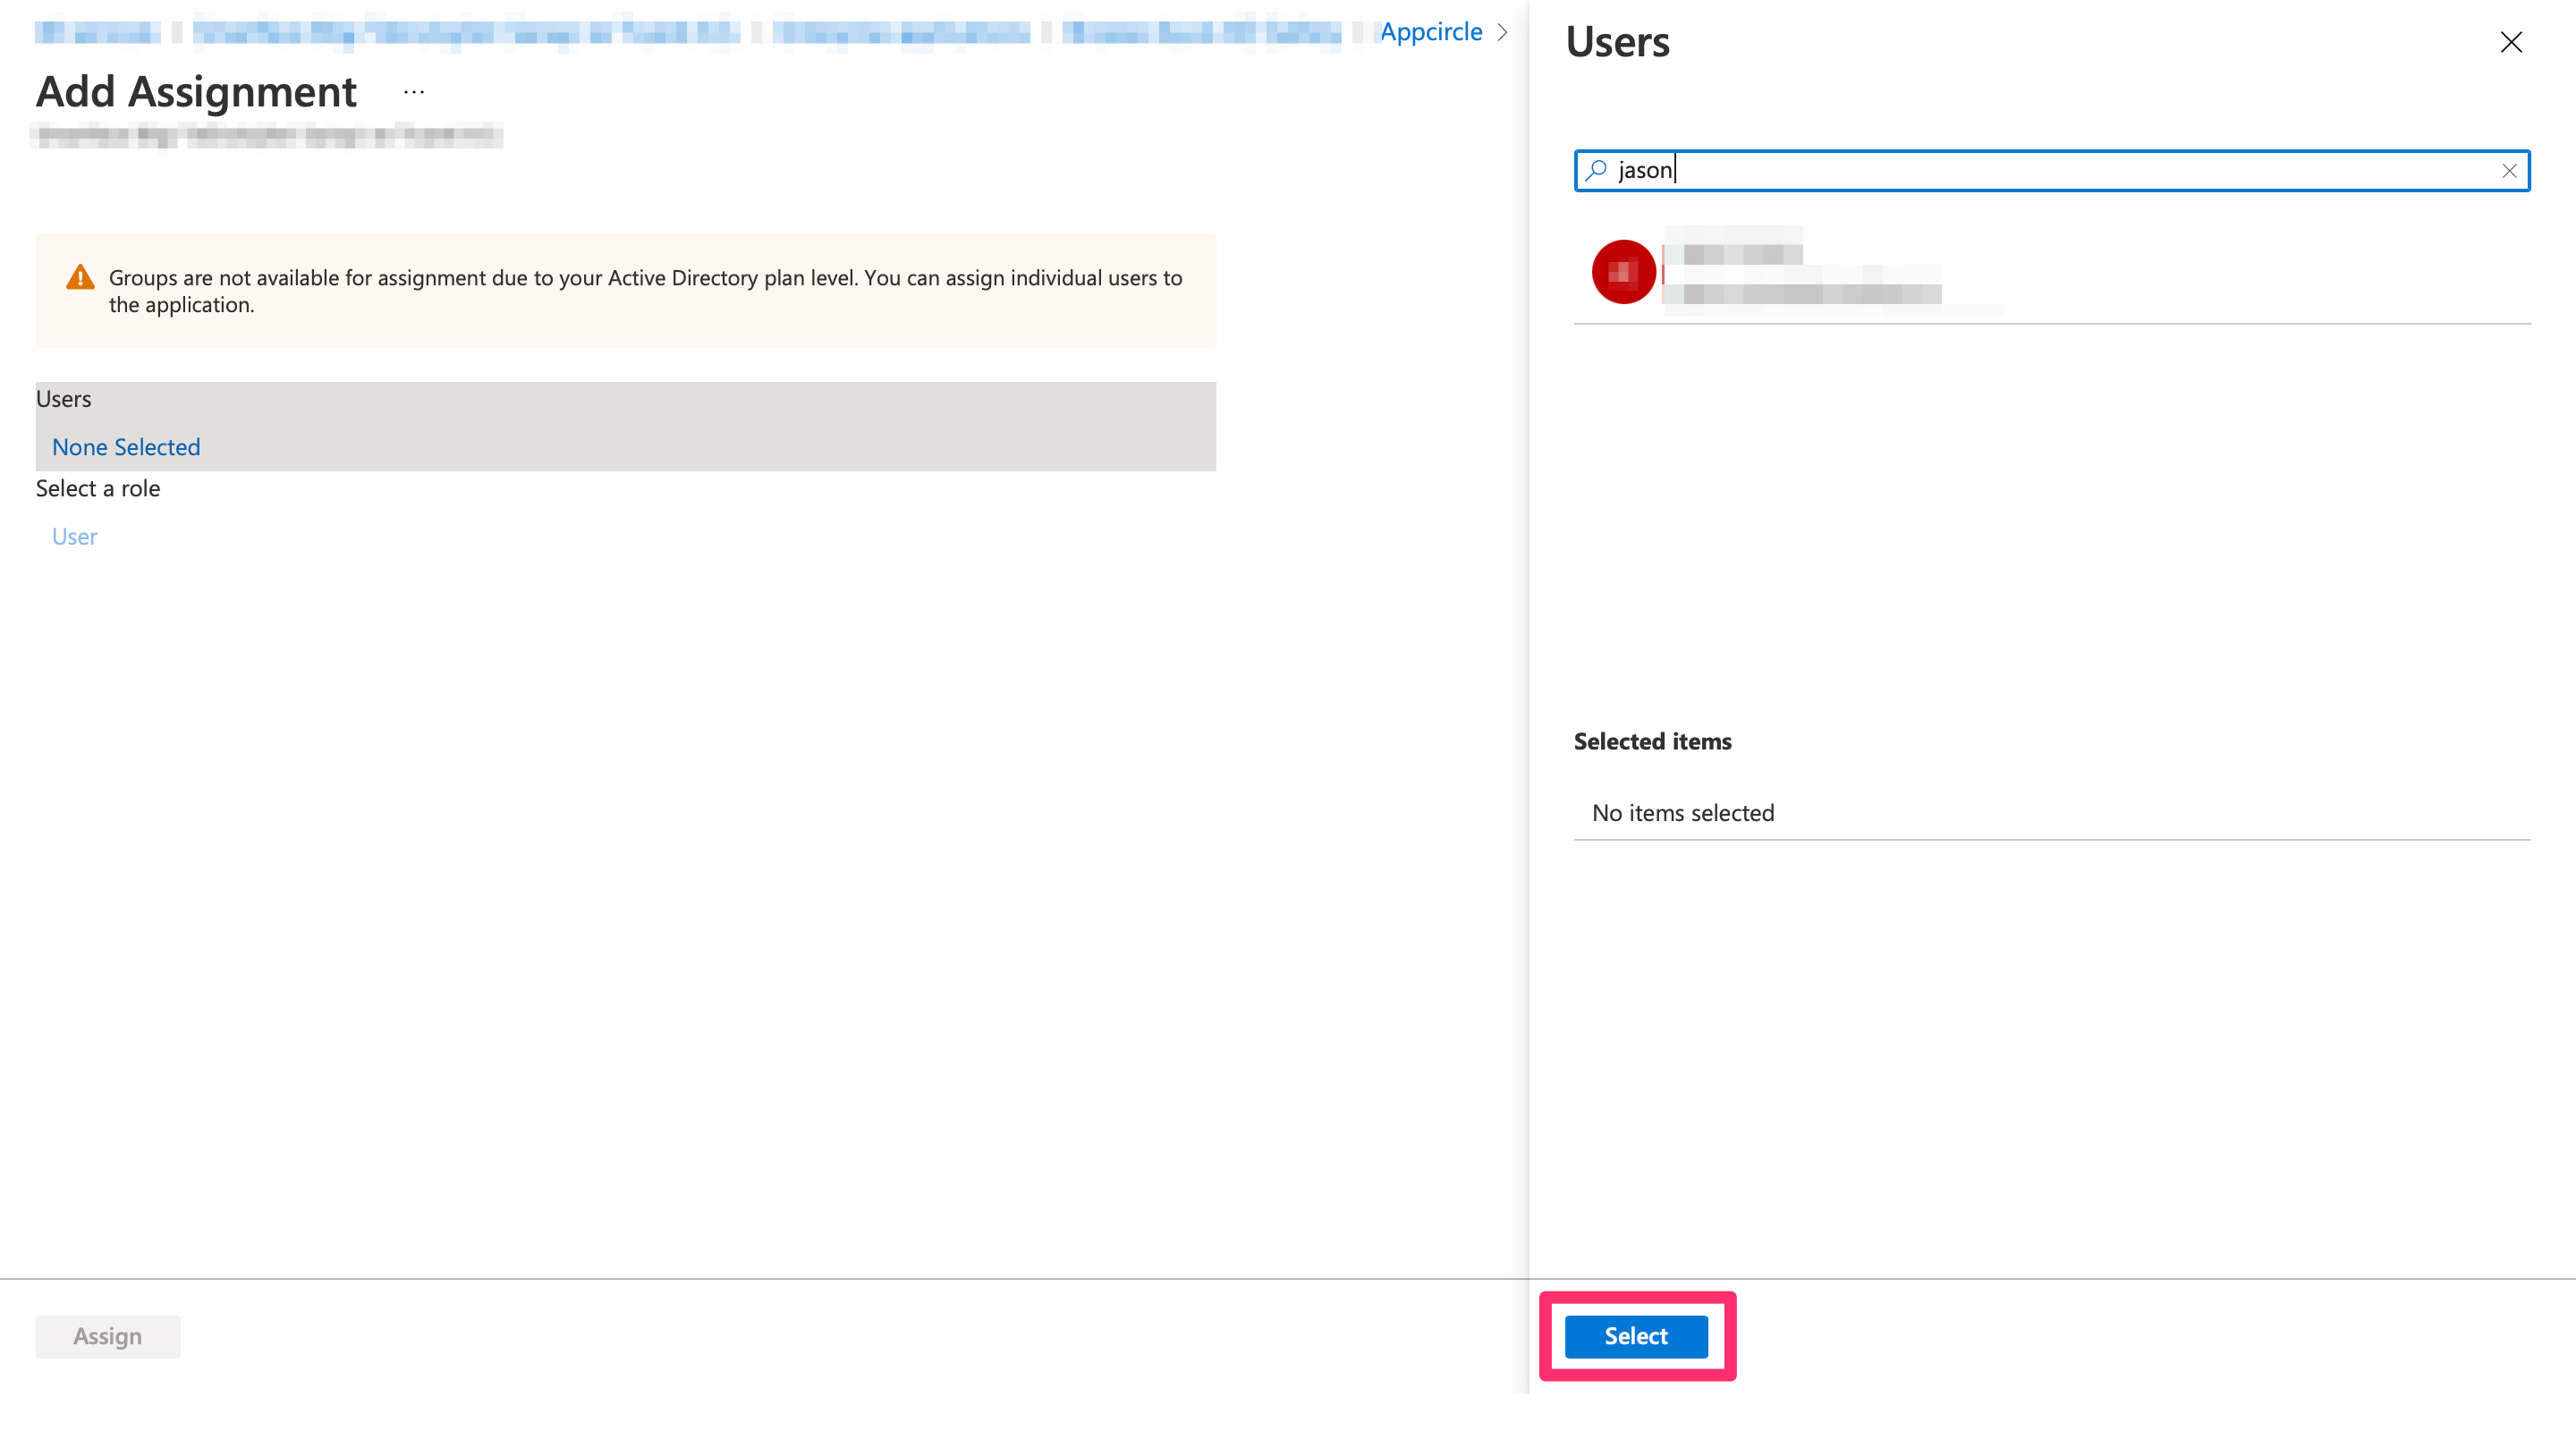
Step 2: Assign Users to the Enterprise Application
Once the enterprise application is created, you need to assign users to it:
- Navigate to the created enterprise application and click Users and Groups.
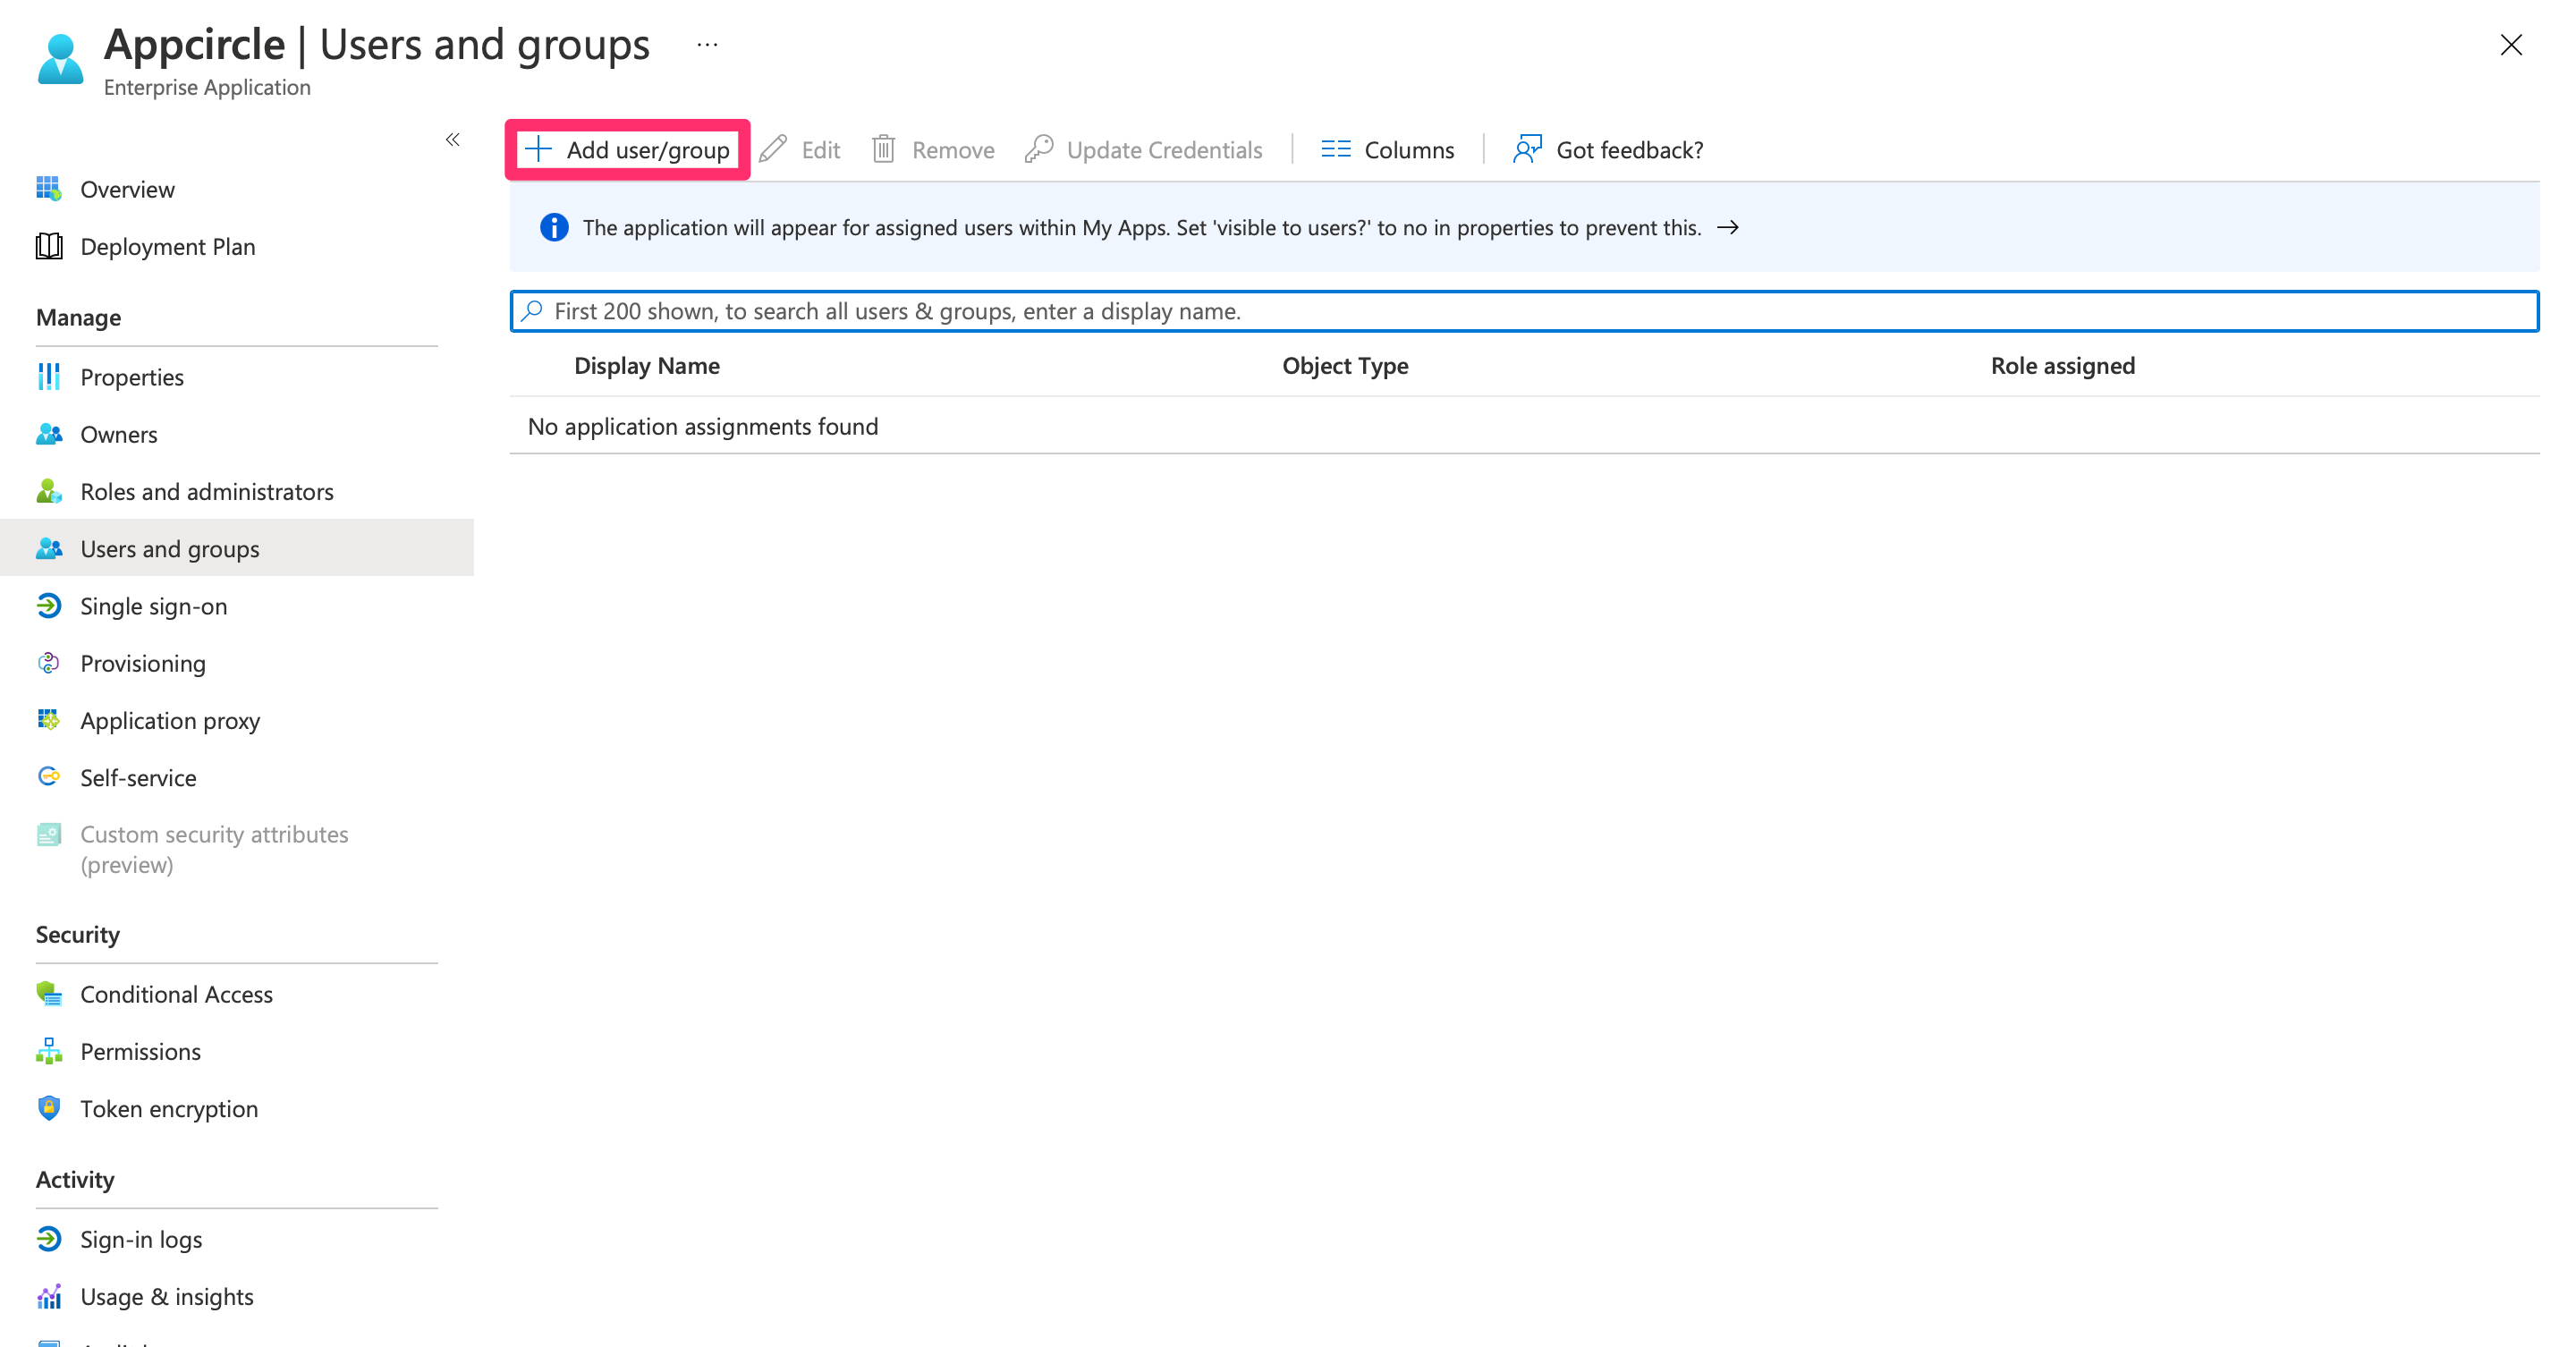
- Click Add User/Group, search for the user you want to assign, select them, and click Assign.
Step 3: Configure SAML-based Sign-on in Microsoft Entra ID
Next, configure the SAML-based sign-on for the Microsoft Entra ID application:
- In the application settings, navigate to Single sign-on and select SAML as the sign-on method.
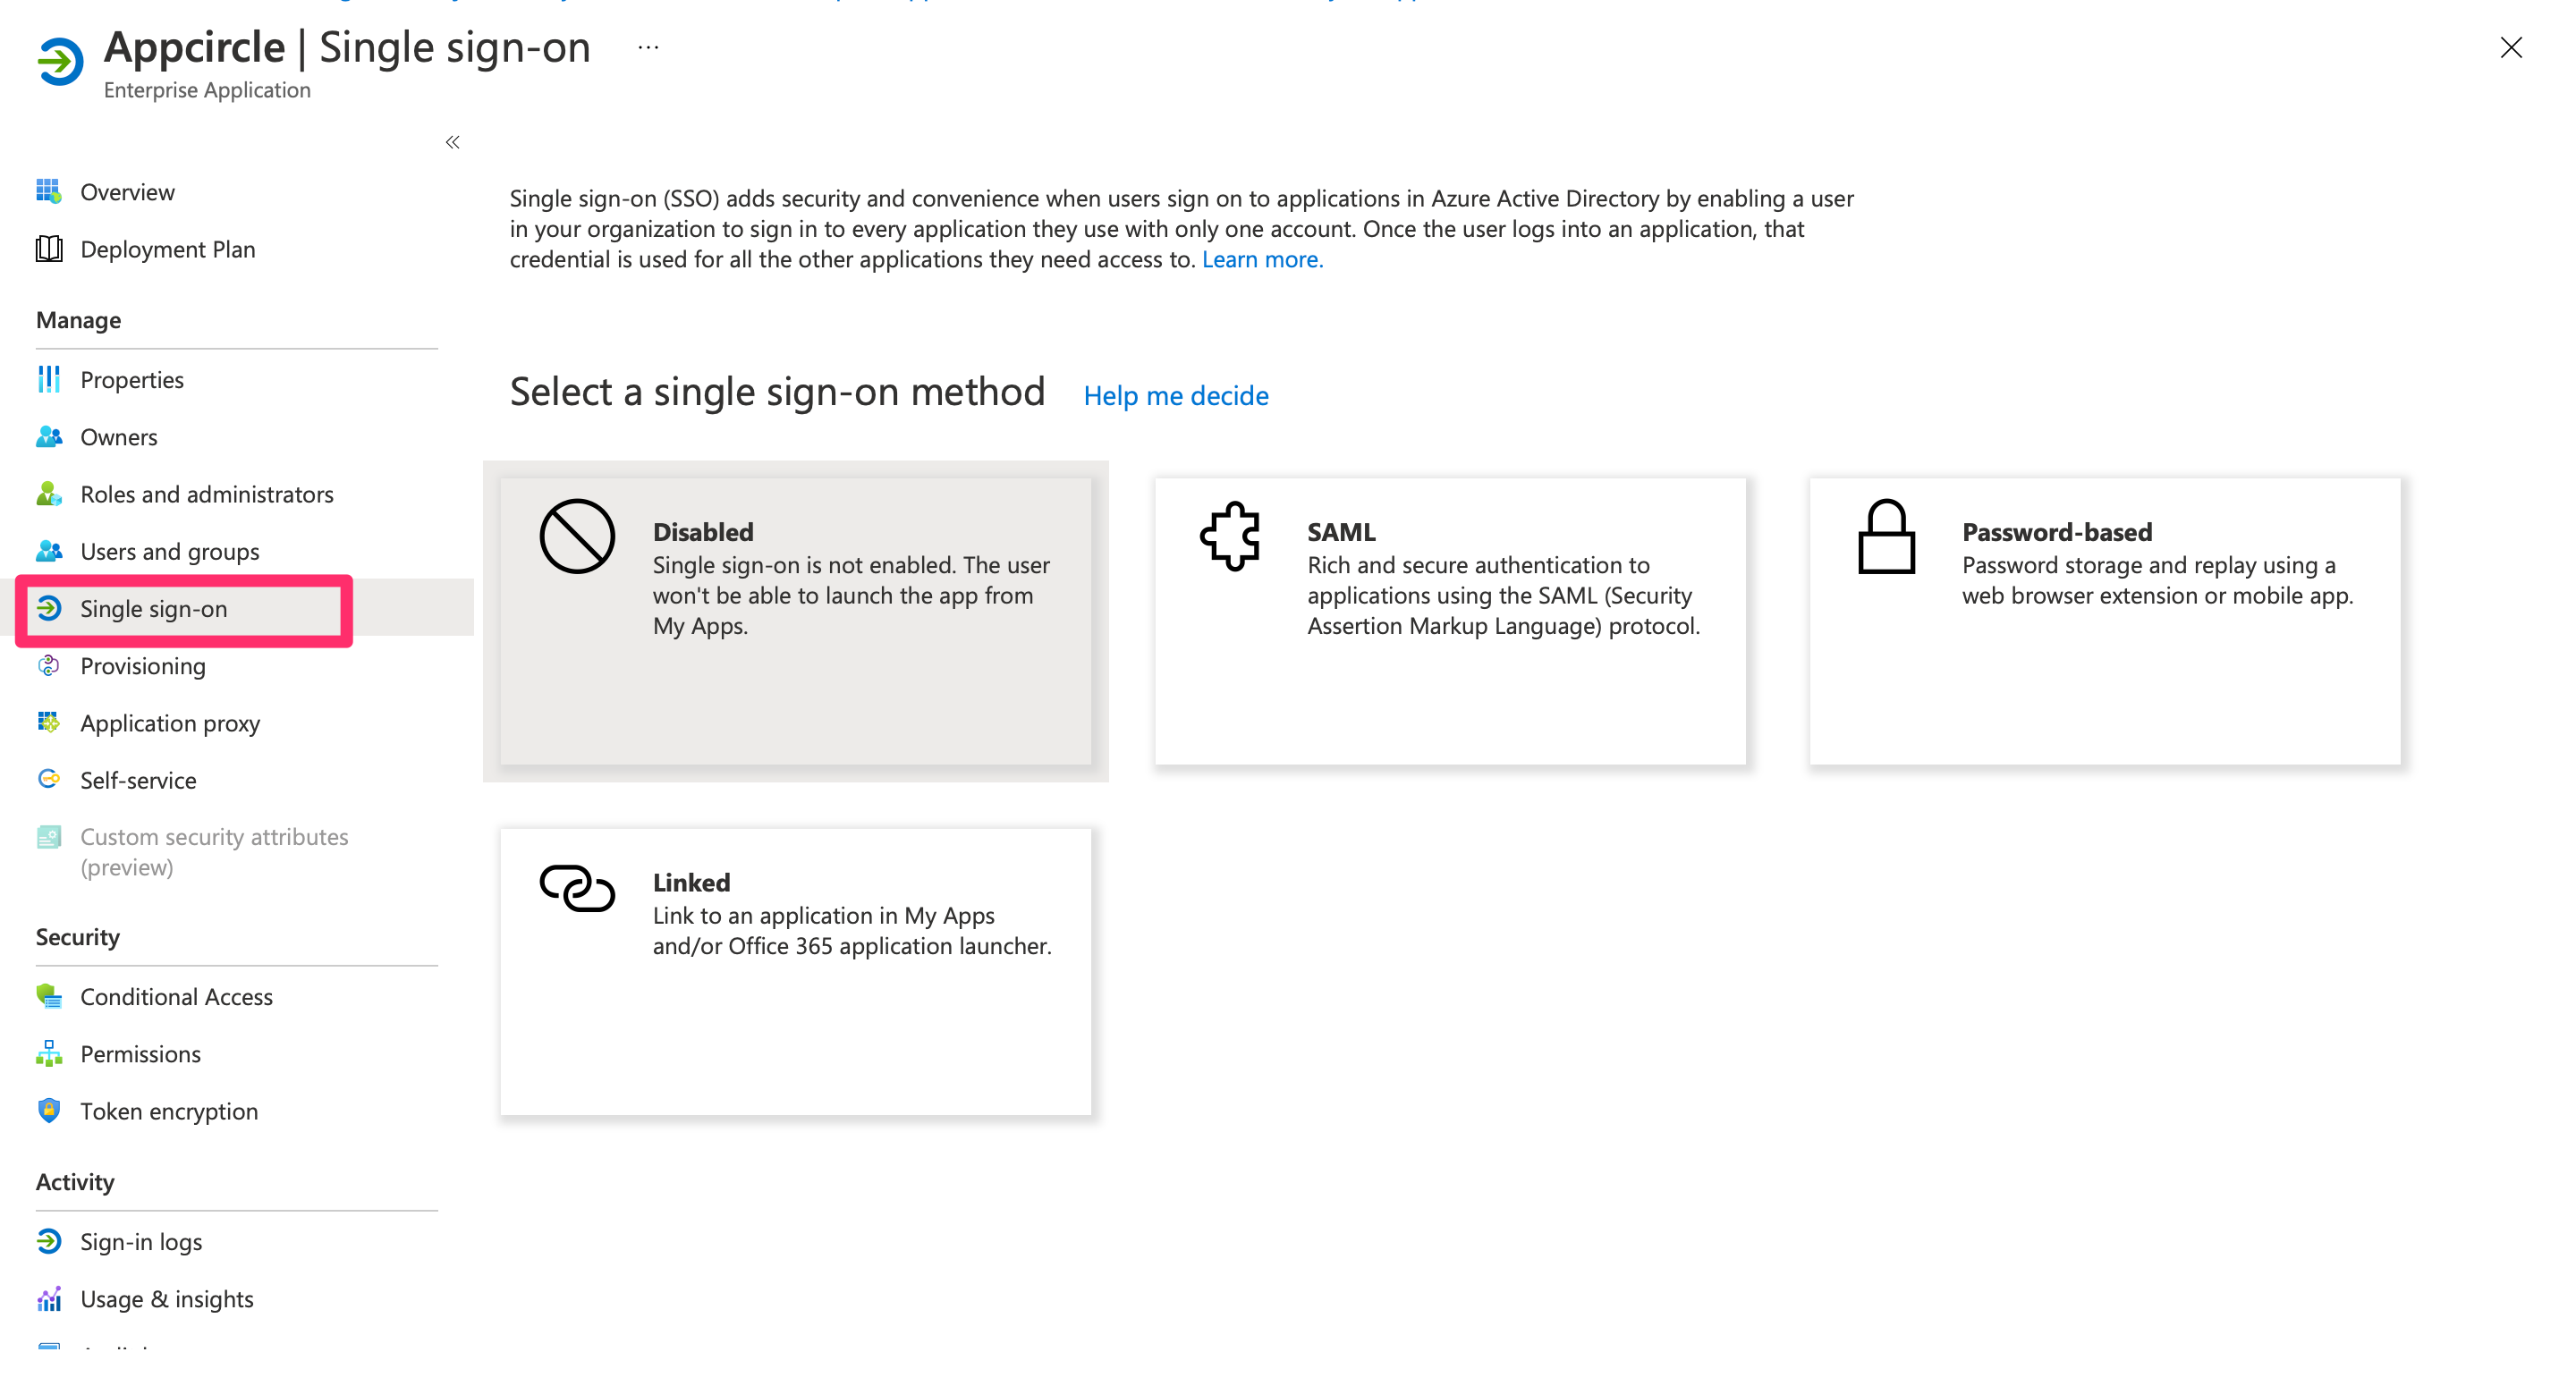
- Click Edit under the Basic SAML Configuration section, and set the following:
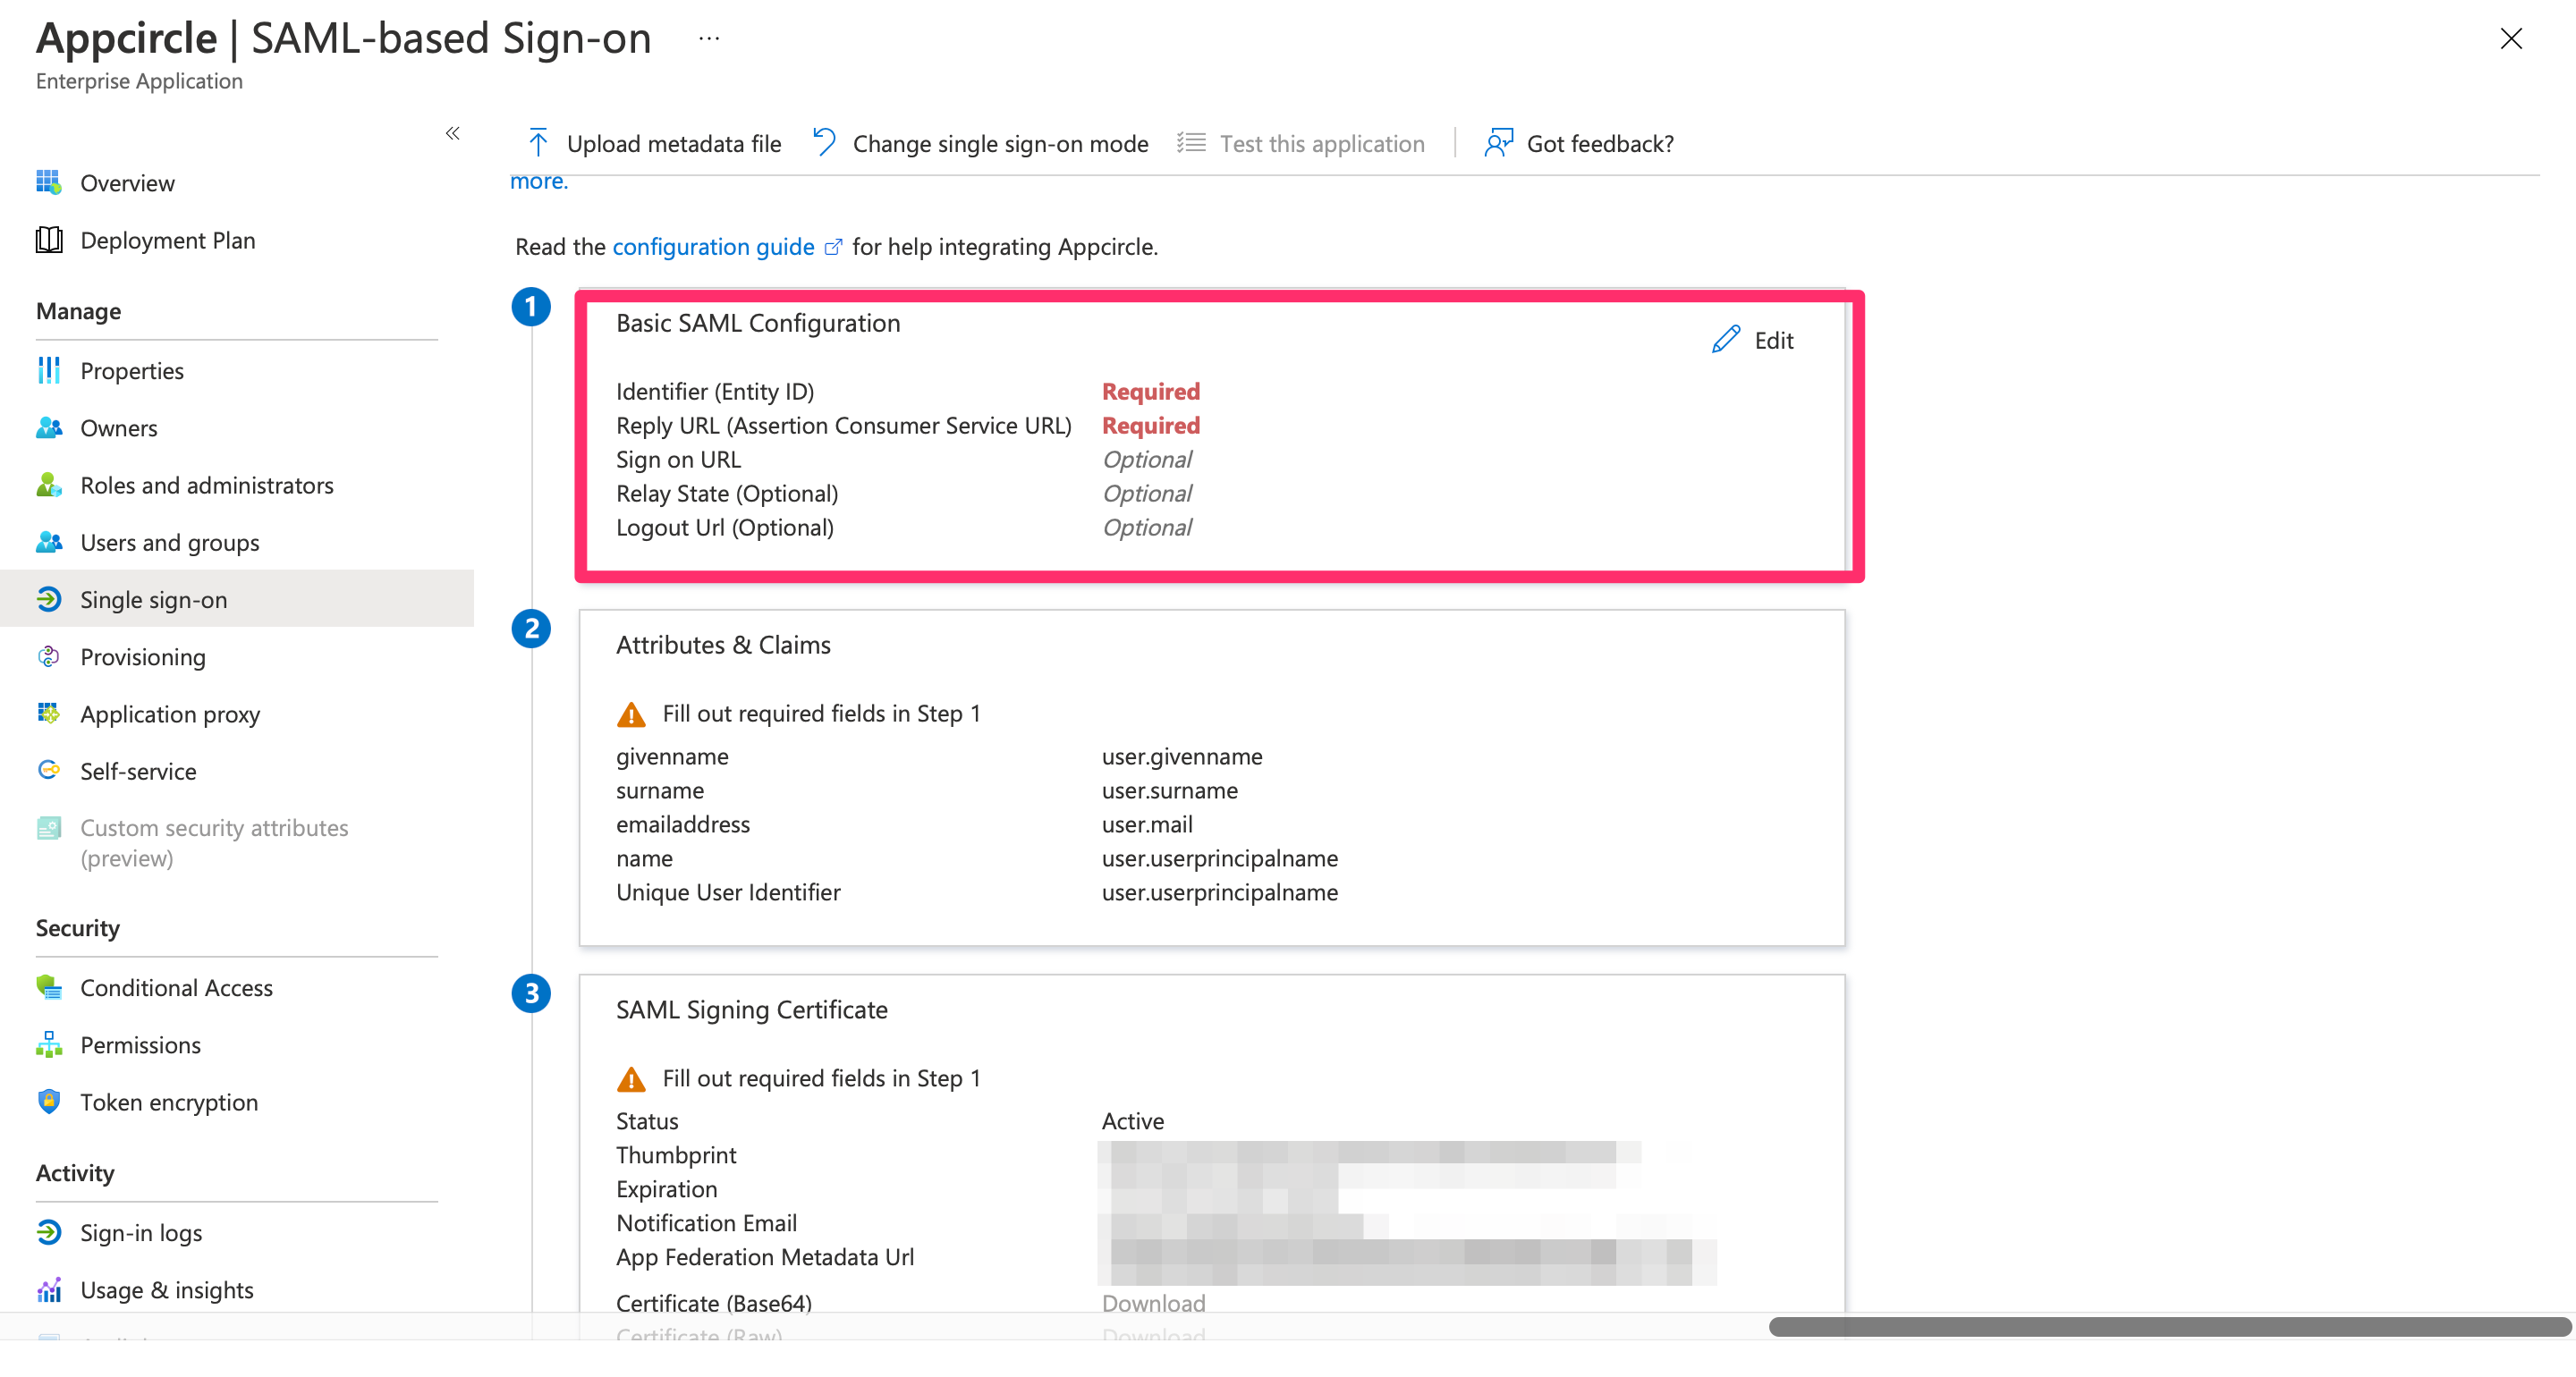
- Identifier (Entity ID): Enter
https://auth.appcircle.io/auth/realms/store. - Reply URL (Assertion Consumer Service URL): Enter the Store Redirect URL and Distribute Redirect URL that created using the alias in "Step 1: Enable SSO in Appcircle" from the "General Configuration Steps" section.
Example Store Redirect URL: https://auth.appcircle.io/auth/realms/store/broker/identity-{your-alias}/endpoint
Example Distribution Redirect URL: https://auth.appcircle.io/auth/realms/distribute/broker/identity-{your-alias}/endpoint
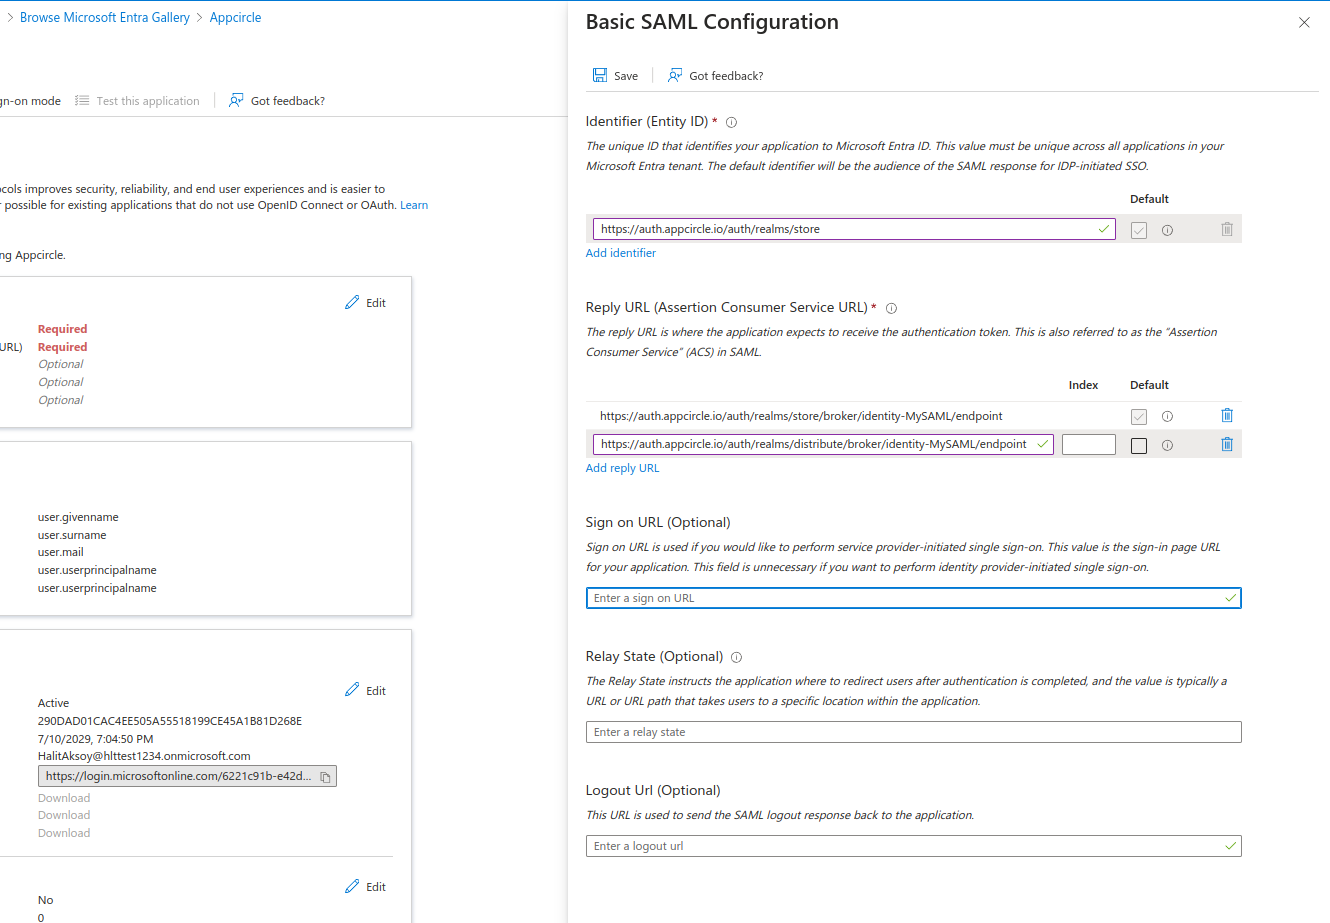
- Click Save to apply the settings.
Step 4: Download and Upload SAML Metadata
Now, download the SAML metadata from Microsoft Entra ID and upload it to Appcircle:
- In the Azure portal, go to the SAML Signing Certificate section and download the Federation Metadata XML file.
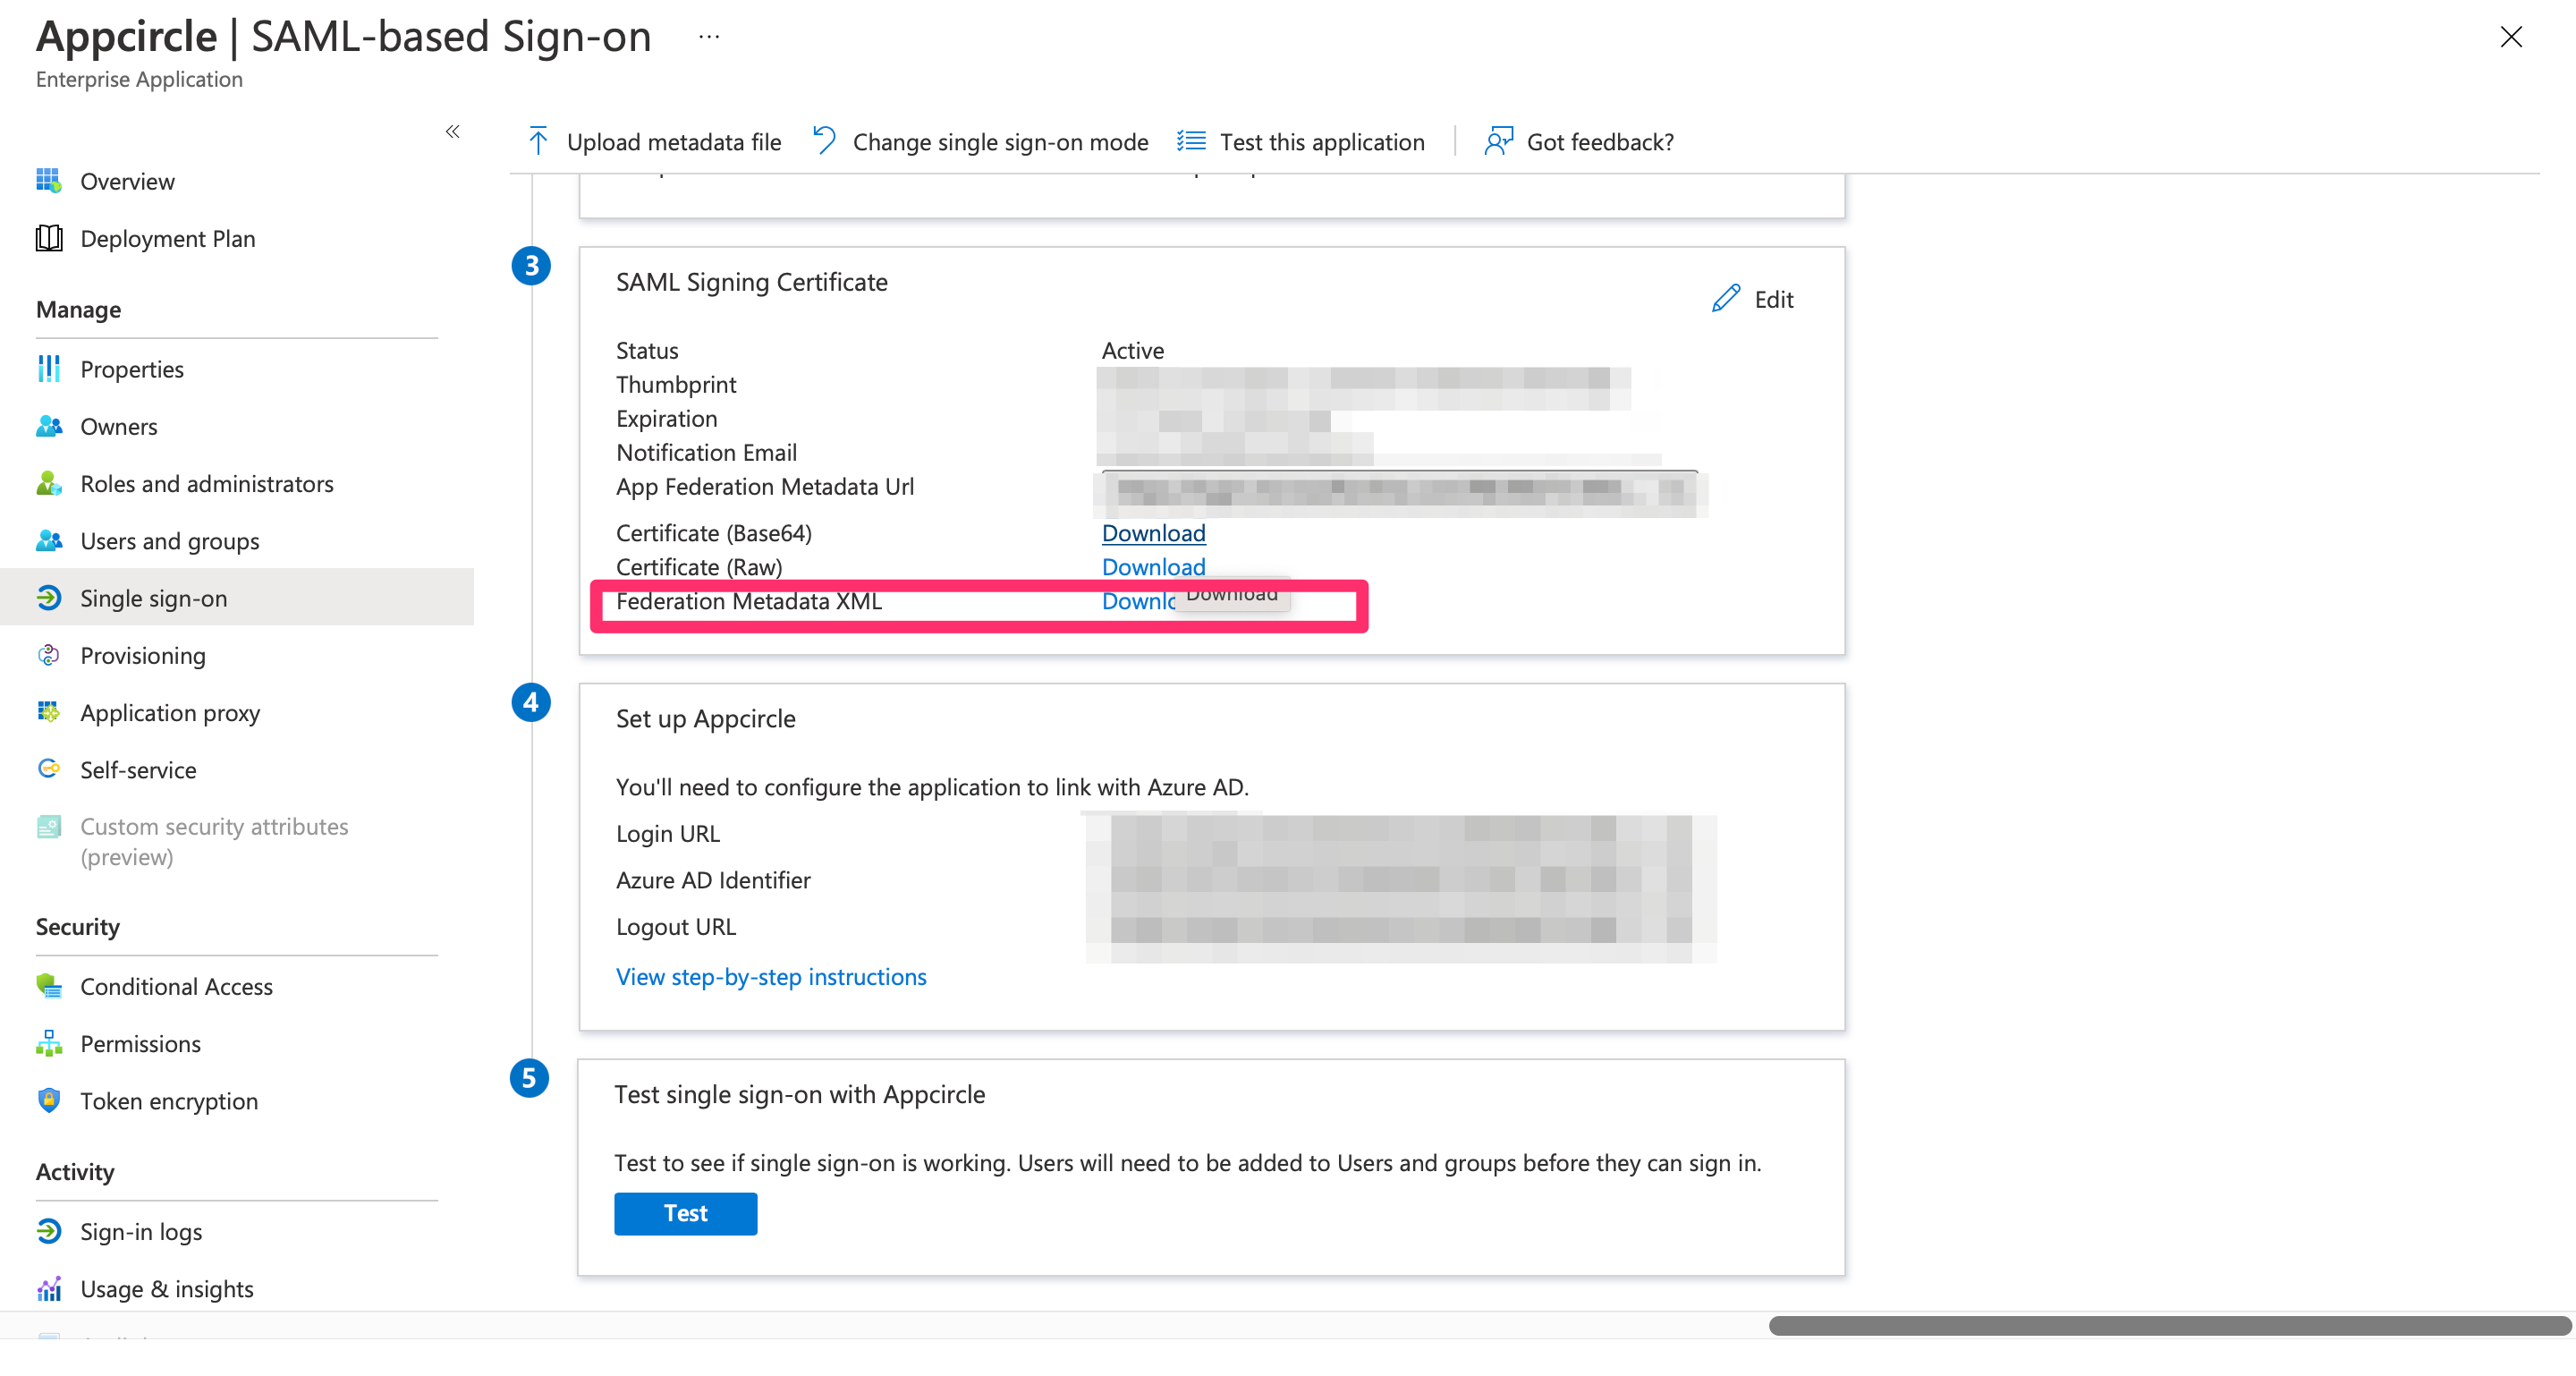
- Navigate to the Set up SAML SSO Provider screen in Appcircle, which you accessed during the SSO setup in the "General Configuration Steps."
- Upload the downloaded Federation Metadata XML file to Appcircle.
- Review the settings and click Save to finalize the configuration.
4.4 Okta (OpenID Connect)
Okta supports the OpenID Connect protocol, allowing integration with Appcircle for secure authentication.
Step 1: Create an Application in Okta
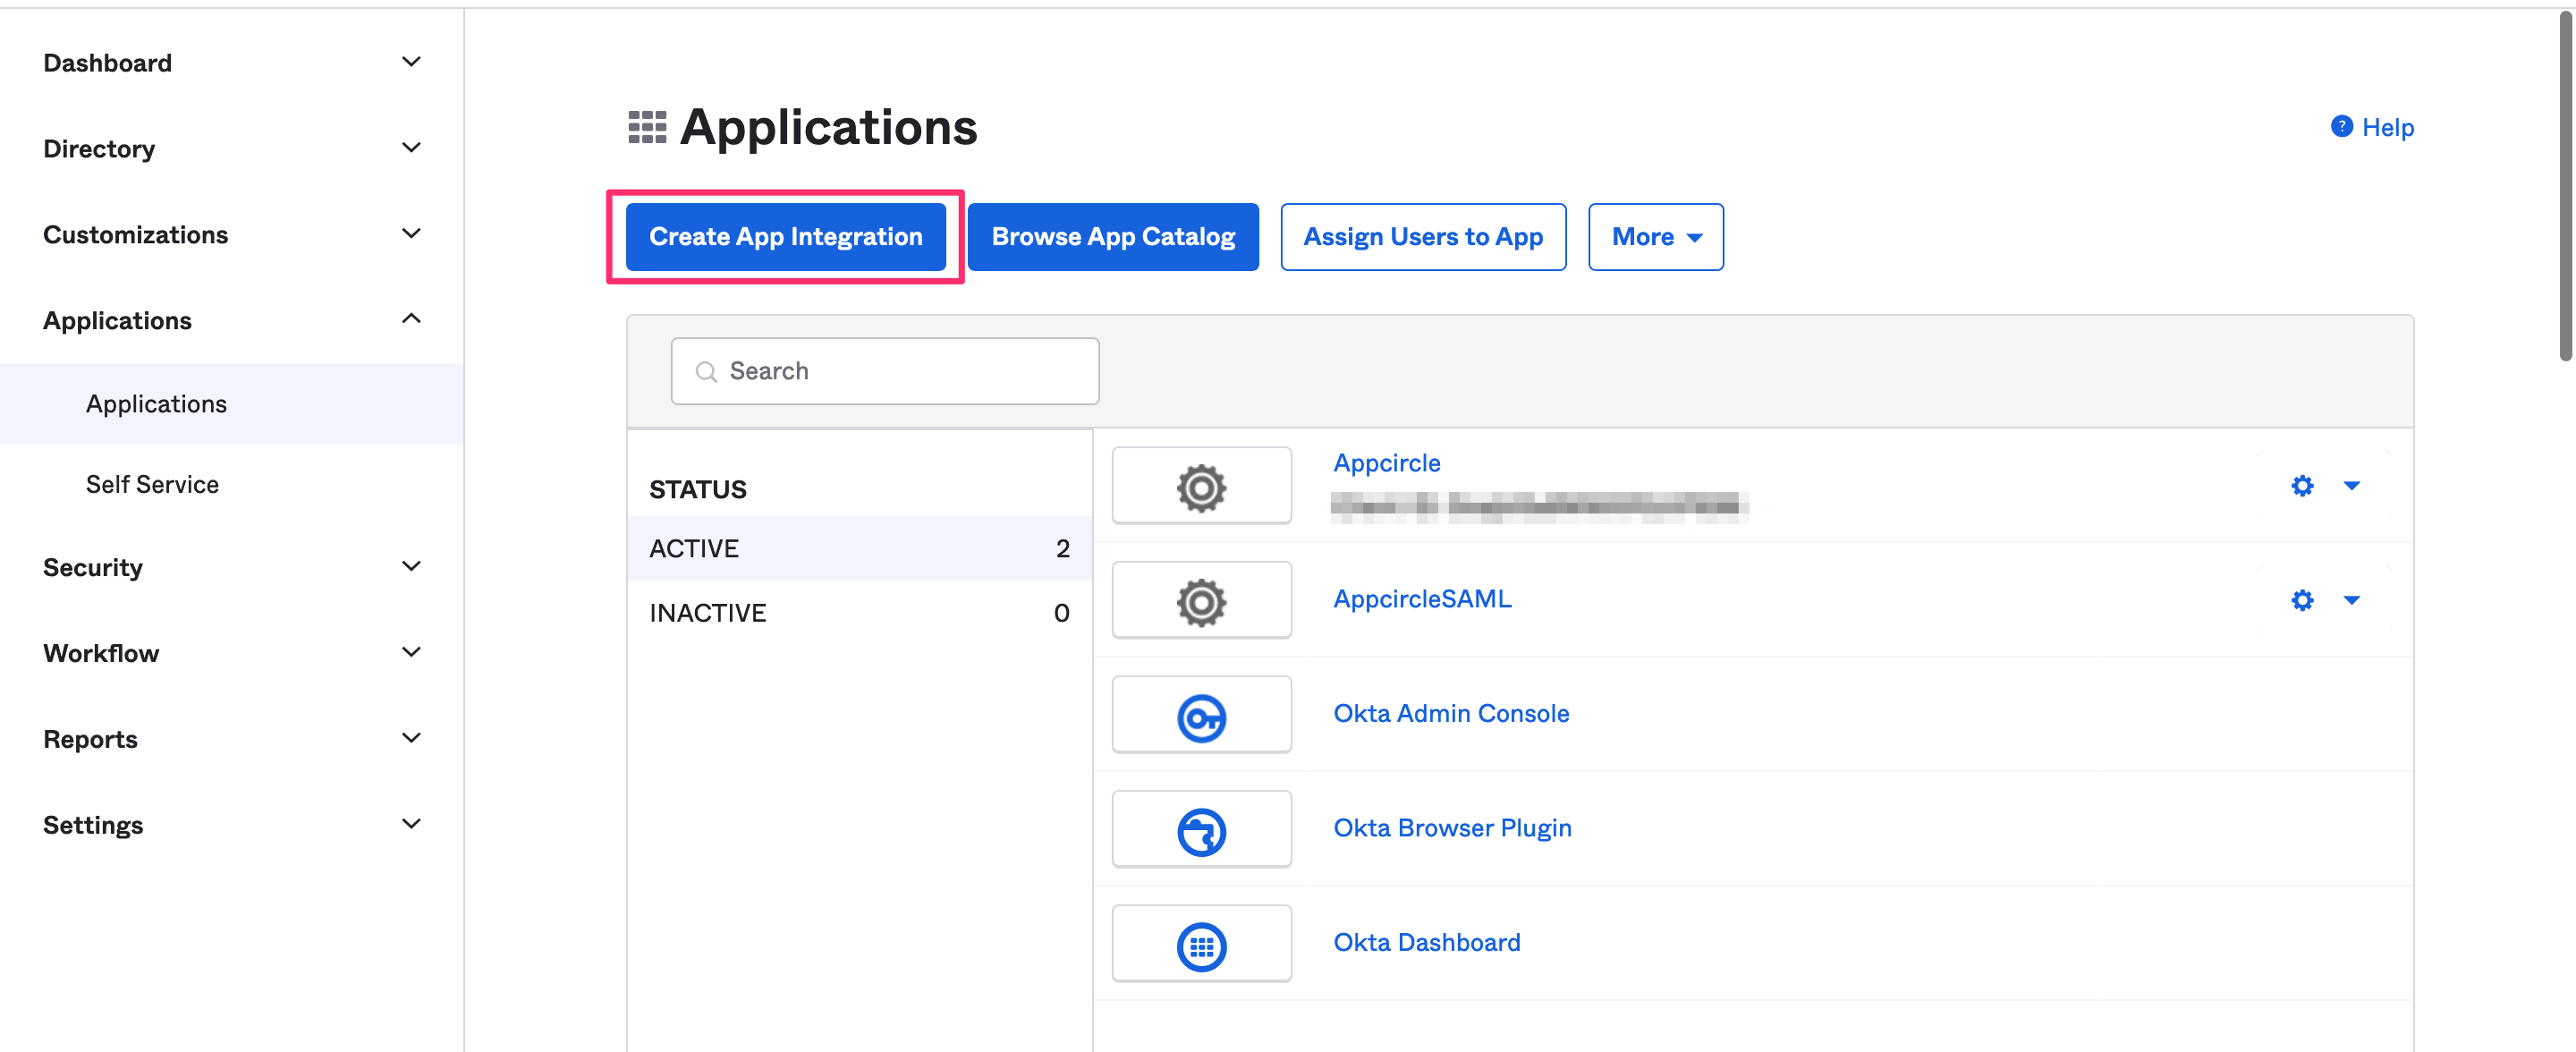
To start, log in to your Okta dashboard and create a new application for Appcircle:
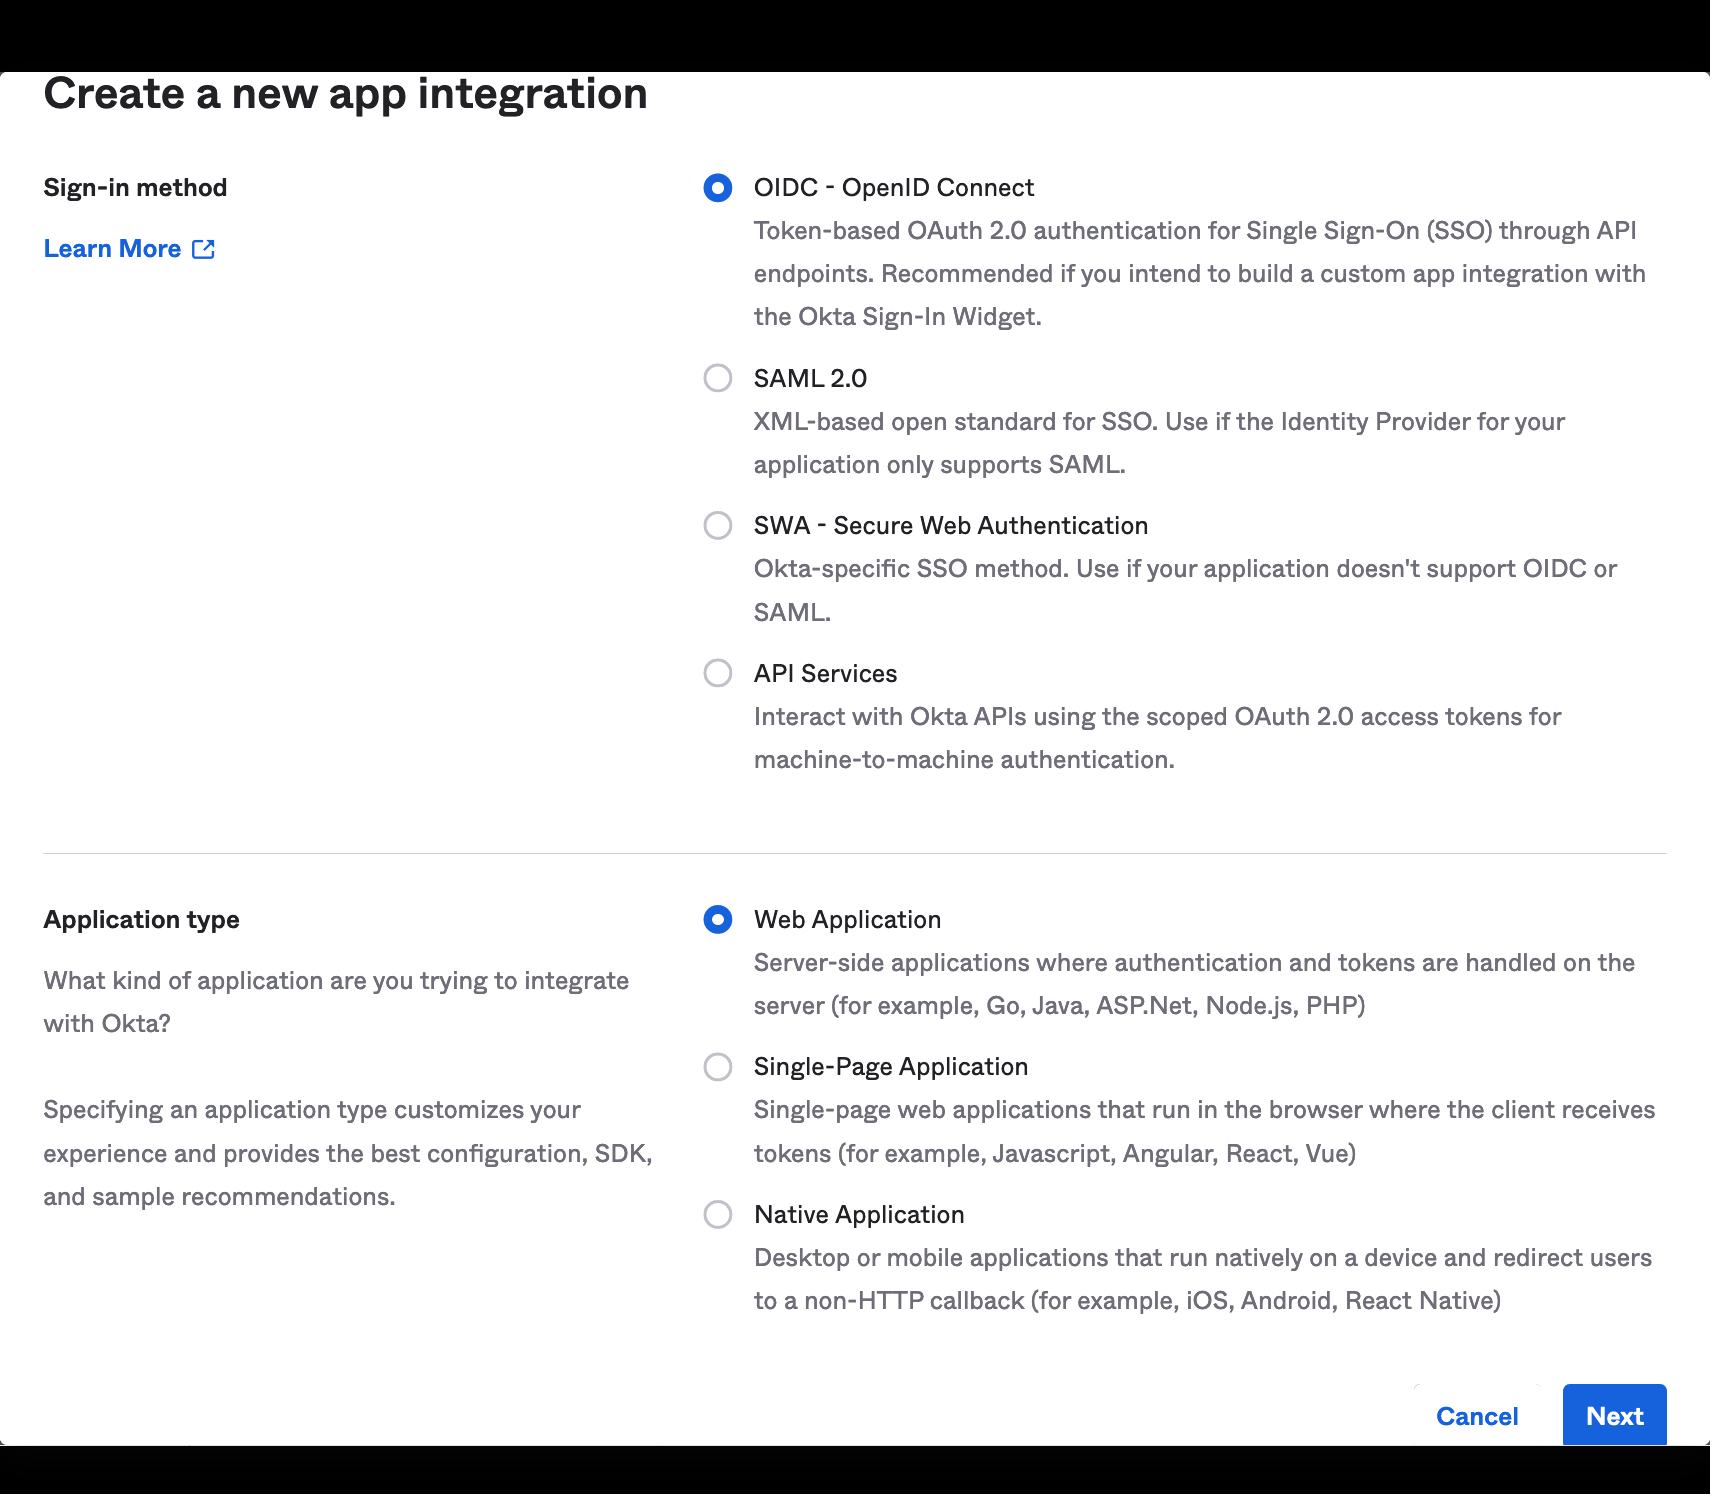
- In the Okta dashboard, navigate to Applications and click Create App Integration.
- Select OIDC - OpenID Connect as the Sign In Method and Web Application as the application type.
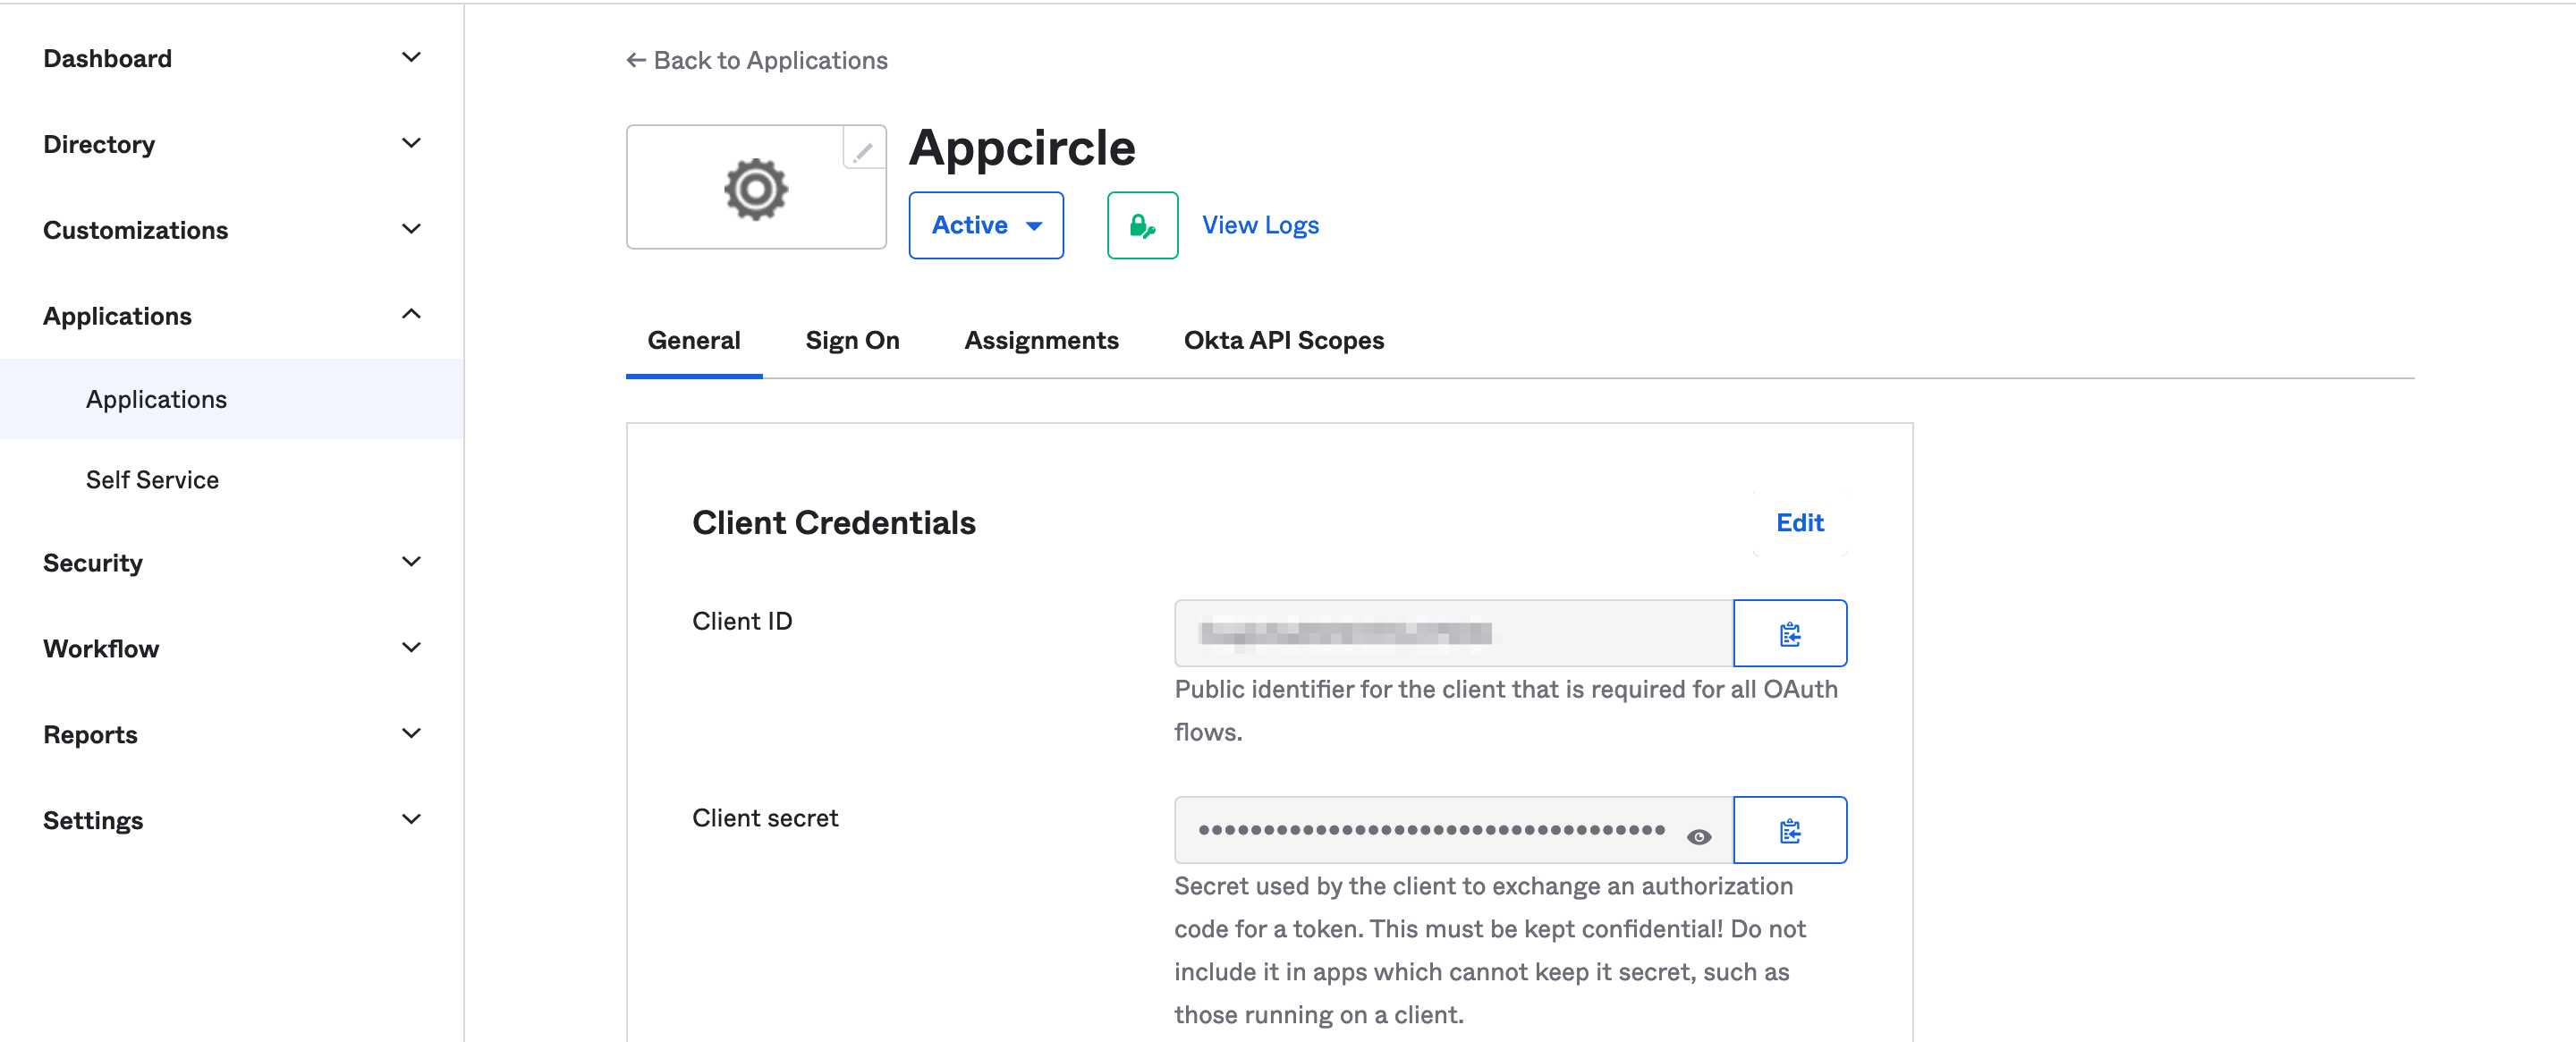
- Once created, take note of the Client ID and Client Secret, which will be needed later.
Step 2: Configure Callback URLs in Okta
Next, configure the callback URLs in Okta to ensure proper redirection to Appcircle after authentication:
- Navigate to the settings of the created application in Okta.
- Add the Store Redirect URL and Distribute Redirect URL (created using the alias in "Step 1: Enable SSO in Appcircle" from the "General Configuration Steps" section) to the Sign-in redirect URLs field.
Example Store Redirect URL: https://auth.appcircle.io/auth/realms/store/broker/identity-{your-alias}/endpoint
Example Distribution Redirect URL: https://auth.appcircle.io/auth/realms/distribute/broker/identity-{your-alias}/endpoint

- Download the OpenID configuration JSON file from Okta using one of the following URLs:
https://{your_okta_domain}/.well-known/openid-configurationhttps://{your_okta_domain}/oauth2/default/.well-known/openid-configuration?client_id={your_client_id}
Step 3: Upload OpenID Configuration to Appcircle
Now, upload the OpenID configuration JSON file to Appcircle and complete the configuration:
- Navigate to the Set up OpenID Provider screen in Appcircle, which you accessed during the SSO setup in the "General Configuration Steps."
- Upload the downloaded OpenID configuration JSON file to Appcircle.
- Check that the Authorization and Token URLs are correctly imported. Enter your Client ID and Client Secret that you noted earlier from Okta.

- Click Save to finalize the SSO setup.
4.5 Okta (SAML)
Okta supports the SAML protocol, allowing integration with Appcircle for secure authentication.
Step 1: Create a SAML Application in Okta
To start, log in to your Okta dashboard and create a new application for Appcircle:
. In the Okta dashboard, navigate to Applications and click Create App Integration.
- Select SAML 2.0 as the Sign In Method.
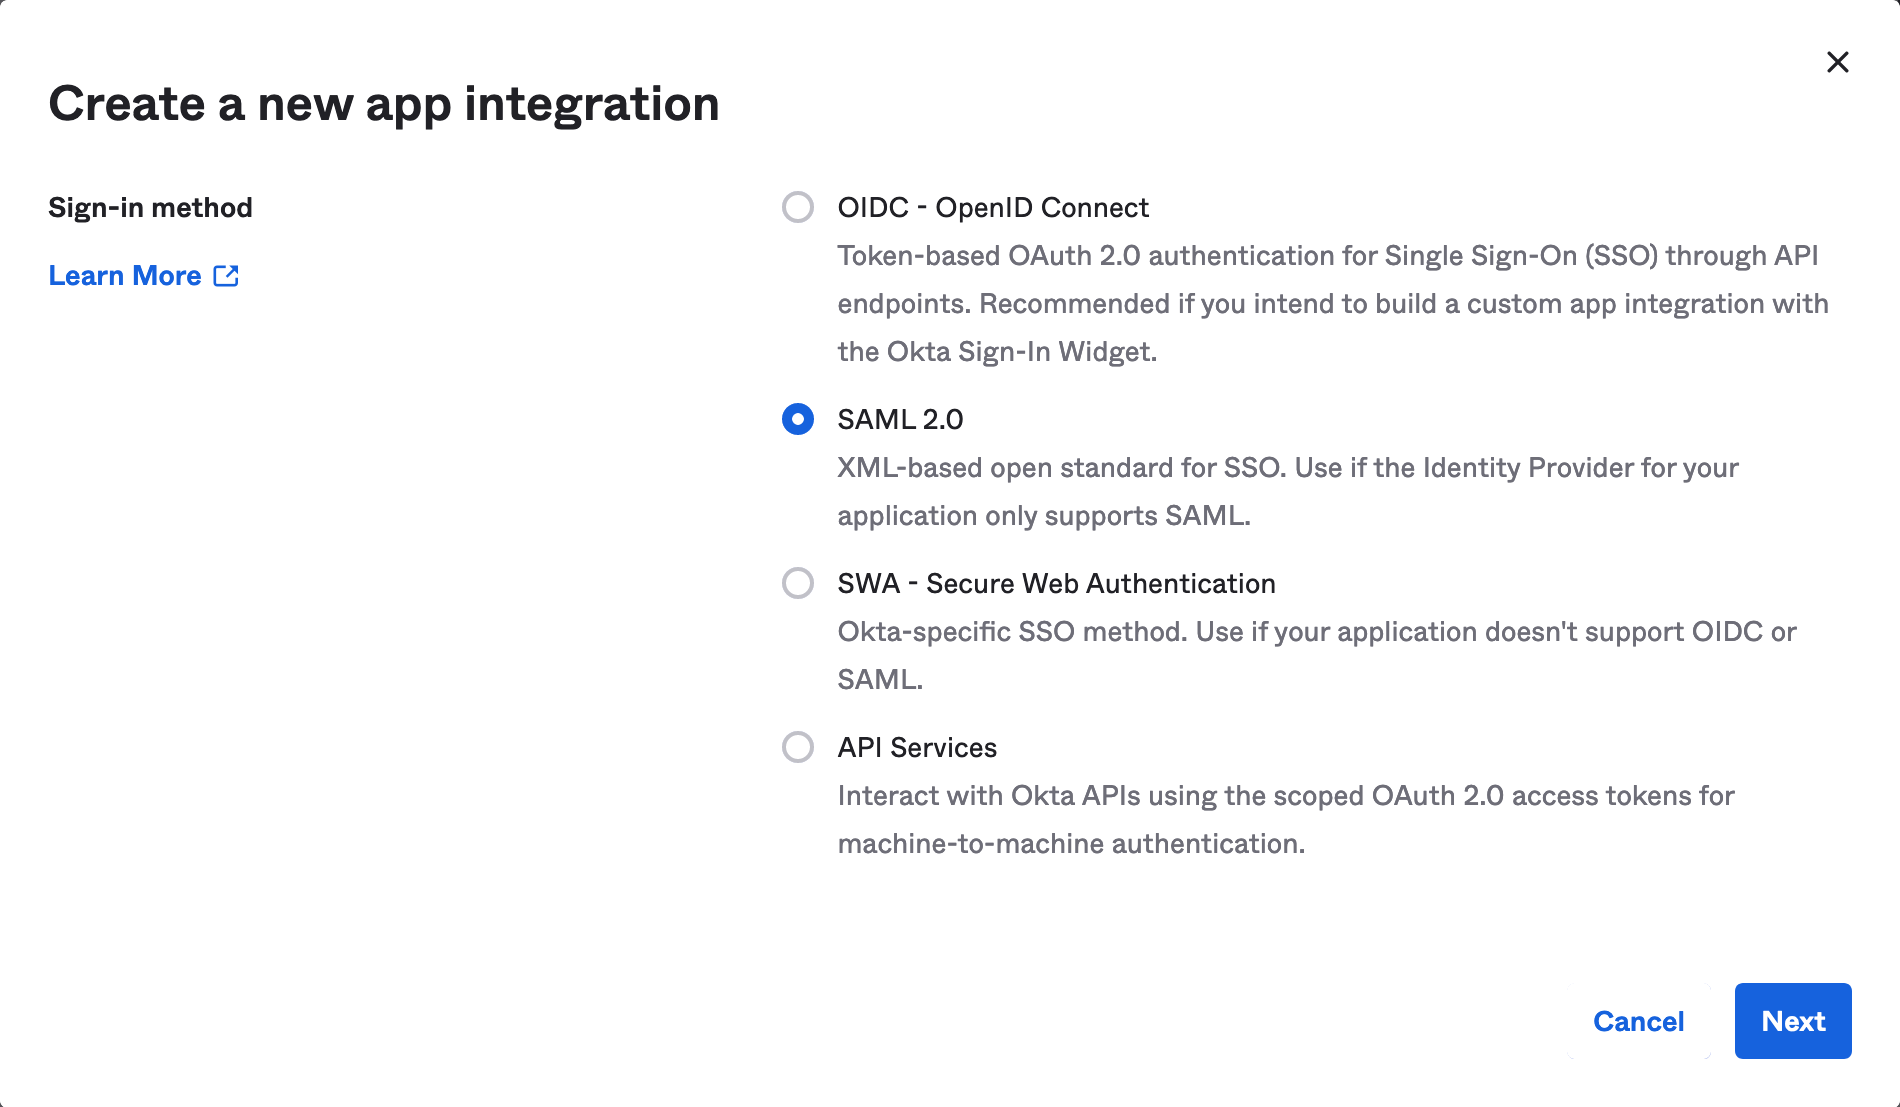
- Pick a name and optional logo for the app, then click Next.
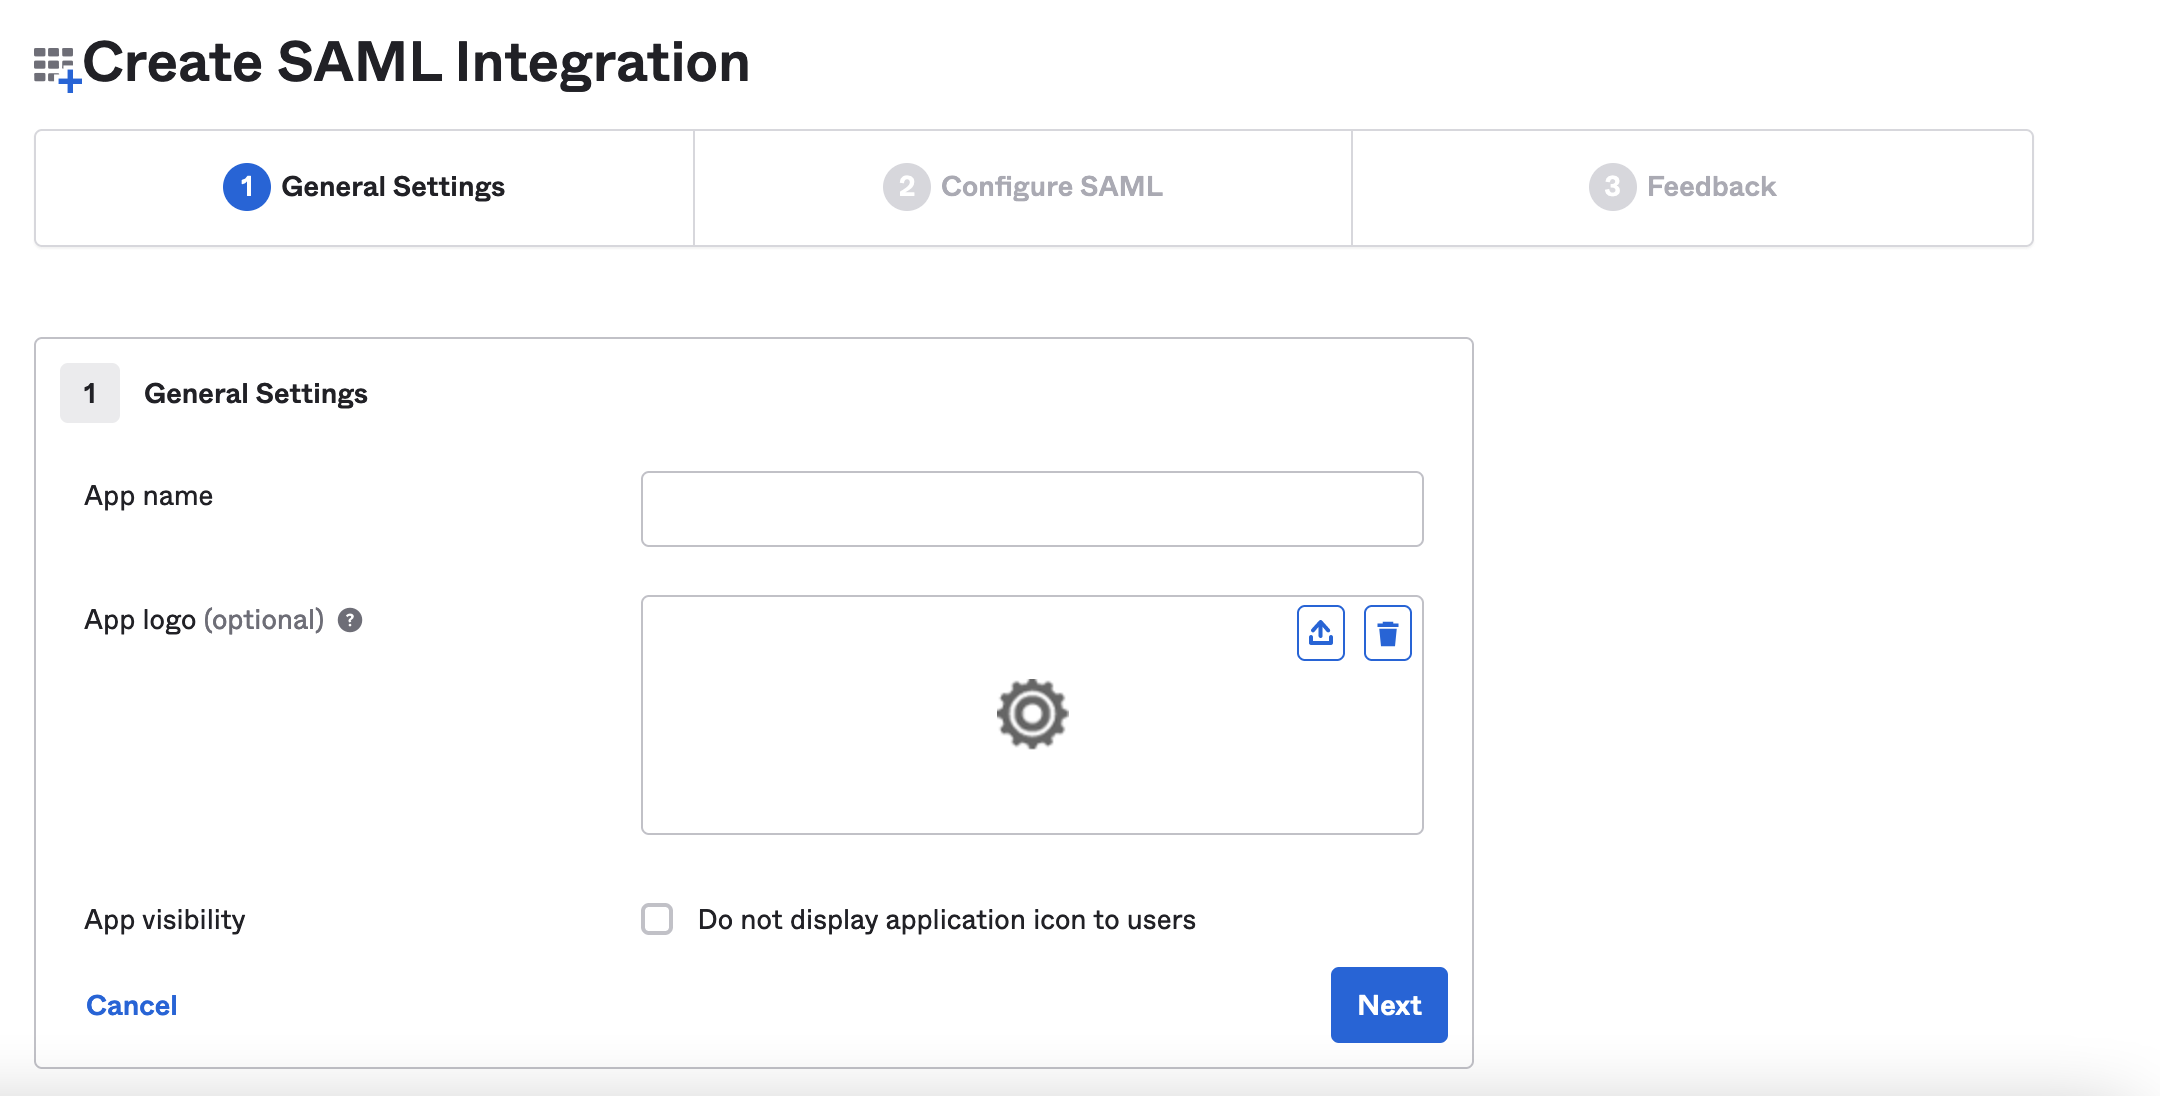
Step 2: Configure SAML Settings in Okta
Next, configure the SAML settings in Okta to ensure proper authentication and redirection to Appcircle:
- In the Single sign-on URL field, enter the Store Redirect URL (created using the alias in "Step 1: Enable SSO in Appcircle" from the "General Configuration Steps" section).
Example Store Redirect URL: https://auth.appcircle.io/auth/realms/store/broker/identity-{your-alias}/endpoint
- For the Audience URI (SP Entity ID) field, use the
https://auth.appcircle.io/auth/realms/store.
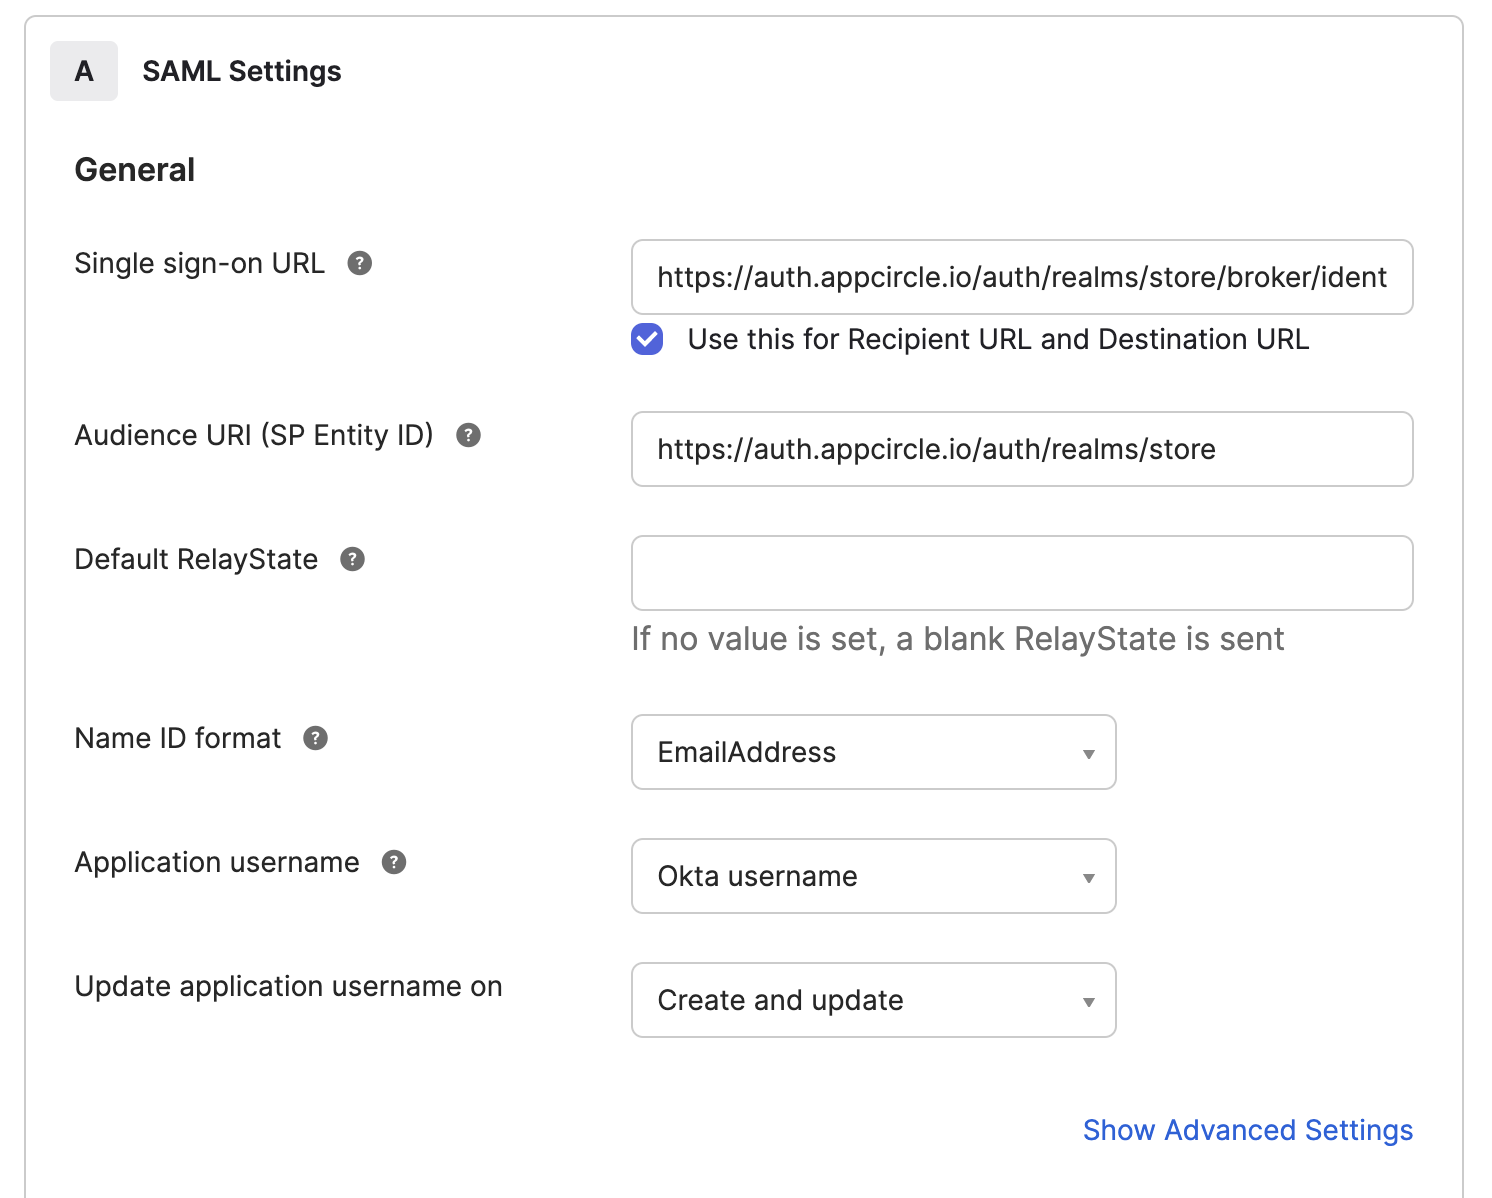
- Click "Show Advance Settings" button
- Add the Distribute Redirect URL (created using the alias in "Step 1: Enable SSO in Appcircle" from the "General Configuration Steps" section) to the Other Requestable SSO URLs section.
Example Distribution Redirect URL: https://auth.appcircle.io/auth/realms/distribute/broker/identity-{your-alias}/endpoint
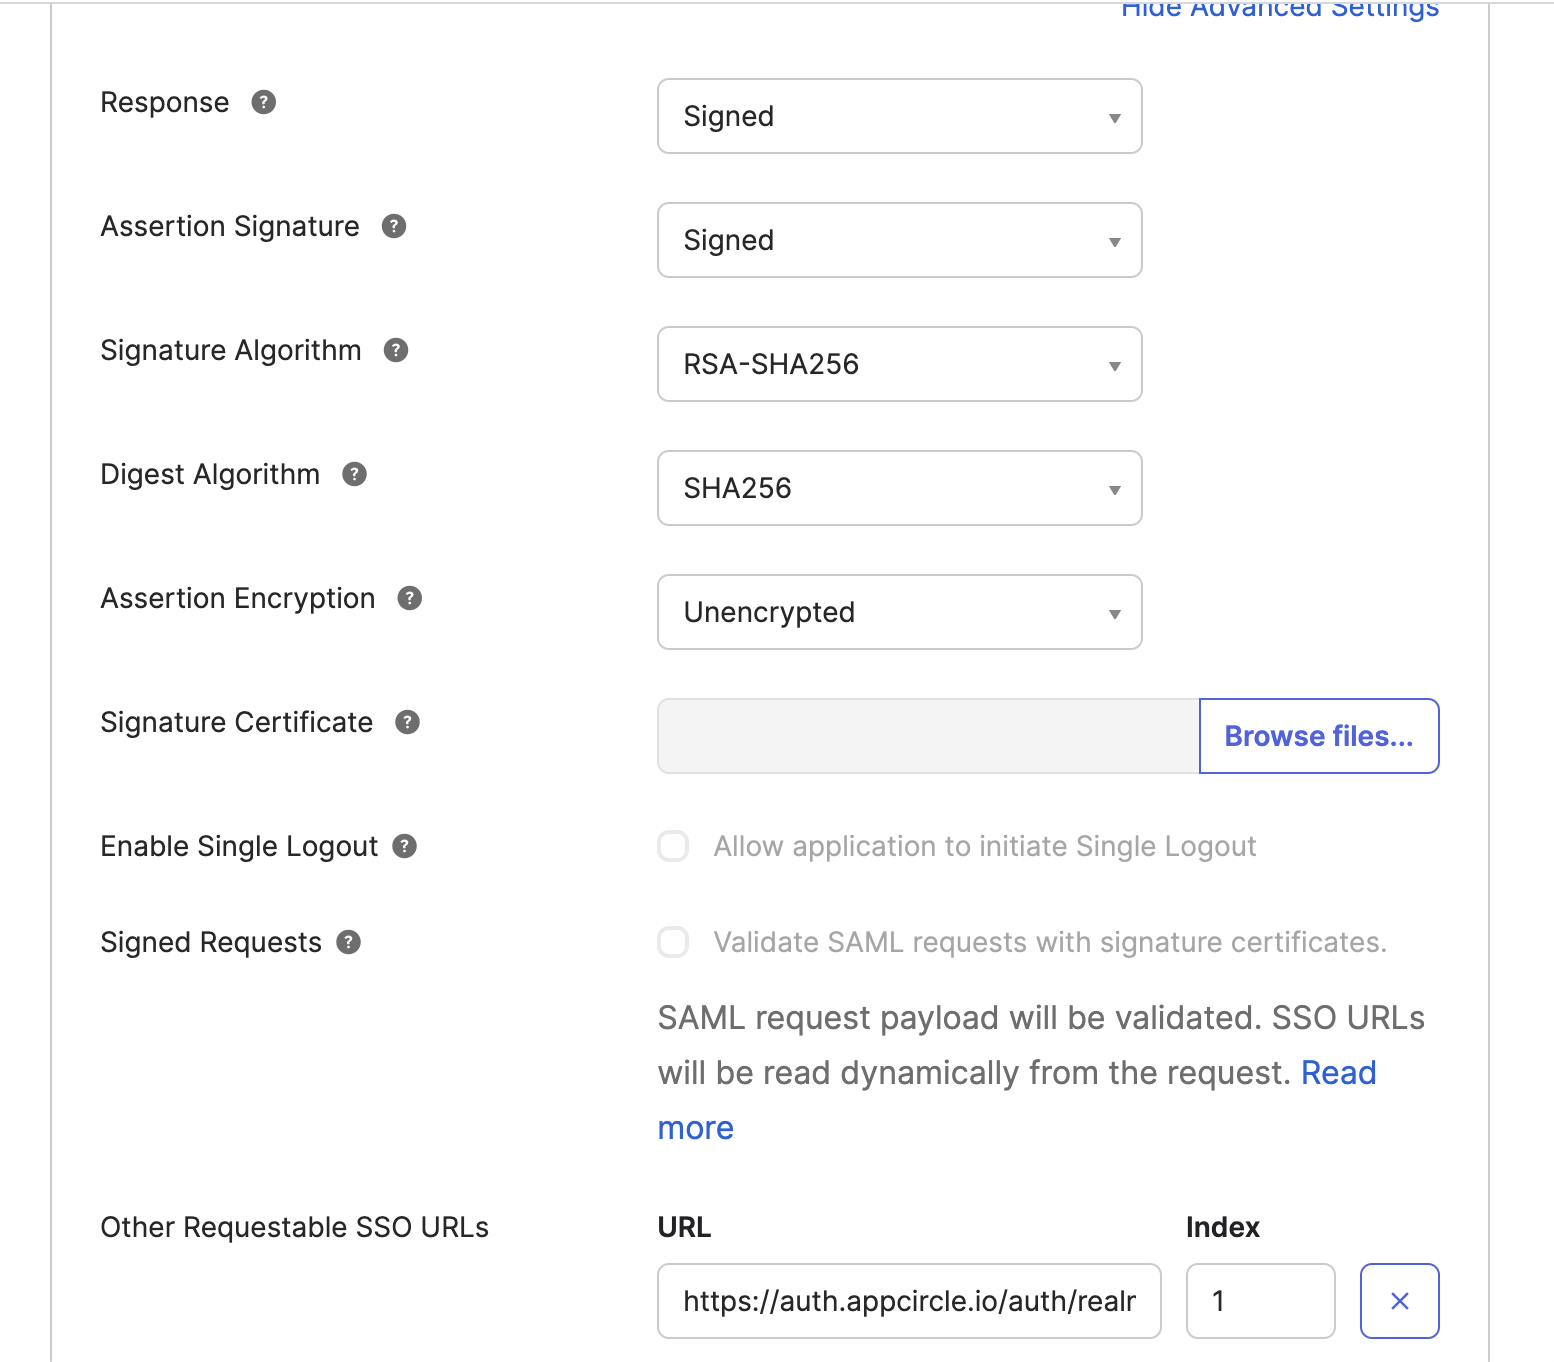
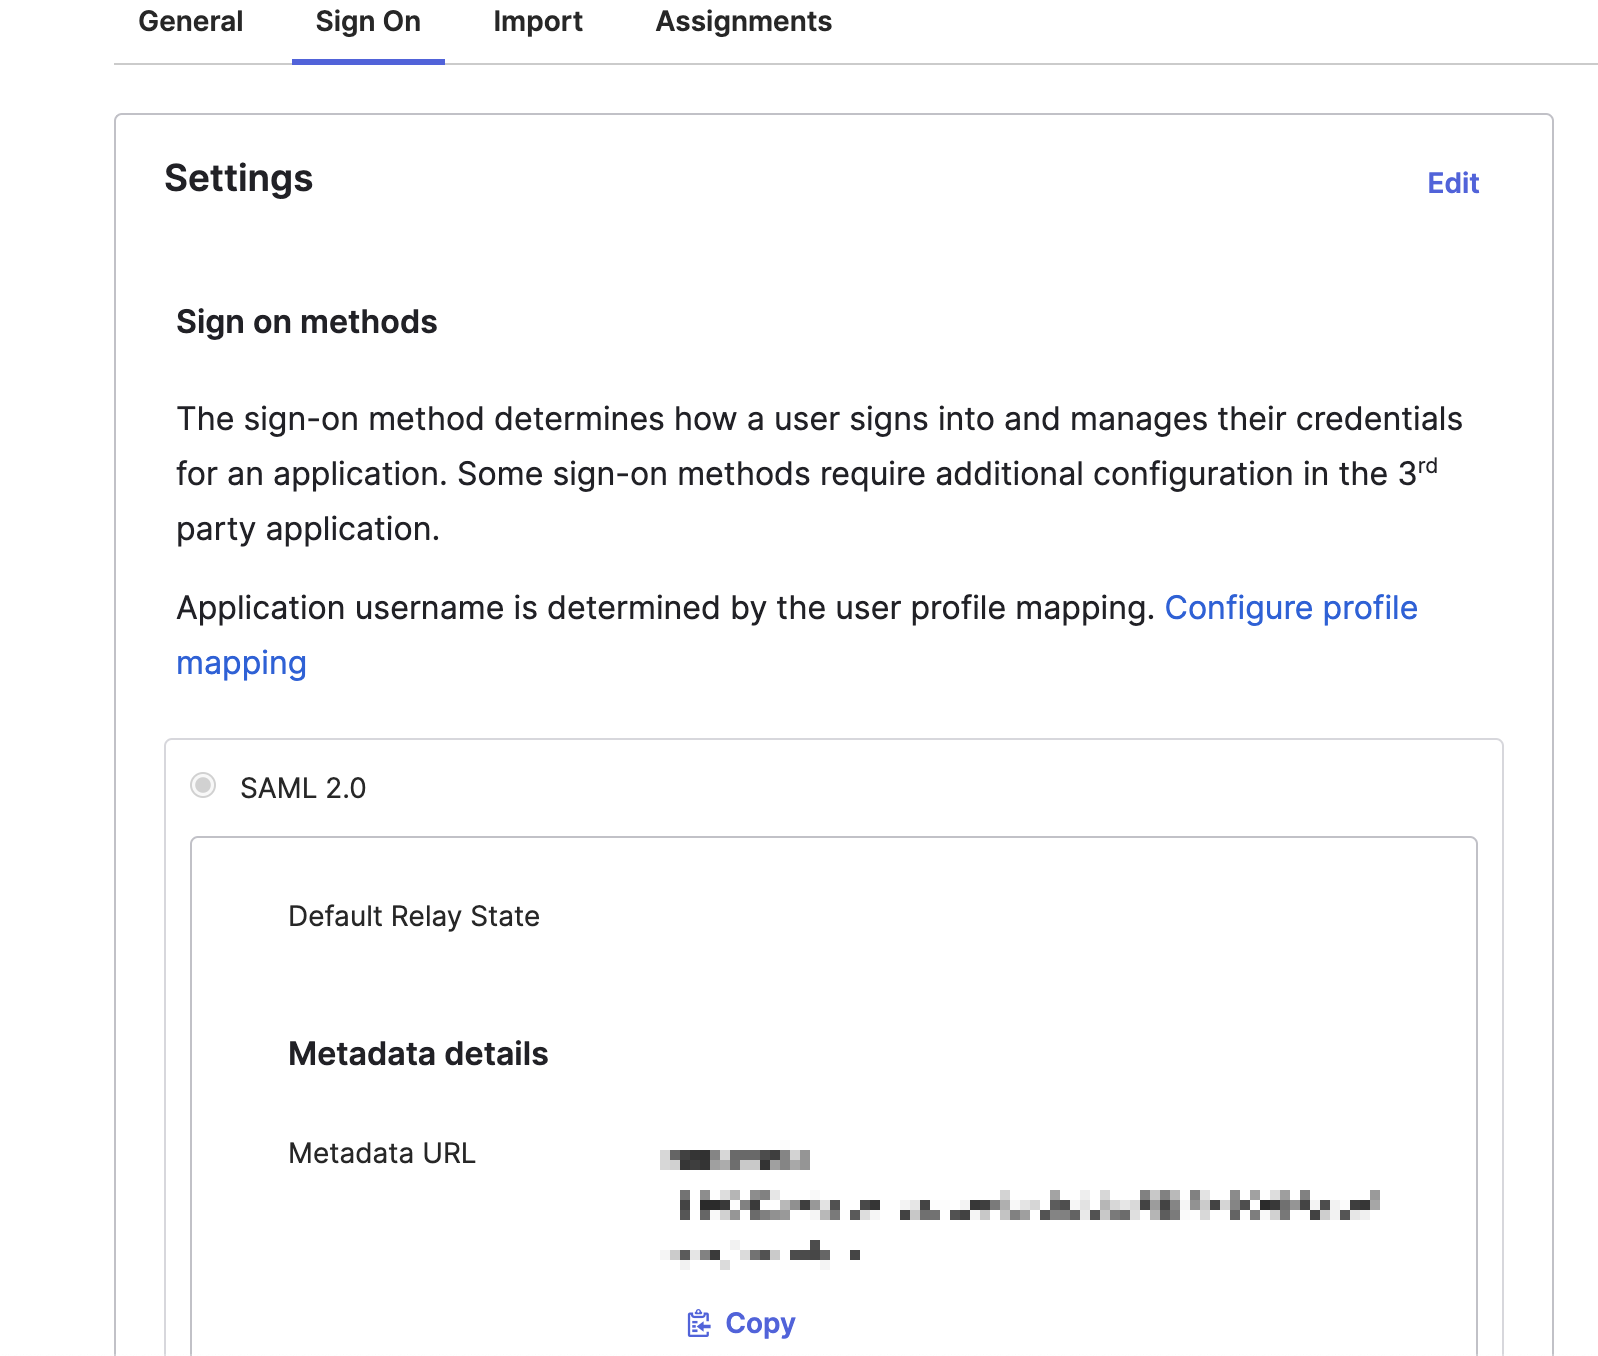
- Instead of manually configuring all SAML settings in Appcircle, you can download the SAML metadata XML file from Okta:
Click the Copy button next to the Metadata URL and open it in another tab to download the XML file.
Step 3: Upload SAML Metadata to Appcircle
Now, upload the SAML metadata XML file to Appcircle to complete the configuration:
- Navigate to the Set up SAML SSO Provider screen in Appcircle, which you accessed during the SSO setup in the "General Configuration Steps."
- Upload the downloaded SAML metadata XML file to Appcircle.
-
Ensure that the Redirect and SSO URLs are imported correctly. You can check if the X509 Certificate is imported correctly as well. If you want to enter multiple certificates you can separate them by using a comma between them. Please be aware that you need to remove any new lines or file headers from this edit box. This edit box only accepts a long base64 encoded string.
-
Click Save to finalize the SSO setup.
5. Testing and Verification
After completing the SSO configuration, it's essential to test and ensure everything is functioning correctly. The following steps show the testing process.
Step 4.1: Test and Verify SSO Configuration for Enterprise Store (Enterprise App Store module)
Begin by enabling SSO for the Enterprise App Store. Follow these steps:
- In the Appcircle dashboard, navigate to the Enterprise App Store section located on the far left sidebar.
- On the Enterprise App Store screen, select Settings from the left-hand menu.
- Click on the Activate button next to SSO Login.
- Follow Enterprise App Store Documentation to test the integration.
Step 4.2: Test and Verify SSO Configuration for Testing Portal (Testing Distribution module)
Begin by enabling SSO for the Testing Portal. Follow these steps:
- In the Appcircle dashboard, navigate to the Testing Distribution section located on the far left sidebar.
- On the Testing Distribution screen, select Distribution Profiles from the left-hand menu.
- Select the relevant Distribution Profile to be distributed via SSO authentication.
- On the Distribution Profile screen, click on the Settings button.
- Navigate to the Authentication tab and select SSO Login as the authentication type.
- Follow Enterprise App Store Documentation to test the integration.
6. Troubleshooting
This section provides a list of common issues that users might encounter during the SSO setup and how to resolve them.
6.1 Common Issues and Resolutions
- Misconfigured SAML Assertions: Ensure that the SAML assertions are correctly configured with the appropriate attributes and claims. Incorrect settings here can lead to failed logins.
- Incorrect Redirect URIs: Verify that the Redirect URIs configured in your identity provider match the ones set in Appcircle. Mismatches can cause authentication failures.
- Token Mismatches: If you encounter token mismatches, ensure that the correct Client ID, Client Secret, and endpoints are configured in both Appcircle and the identity provider.
- Metadata Import Issues: If the metadata import fails, manually check the SAML metadata for formatting errors or missing elements that may cause issues during import.
- SSO Alias Not Recognized: Make sure the SSO alias entered matches the one configured in Appcircle. Any discrepancies could prevent successful authentication.
- Account Linking Problems: If account linking fails, verify that the user’s email address in the identity provider matches the one in Appcircle.
6.2 Troubleshooting for Auth0 (OpenID Connect)
- Callback URL Mismatch: Ensure that the callback URL in Auth0 matches the one configured in Appcircle. This mismatch often causes authentication failures.
- Invalid or Missing Redirect URIs: Ensure that the redirect URIs in both Auth0 and Appcircle match exactly. Any mismatch, even in trailing slashes, can cause authentication to fail.
- Invalid Client ID/Secret: Verify that the Client ID and Secret are correctly entered in Appcircle’s SSO settings. Regenerate these values in Auth0 if needed.
- Logs Don't Show Successful Login Event: If the user successfully logs in with the identity provider, but the Appcircle logs do not show a successful login event, check the SAML Authentication Assertion returned by the IdP or analyze the HTTP trace for any discrepancies in Appcircle.
- Misconfigured Scopes: Ensure that the scopes requested in Appcircle match those defined in Auth0. Mismatches can lead to login failures.
6.3 Troubleshooting for Auth0 (SAML)
- Attribute Mapping Problems: Verify that the attributes sent by Auth0 match those expected by Appcircle.
- Token Mismatch: Ensure the tokens issued by Auth0 match the expected format in Appcircle.
- Incorrect Assertion Consumer Service (ACS) URL: Verify that the ACS URL in Auth0 matches the one configured in Appcircle’s SSO settings.
- SAML Assertion Issues: Use tools like a SAML debugger to check the contents of the SAML assertion for correct format and expected values before entering them into Appcircle.
- IdP Login Page Doesn't Display: If the IdP login page fails to display, ensure the correct SSO URL is being used in Appcircle and that the binding method (HTTP-POST or HTTP-Redirect) is properly configured.
- Certificate Issues: Ensure the SAML certificate in Auth0 is valid and correctly configured. Invalid certificates can prevent proper authentication in Appcircle.
6.4 Troubleshooting for Microsoft Entra ID (SAML)
- Incorrect SAML Response: Check that all required claims and attributes are configured correctly in Microsoft Entra ID.
- Certificate Expiration: Ensure that the SAML signing certificate used by Microsoft Entra ID is valid and not expired.
- Misconfigured Claims or Attributes: Ensure that the claims and attributes being sent from Microsoft Entra ID are correctly mapped and expected by Appcircle. Mismatches can lead to failed logins or incomplete user profiles.
- Redirect Loop: This often occurs due to incorrect reply URLs or session issues. Verify the reply URL in Microsoft Entra ID matches the one in Appcircle and that session cookies are correctly managed.
- Invalid Certificate or Encryption Issues: Ensure that the certificates used for signing and encryption are valid and correctly configured in both Microsoft Entra ID and Appcircle’s SSO settings. Expired certificates are a common cause of failures in SAML setups.
- Unassigned Users: Ensure that users are assigned to the enterprise application in Microsoft Entra ID. Unassigned users cannot authenticate through Appcircle.
6.5 Troubleshooting for Okta (OpenID Connect)
- Invalid Client ID/Secret: Verify the Client ID and Secret in Appcircle match those configured in Okta.
- Incorrect Scopes Configuration: Ensure that the correct scopes, like
openid,profile, andemail, are requested by the client application and match those configured in Appcircle. Okta will reject requests with unsupported or misconfigured scopes. - Token Validation Issues: Use Okta’s introspection endpoint for remote validation of access tokens to ensure they have not been revoked or expired in Appcircle’s SSO integration.
- Key Rotation Problems: Regularly update the public keys used by Okta in Appcircle’s SSO settings to ensure continuous validation of tokens, as Okta automatically rotates these keys multiple times a year.
- Invalid Redirect URI: Ensure that the redirect URI in Okta matches the one specified in Appcircle. Mismatches can cause authentication failures.
- 403 Forbidden Errors: Ensure the user has the necessary permissions and that the application is set up correctly in Okta to prevent access issues in Appcircle.
6.6 Troubleshooting for Okta (SAML)
- Certificate Errors: Verify that the SAML certificate used in Okta is valid and has not expired.
- Incorrect ACS URL: Ensure the Assertion Consumer Service (ACS) URL in Okta matches the one configured in Appcircle.
- Signing and Encryption Issues: Verify that both signing and encryption certificates are correctly configured and up to date in both Okta and Appcircle. Expired or incorrectly installed certificates are a common cause of SAML failures.
- Misconfigured SAML Responses: Use Okta’s SAML troubleshooting tools to validate the SAML response, ensuring that all required fields are present and correctly formatted before integrating with Appcircle.
- Invalid SSO URL or Mismatched Entity IDs: Confirm that the SSO URL and Entity ID configured in Okta are correctly set up in Appcircle’s SSO settings to prevent login issues or errors in the authentication process.
- Clock Skew: Ensure the system clocks of both Okta and Appcircle are synchronized to avoid timing issues in the authentication process.
6.7 Troubleshooting for OneLogin (SAML)
- SSO Errors Due to Incorrect URLs: Ensure that the SAML Assertion Consumer Service (ACS) URL and other SSO URLs in OneLogin match those in Appcircle.
- SAML Metadata Misconfiguration: Ensure that the SAML metadata imported into OneLogin is current and accurately reflects Appcircle’s SSO requirements. Update the metadata periodically to avoid integration issues.
- Incomplete Attribute Mapping: Verify that all necessary user attributes are mapped from OneLogin to Appcircle to avoid incomplete user sessions or missing information.
- Account Linking Failures: Ensure that user email addresses match between OneLogin and Appcircle. Discrepancies in user data can prevent successful account linking.
- Certificate Expiration: Verify that the SAML signing certificate in OneLogin is valid and not expired to ensure seamless authentication with Appcircle.
6.8 Troubleshooting for Keycloak (OpenID Connect)
- Invalid Client ID/Secret: Verify that the Client ID and Secret from Keycloak are correctly entered in Appcircle.
- Incorrect Redirect URI: Ensure that the redirect URIs match between Keycloak and Appcircle.
- Incorrect Client Configuration: Ensure that the client settings in Keycloak, including redirect URIs and client secrets, are correctly configured to match those in Appcircle’s SSO settings.
- Key Rotation Issues: Periodically check for key rotations in Keycloak and update the keys in Appcircle’s SSO configuration to avoid validation errors.
- OIDC Token Mismatches: Validate that the tokens issued by Keycloak match the expected format in Appcircle, including the correct scopes and audience claims.
- Token Signature Verification Failures: Ensure the public key in Appcircle matches the one used by Keycloak for token signing.
6.9 Troubleshooting for Keycloak (SAML)
- Certificate Mismatches: Ensure the SAML certificate in Keycloak matches what Appcircle expects.
- SAML Response Issues: Verify that the NameID format and attribute mapping are configured correctly.
- ACS URL Errors: Ensure the Assertion Consumer Service (ACS) URL in Keycloak matches the one configured in Appcircle.
- Assertion Signing Problems: Ensure that the assertions are properly signed and that the correct signing algorithm is used in both Keycloak and Appcircle. Mismatches in signing algorithms can lead to failed authentication attempts.
- SAML Assertion Format Issues: Use a SAML debugging tool to validate the format and content of the SAML assertions before configuring them in Appcircle. Ensure that all required fields, such as the audience and recipient, are correctly set.
- Misconfigured SAML Bindings: Verify that the correct SAML binding method (e.g., POST or Redirect) is configured in both Keycloak and Appcircle to ensure smooth communication during the SSO process.
- Invalid Certificate Configuration: Ensure that the SAML signing certificate used in Keycloak is valid and correctly configured in Appcircle. Expired or incorrectly configured certificates can cause authentication failures.
- Clock Synchronization Issues: Ensure that the system clocks of both Keycloak and Appcircle are synchronized to prevent timing-related authentication errors, such as expired assertions.